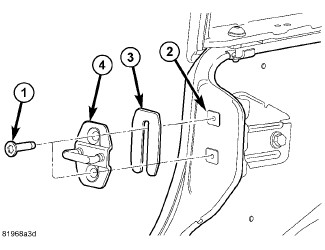
STRIKER, Door Latch
ADJUSTMENTS
-
Using a grease pencil or equivalent, mark the location of the door latch striker (4) on the C-pillar to aid in adjustment.
-
Loosen the two screws (1) that secure the door latch striker to the C-pillar.
-
To adjust the rear gap and flush measurement, change the position of the door latch striker and then tighten the two bolts to 26 N·m (19 ft. lbs.), (Refer to 23 - Body/Body Structure/Gap and Flush - Specifications)
.
-
Verify correct door and latch position.
REMOVAL
-
Remove the screws (1).
-
Remove the striker (4) and the shims (3), if equipped.
INSTALLATION
-
Install the shims (3), if equipped, and install the striker (4).
-
Install the screws (1) and tighten to 26 N·m (19 ft. lbs.).
-
If necessary, adjust the door latch striker,