PAN, Oil
UPPER OIL PAN
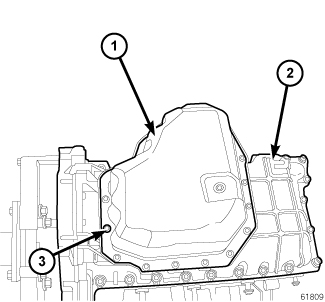 |
- Disconnect the negative battery cable.
- Remove the air cleaner body (Refer to 09 - Engine/Air Intake System/BODY, Air Cleaner - Removal) .
- Remove the upper dip stick bolt.
- Raise and support the vehicle (Refer to 04 - Vehicle Quick Reference/Hoisting - Standard Procedure) .
- Remove four bolts securing upper oil pan to transmission adapter plate.
- Remove the lower oil pan (Refer to 09 - Engine/Lubrication/PAN, Oil - Removal) .
- Remove the Crankshaft Position (CKP) sensor (Refer to 14 - Fuel System/Fuel Injection/SENSOR, Crankshaft Position - Removal) .
-
Remove lower dipstick bolt and the oil dipstick.
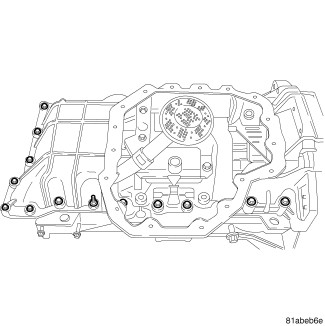
-
Remove bolts and the upper oil pan.
LOWER OIL PAN
|
- Disconnect the negative battery cable.
- Raise and support the vehicle, (Refer to 04 - Vehicle Quick Reference/Hoisting - Standard Procedure) .
- Drain the engine oil.
- Using a new copper sealing washer, install and tighten oil drain plug to 54 N·m (40 ft. lbs.).
- Remove bolts (3) and the lower oil pan (1).
-
Remove and discard the oil pan gasket.
UPPER OIL PAN
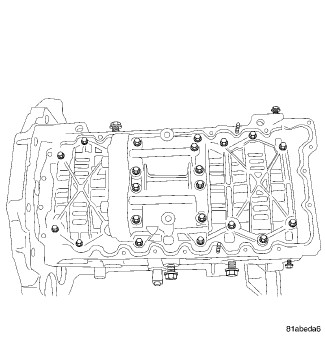 |
-
Clean oil pan and engine block gasket surfaces.
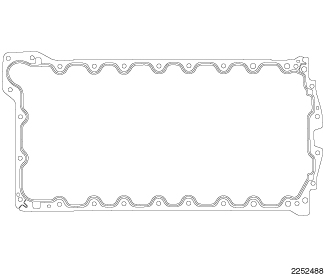
-
Install the upper oil pan gasket.
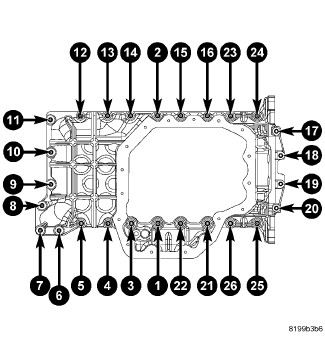
- Install the upper oil pan bolts in positions one and two, then follow the sequence illustrated for the remaining bolts. Once all of the bolts are installed, tighten the M6 bolts to 15 N·m (133 in. lbs. ) and M8 bolts to 32 N·m (23 ft. lbs.).
- Loosen all of the upper oil pan bolts and studs by 90 degrees and retighten the M6 bolts to 15 N·m (133 in. lbs.) and M8 bolts to 32 N·m (23 ft. lbs.).
- Install the oil dip stick. Tighten lower bolt to 11 N·m (97 in. lbs.).
- Install the lower oil pan (Refer to 09 - Engine/Lubrication/PAN, Oil - Installation) .
- Install the Crankshaft Position (CKP) sensor (Refer to 14 - Fuel System/Fuel Injection/SENSOR, Crankshaft Position - Installation) .
- Install four bolts securing oil pan to transmission adapter plate and tighten to 69 N·m (51 ft. lbs.).
- Lower the vehicle.
- Install the upper dip stick bolt. Tighten upper bolt to 11 N·m (97 in. lbs.).
- Install the air cleaner body (Refer to 09 - Engine/Air Intake System/BODY, Air Cleaner - Installation) .
- Refill engine with recommended engine oil (Refer to 04 - Vehicle Quick Reference/Capacities and Recommended Fluids - Specifications) .
-
Connect the negative battery cable.
LOWER OIL PAN
|
- Make sure that the lower oil pan sealing surface is free of oil, debris and silicone.
-
Install the new lower oil pan gasket onto the oil pan.
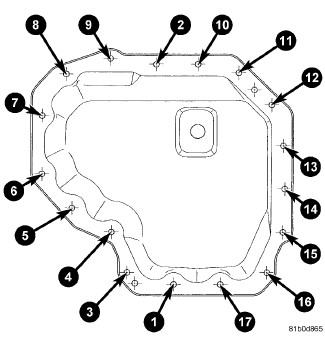
- Install bolts one and two into the lower oil pan and tighten to 15 N·m (133 in. lbs.).
- Install the remaining bolts in the sequence shown.
- Tighten the oil pan bolts in sequence to 15 N·m (133 in. lbs.).
- Loosen each bolt 90 degrees and retighten bolts to 15 N·m (133 in. lbs.) using the sequence shown.
- Fill the engine with recommended oil to proper level (Refer to 04 - Vehicle Quick Reference/Capacities and Recommended Fluids - Specifications) .
-
Lower the vehicle.