INSTALLATION
Removal / installation
| 1. INSTALL NO. 2 PARKING BRAKE CABLE ASSEMBLY LH |

Install the 2 cable support brackets to the No. 2 parking brake cable assembly LH.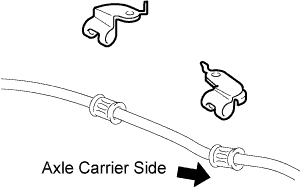

Install the No. 2 parking brake cable assembly LH to the parking brake plate with the 2 nuts.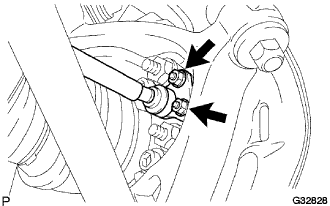
- Torque:
- 8.0 N*m{ 82 kgf*cm , 71 in.*lbf }
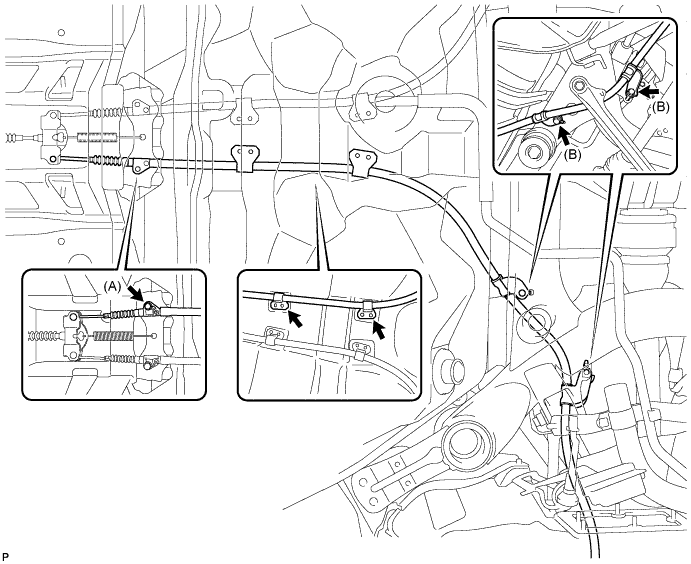
Connect the No. 2 parking brake cable assembly LH to the parking brake equalizer.
Install the No. 2 parking brake cable assembly LH to the body with the 3 bolts and 2 clamps.
- Torque:
- Bolt A:
- 6.0 N*m{ 61 kgf*cm , 53 in.*lbf }
- Bolt B:
- 19 N*m{ 194 kgf*cm , 14 ft.*lbf }
| 2. APPLY HIGH TEMPERATURE GREASE |
Apply a thin layer of high temperature grease to the area where the parking brake plate contacts the parking brake shoe (Click here).
| 3. INSTALL PARKING BRAKE SHOE LEVER |
Apply a thin layer of high temperature grease to the area where the parking brake shoe lever contacts the parking brake anchor block.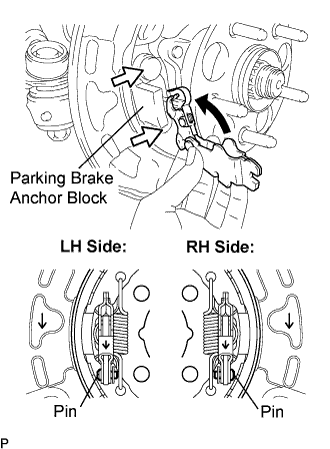
Install the parking brake shoe lever to the parking brake cable assembly.
- NOTICE:
- Take care to install the correct parking brake shoe lever because the direction of the pin is different between left and right.
| 4. INSTALL NO. 2 PARKING BRAKE SHOE ASSEMBLY |
Using SST, install the No. 2 parking brake shoe assembly with the No. 1 shoe hold down spring cup, No. 1 compression spring and No. 1 shoe hold down spring pin.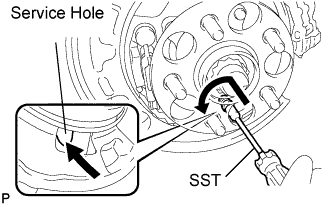
- SST
- 09718-00010
- HINT:
- Use the service hole to retain the No. 2 shoe hold down spring pin with your finger.
| 5. INSTALL NO. 1 PARKING BRAKE SHOE ASSEMBLY |
Using SST, install the No. 1 parking brake shoe assembly with the No. 1 shoe hold down spring cup, No. 1 compression spring and No. 1 shoe hold down spring pin.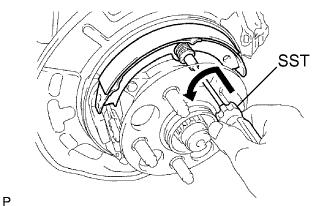
- SST
- 09718-00010
- HINT:
- Use the service hole to retain the No. 1 shoe hold down spring pin with your finger.
| 6. INSTALL PARKING BRAKE SHOE ADJUSTING SCREW SET |
Apply high temperature grease to the thread and all joining areas of the parking brake shoe adjusting screw set.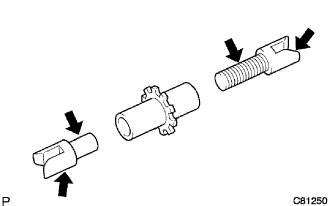
Install the parking brake shoe adjusting screw set.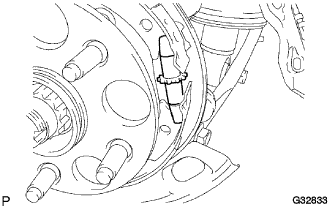
| 7. INSTALL NO. 1 PARKING BRAKE SHOE RETURN SPRING |
Install the No. 1 parking brake shoe return spring.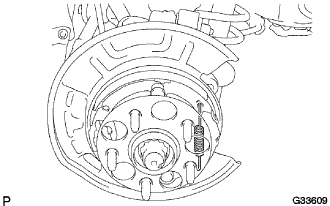
| 8. INSTALL NO. 2 PARKING BRAKE SHOE RETURN SPRING |
Install the No. 2 parking brake shoe return spring.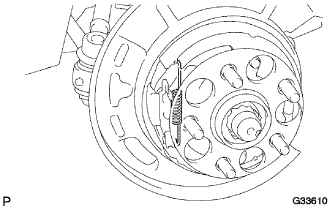
| 9. CHECK PARKING BRAKE INSTALLATION |
Make sure that all the parts are installed properly.
If necessary, reinstall properly.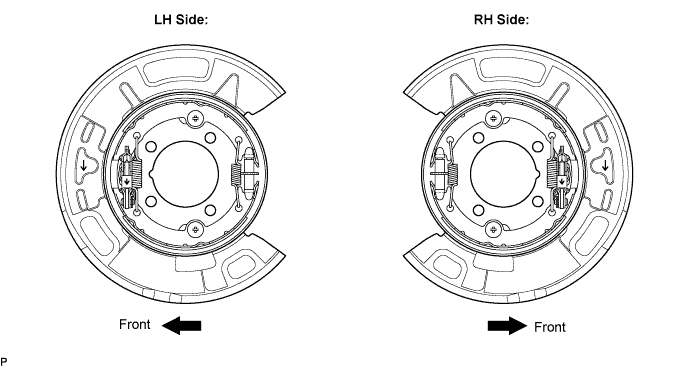
| 10. INSTALL REAR DISC |
Align the matchmarks on the rear disc and rear axle hub.
| 11. ADJUST PARKING BRAKE SHOE CLEARANCE |
Temporarily install the hub nuts.
Remove the shoe adjusting hole plug.
Turn the shoe adjuster and expand the shoe until the disc locks.
Turn and contract the shoe adjuster until the disc can rotate smoothly.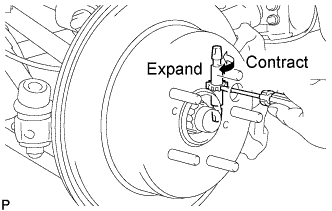
- Standard:
- Return 7 notches
Check that there is no brake drag against the shoe.
Install the shoe adjusting hole plug.
Remove the hub nuts.
| 12. INSTALL REAR DISC BRAKE CALIPER ASSEMBLY |
Install the rear disc brake caliper assembly with the 2 bolts and 2 new No. 1 caliper plates.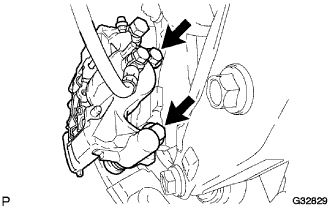
- Torque:
- 50 N*m{ 510 kgf*cm , 37 ft.*lbf }
- NOTICE:
- Do not twist the brake hose.
- Make sure that the bolts are free from damage and foreign matter.
- Do not overtighten the bolts.
- Do not twist the brake hose.
| 13. INSTALL REAR WHEEL |
- Torque:
- 103 N*m{ 1,050 kgf*cm , 76 ft.*lbf }
| 14. INSTALL NO. 2 DIFFERENTIAL SUPPORT PROTECTOR |
Install the No. 2 differential support protector with the 2 nuts.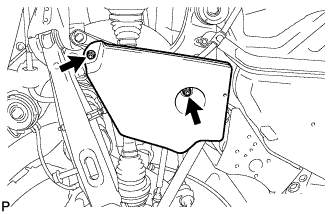
| 15. INSTALL NO. 1 DIFFERENTIAL SUPPORT PROTECTOR |
- HINT:
- Installation procedure of the No. 1 differential support protector is the same as that of the No. 2 differential support protector.
| 16. INSTALL NO. 1 PARKING BRAKE CABLE ASSEMBLY |
Pass the No. 1 parking brake cable assembly through the parking brake and hold the cable with the clip.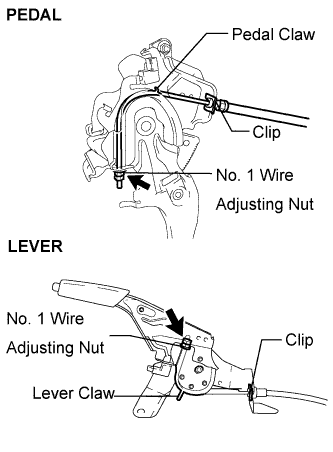
- HINT:
- Fully tighten the No. 1 wire adjusting nut and lock nut when adjusting the parking brake free play.
Fully bend the parking brake pedal claw.
| 17. INSTALL PARKING BRAKE PEDAL ASSEMBLY (for Automatic Transmission) |
- HINT:
- Refer to the procedures up to "INSTALL PARKING BRAKE PEDAL" (Click here).
| 18. INSTALL PARKING BRAKE LEVER SUB-ASSEMBLY (for Manual Transmission) |
- HINT:
- Refer to the procedures up to "INSTALL PARKING BRAKE LEVER" (Click here).