REASSEMBLY
Removal / installation
- CAUTION:
- Wear protective gloves. Sharp areas on the seat adjuster may injure your hands.
- HINT:
- Use the same procedures for the LH side and RH side.
- A bolt without a torque specification is shown in the standard bolt chart. (Click here)
- Use the same procedures for the LH side and RH side.
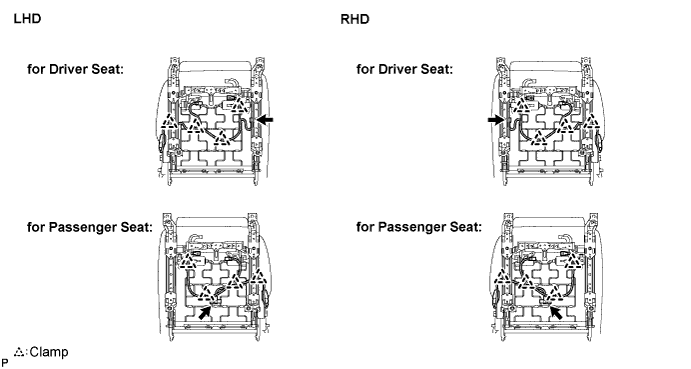
| 1. INSTALL FRONT SEAT WIRE |
| 2. INSTALL SEAT HEATER CONTROL SUB-ASSEMBLY (w/ Seat Heater System) |
| 3. INSTALL SEAT POSITION SENSOR (for Driver Side) |

Install the seat position sensor, but do not fully tighten it yet.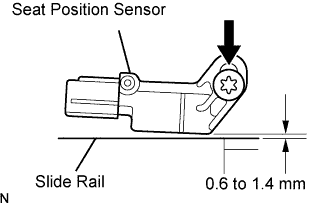

Install a 1 mm (0.04 in.) feeler gauge between the slide rail and sensor.
- HINT:
- Make sure that the clearance between the seat position sensor and the slide rail is within 0.6 to 1.4 mm (0.023 to 0.055 in.).
- CAUTION:
- If the seat position sensor has been dropped, or there are any cracks or other defects in the case, bracket or connector, replace the seat position sensor with a new one.
- When installing the seat position sensor, make sure that the SRS wiring does not interfere with other parts and is not pinched between other parts.
- If the seat position sensor has been dropped, or there are any cracks or other defects in the case, bracket or connector, replace the seat position sensor with a new one.
Hold down the top of the sensor and tighten the sensor using a T30 "torx" socket.
- Torque:
- 8.0 N*m{ 82 kgf*cm , 71 in.*lbf }
Remove the feeler gauge.
Install the seat slide position sensor protector.
Connect the wire harness connector.
| 4. INSTALL SEAT CLIMATE CONTROL BLOWER (w/ Climate Control Seat System) |
| 5. INSTALL SEAT CUSHION CLIMATE CONTROL DUCT (w/ Climate Control Seat System) |
| 6. INSTALL SEATBACK CLIMATE CONTROL BLOWER (w/ Climate Control Seat System) |
Using a T30 ''torx'' socket, install the blower cover and blower to the seat frame with the 6 ''torx'' bolts.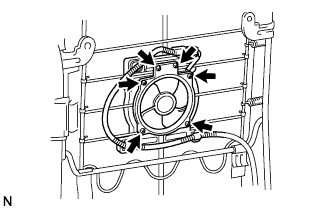
Connect the connector and attach the 3 clamps.
| 7. INSTALL LUMBAR SUPPORT ADJUSTER ASSEMBLY |
Install the lumbar support adjuster with the 2 screws.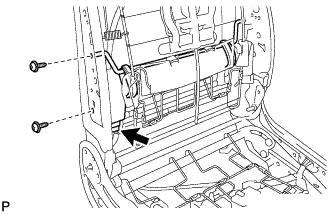
Connect the connector.
| 8. INSTALL FRONT LOWER SEAT CUSHION SHIELD |
| 9. INSTALL FRONT LOWER SEAT CUSHION SHIELD LH |
| 10. INSTALL RECLINING ADJUSTER INSIDE COVER LH |
| 11. INSTALL SEAT RECLINING ADJUSTER INSIDE COVER LH |
| 12. INSTALL RECLINING ADJUSTER INSIDE COVER LH |
| 13. INSTALL LOWER RECLINING ADJUSTER INSIDE COVER RH |
| 14. INSTALL FRONT SEAT BACK HEATER ASSEMBLY (w/ Seat Heater System) |
Using a tacker, install the front seatback heater to the end of the seat cover with the 7 tack pins.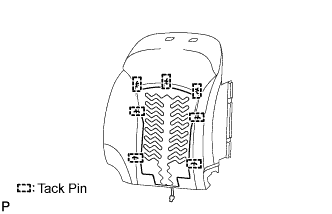
| 15. INSTALL FRONT SEPARATE TYPE SEATBACK COVER |
Using hog ring pliers, install the seatback cover to the seatback pad with new hog rings.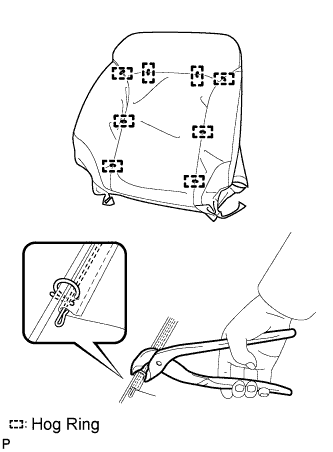
| 16. INSTALL FRONT SEPARATE TYPE SEATBACK ASSEMBLY (w/o Seatback Board) |
Fully cover the airbag with the 2 seatback cover brackets and tighten the nut.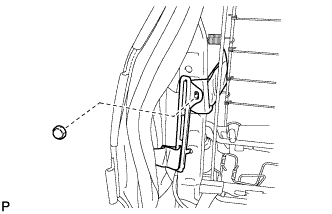
- Torque:
- 5.5 N*m{ 56 kgf*cm , 49 in.*lbf }
- CAUTION:
- For vehicles with side airbags, the seatback cover must be securely installed. Otherwise, the side airbags may not deploy properly.
- Make sure that the strap is not twisted after installing the bracket.
- Install the bracket securely.
- For vehicles with side airbags, the seatback cover must be securely installed. Otherwise, the side airbags may not deploy properly.
Using hog ring pliers, install the seatback cover (with pad) to the seat frame with new hog rings, and attach the hooks.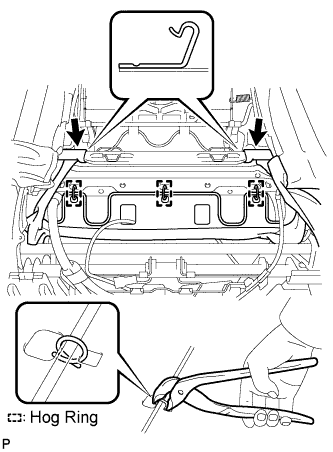
Install the seatback cover (with pad) to the seat frame. (w/o Seatback Board)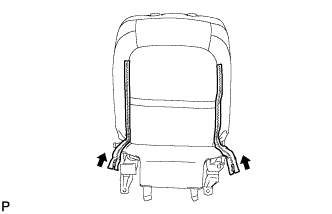
| 17. INSTALL FRONT SEPARATE TYPE SEATBACK ASSEMBLY (w/ Seatback Board) |
Fully cover the airbag with the 2 seatback cover brackets and tighten the nut.
- Torque:
- 5.5 N*m{ 56 kgf*cm , 49 in.*lbf }
- CAUTION:
- For vehicles with side airbags, the seatback cover must be securely installed. Otherwise, the side airbags may not deploy properly.
- Make sure that the strap is not twisted after installing the bracket.
- Install the bracket securely.
- For vehicles with side airbags, the seatback cover must be securely installed. Otherwise, the side airbags may not deploy properly.
Using hog ring pliers, install the seatback cover (with pad) to the seat frame with new hog rings.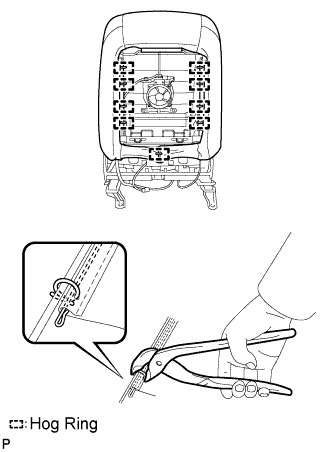
Using hog ring pliers, install the seatback cover (with pad) to the seat frame with new hog rings, and attach the hooks.
Install the front seatback cover and attach the hooks.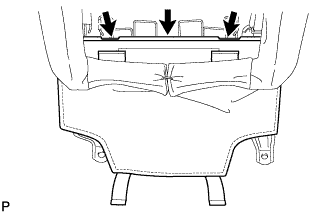
| 18. INSTALL FRONT SEATBACK BOARD SUB-ASSEMBLY (w/ Seatback Board) |
| 19. INSTALL FRONT SEAT HEADREST SUPPORT |
| 20. INSTALL FRONT SEAT HEADREST SUPPORT |
| 21. INSTALL FRONT SEAT CUSHION HEATER ASSEMBLY (w/ Seat Heater System) |
Using a tacker, install the front seat cushion heater to the end of the seat cover with the 28 tack pins.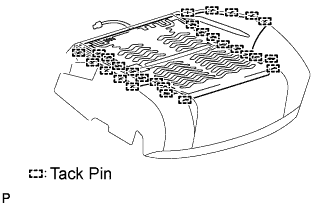
| 22. INSTALL FRONT SEPARATE TYPE SEAT CUSHION COVER |
Using hog ring pliers, install the seat cushion cover to the seat cushion pad with new hog rings.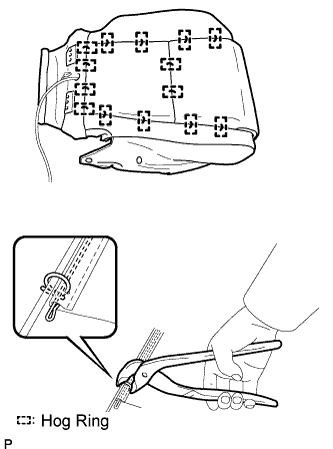
| 23. INSTALL FRONT SEPARATE TYPE SEAT CUSHION ASSEMBLY LH |
| 24. INSTALL FRONT POWER SEAT SWITCH (w/ Seat Position Memory System) |
Connect the 2 connectors.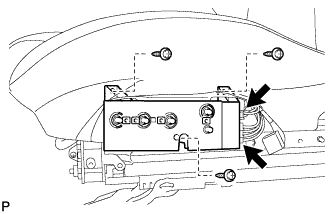
Install the switch with the 3 screws.
| 25. INSTALL FRONT POWER SEAT SWITCH (w/o Seat Position Memory System) |
Connect the connector.
Install the switch with the 3 screws.
| 26. INSTALL FRONT INNER SEAT CUSHION SHIELD |
Attach the clip and 2 claws to install the cushion shield inner.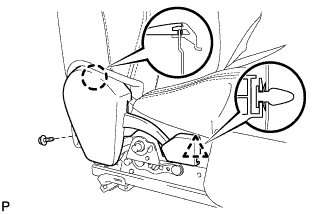
Install the screw.
| 27. INSTALL LOWER INNER SEAT TRACK SPACER |
Install the spacer to the front cushion shield with the 2 screws.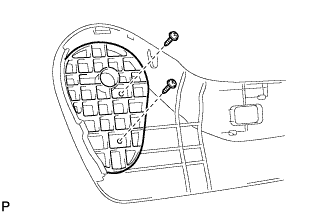
| 28. INSTALL LOWER OUTER SEAT TRACK SPACER |
Install the spacer to the front cushion shield with the 2 screws.
| 29. INSTALL FRONT POWER SEAT LUMBAR SWITCH |
Install the switch to the front cushion shield with the 2 screws.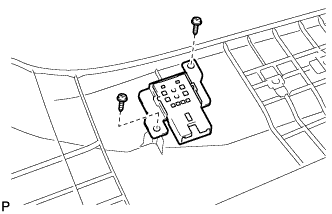
| 30. CONNECT INNER NO. 1 FRONT SEAT CUSHION SHIELD |
Attach the claw and connect the No. 1 cushion shield inner to the front cushion shield.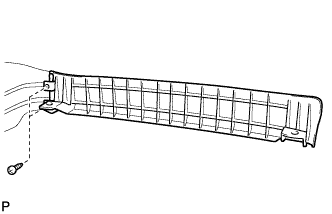
Install the 2 screws.
| 31. INSTALL NO. 1 FRONT SEAT CUSHION SHIELD WITH CUSHION SHIELD INNER |
Connect the connector to the lumbar front power seat switch.
Attach the claw and install the cushion shield with cushion shield inner.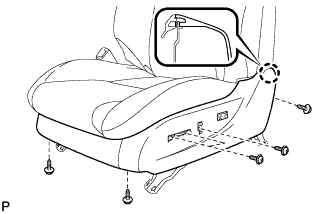
Install the 5 screws.
Install the 2 rubber bands of the front seatback board to the seat frame.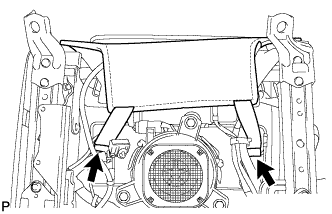
Connect the connector to the No. 1 interior illumination light.
| 32. INSTALL RECLINING POWER SEAT SWITCH KNOB |
| 33. INSTALL SLIDE AND VERTICAL POWER SEAT SWITCH KNOB |
| 34. INSTALL FRONT SEAT INNER BELT ASSEMBLY |
Install the front seat inner belt assembly with the nut.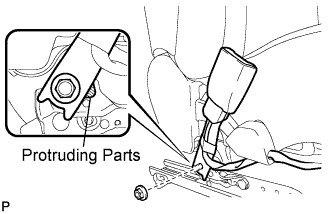
- Torque:
- 42 N*m{ 428 kgf*cm , 31 ft.*lbf }
- NOTICE:
- Do not allow the anchor part of the front seat inner belt assembly to overlap the protruding parts of the front seat adjuster.
Connect the connector and attach the 4 clamps.