REMOVAL
Removal / installation
- NOTICE:
- As much as possible avoid touching the stroke portions of the rod to prevent foreign matter from attaching to it. Be sure to hold the cylinders while servicing.
- Do not wear cotton gloves or other similar materials when handling the rod. Fibers may attach to the rod and result in gas leaks.
- Do not apply any load to the cylinders in the horizontal direction in order to prevent the rod from being deformed.
- As much as possible avoid touching the stroke portions of the rod to prevent foreign matter from attaching to it. Be sure to hold the cylinders while servicing.
- HINT:
- Use the same procedures for the RH side and LH side.
- The procedures listed below are for the LH side.
- Use the same procedures for the RH side and LH side.
| 1. REMOVE COOL AIR INTAKE DUCT SEAL |

Remove the 11 clips and intake duct seal.

| 2. REMOVE ENGINE ROOM SIDE COVER |
Remove the 5 clips and side cover.
| 3. REMOVE FRONT UPPER FENDER PROTECTOR |
Using a clip remover, separate the clip on the rubber portion of the cowl top ventilator louver sub-assembly from the front upper fender protector LH.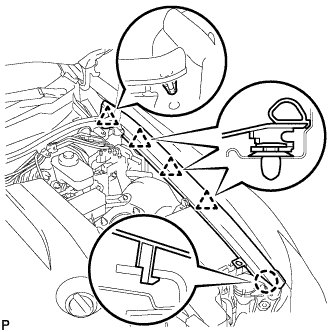
Disengage the 3 clips and the claw to remove the front fender protector upper LH.
| 4. REMOVE HOOD SUPPORT ASSEMBLY |
When the hood support assembly is to be replaced with a new one:
Using a screwdriver, remove the hood support assembly while releasing the 2 clips.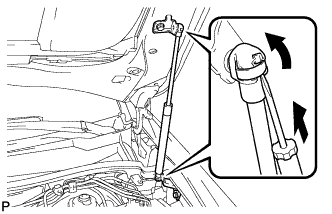
- NOTICE:
- Remove the hood support while supporting the hood with one hand.
- HINT:
- Tape the screwdriver tip before use.
When the hood support assembly is to be reinstalled:
Remove the 3 bolts and hood support assembly.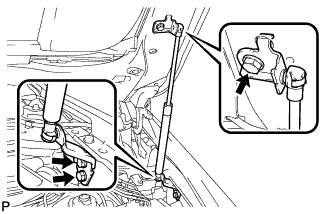
- NOTICE:
- Remove the hood support while supporting the hood with one hand.