REASSEMBLY
Removal / installation
| 1. INSTALL RADIATOR SUPPORT OPENING COVER |
| 2. INSTALL FRONT BUMPER SIDE RETAINER RH |
| 3. INSTALL FRONT BUMPER SIDE RETAINER LH |
| 4. INSTALL FRONT BUMPER REINFORCEMENT |

Install the front bumper reinforcement with the 6 bolts.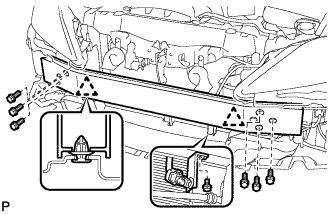

- Torque:
- 70 N*m{ 714 kgf*cm , 52 ft.*lbf }
Install the cooler (ambient temp sensor) thermistor with the bolt.
Install the radiator support opening cover with the 2 clips.
| 5. INSTALL FRONT BUMPER ENERGY ABSORBER |
| 6. INSTALL FRONT BUMPER COVER |
| 7. INSTALL FRONT FENDER LINER RETAINER |
| 8. INSTALL FRONT BUMPER PROTECTOR |
Install 2 new front bumper protectors.
| 9. INSTALL FRONT SPOILER COVER LH |
| 10. INSTALL FRONT SPOILER COVER RH |
| 11. INSTALL LOWER RADIATOR GRILLE |
Install the lower radiator grille withe the 14 claws.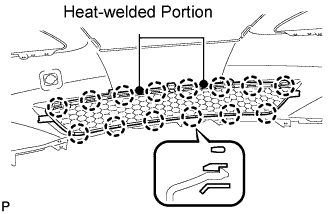
Using a soldering gun, install the lower radiator grille at the 2 portions shown in the illustration.
| 12. INSTALL FRONT BUMPER GUARD COVER RH |
| 13. INSTALL FRONT BUMPER GUARD COVER LH |
| 14. INSTALL LOWER FRONT BUMPER COVER |
| 15. INSTALL FRONT BUMPER EXTENSION MOUNTING BRACKET |
| 16. INSTALL RADIATOR GRILLE EMBLEM (w/ Dynamic Radar Cruise Control System) |
| 17. INSTALL RADIATOR GRILLE EMBLEM (w/o Dynamic Radar Cruise Control System) |
- HINT:
- When installing the radiator grille emblem, heat the vehicle body and radiator grille emblem using a heat light.
| Item |
Temperature |
| Vehicle Body |
40 to 60°C (104 to 140°F) |
| Emblem |
20 to 30°C (68 to 86°F) |
- NOTICE:
- Do not heat the vehicle body and radiator grille emblem excessively.
Clean the vehicle body surface.
Using a heat light, heat the vehicle body surface.
Remove the double-sided tape from the vehicle body.
Wipe off any tape adhesive residue with cleaner.
Clean the radiator grille emblem. (If reusing the radiator grille emblem)
Using a heat light, heat the radiator grille emblem.
Remove the double-sided tape from the radiator grille emblem.
Wipe off any tape adhesive residue with cleaner.
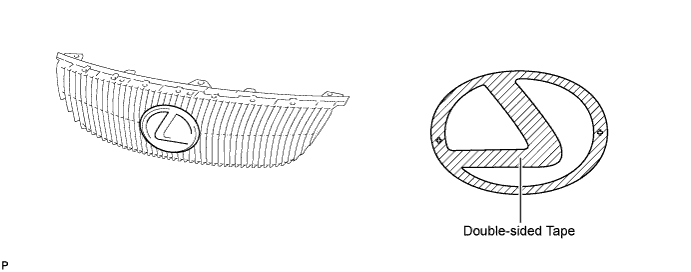
Apply new double-sided tape to the radiator grille emblem.
Install the radiator grille emblem.
Using a heat light, heat the vehicle body and radiator grille emblem.
Remove the peeling paper from the face of the radiator grille emblem.
- HINT:
- After removing the peeling paper, keep the exposed adhesive free from foreign matter.
Install the radiator grille emblem.
| 18. INSTALL RADIATOR GRILLE |
| 19. INSTALL RADIATOR GRILLE MOULDING |
| 20. INSTALL RADIATOR GRILLE PROTECTOR |
| 21. INSTALL HEADLIGHT CLEANER HOSE (w/ Headlight Cleaner System) |
| 22. INSTALL HEADLIGHT HOSE (w/ Headlight Cleaner System) |
| 23. INSTALL NO. 4 ENGINE ROOM WIRE |
| 24. INSTALL HEADLIGHT WASHER ACTUATOR SUB-ASSEMBLY LH (w/ Headlight Cleaner System) |
Engage the 2 claws.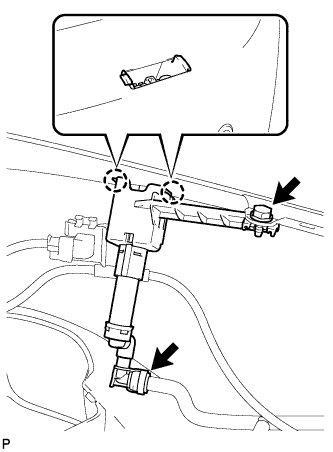
Install the headlight washer actuator sub-assembly with the bolt.
Connect the headlight washer hose.
- HINT:
- Use the same procedures for the RH side and the LH side.
| 25. INSTALL HEADLIGHT WASHER ACTUATOR SUB-ASSEMBLY RH (w/ Headlight Cleaner System) |
| 26. INSTALL HEADLIGHT CLEANER WASHER NOZZLE LH (w/ Headlight Cleaner System) |
Install the headlight cleaner washer nozzle.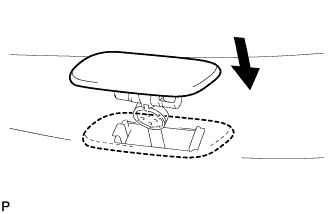
- HINT:
- Use the same procedures for the RH side and the LH side.
| 27. INSTALL HEADLIGHT CLEANER WASHER NOZZLE RH (w/ Headlight Cleaner System) |
| 28. INSTALL NO. 2 ULTRASONIC SENSOR RETAINER (w/ Clearance Sonar System) |
| 29. INSTALL NO. 1 ULTRASONIC SENSOR (w/ Clearance Sonar System) |
Install the No. 1 ultrasonic sensor to the front bumper.
Install the sensor retainer as shown in the illustration.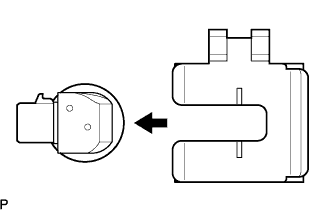
Connect the sensor connector.
| 30. INSTALL FOG LIGHT ASSEMBLY LH |
Install the fog light assembly with the bolt and 3 pins.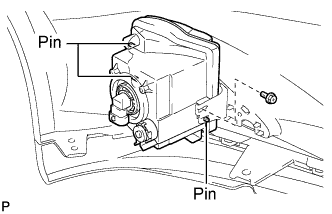
Install the clamp.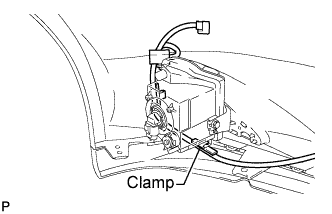
| 31. INSTALL FOG LIGHT ASSEMBLY RH |