INSTALLATION
Removal / installation
| 1. INSTALL NO. 1 ROOF DRIP SIDE FINISH MOULDING CLIP |

- NOTICE:
- If reusing the clips, do not remove the double-sided tape remaining on the clips and where the clips will be installed on the body.
- If installing new clips, remove the double-sided tape remaining where the clips will be installed on the body and clean the body with a non-residue type solvent.
- If reusing the clips, do not remove the double-sided tape remaining on the clips and where the clips will be installed on the body.
Apply a 2 to 3 mm (0.07 to 0.11 in.) bead of adhesive (3M DP-105 or equivalent) from the tube to new No. 1 roof drip side finish moulding clips.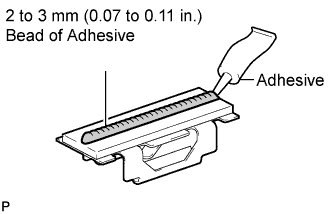

- HINT:
- Adhesive strength (tensile strength): 13.7 MPa (140 kgf/cm2) or more (when the temperature is 23°C)
Press and install the No. 1 roof drip side finish moulding clips.
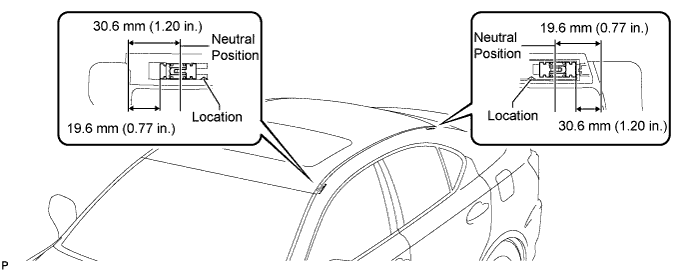
Install the clips to the positions on the roof panel shown in the illustration. Determine the locations and firmly press and install the No. 1 roof drip side finish moulding clips after lightly rubbing up adhesive (3M DP-105 or equivalent) .
Install the roof drip side finish moulding center when 20 minutes or more have elapsed after pressing and installing the No. 1 roof drip side finish moulding clips.
- HINT:
- Initial hardening time 20 minutes
- Complete hardening time 48 hours
- Initial hardening time 20 minutes
| 2. INSTALL ROOF DRIP SIDE FINISH MOULDING CENTER |
| 3. INSTALL NO. 1 WINDSHIELD OUTSIDE MOULDING CLIP |
| 4. INSTALL ROOF DRIP SIDE FINISH MOULDING |