INSTALLATION
Removal / installation
| 1. INSTALL LUGGAGE COMPARTMENT OUTSIDE DOOR GARNISH SUB-ASSEMBLY |
| 2. INSTALL NO. 3 LUGGAGE COMPARTMENT DOOR PLATE |

Clean the vehicle body surface.
Using a heat light, heat the vehicle body surface.
Remove the double-sided tape from the vehicle body.
Wipe off any tape adhesive residue with cleaner.
Clean the No. 3 luggage compartment door plate. (If reusing the No. 3 luggage compartment door plate)
Using a heat light, heat the No. 3 luggage compartment door plate.
Remove the double-sided tape from the No. 3 luggage compartment door plate.
Wipe off any tape adhesive residue with cleaner.
Apply new double-sided tape to the No. 3 luggage compartment door plate.
Install the No. 3 luggage compartment door plate.
Using a heat light, heat the vehicle body and No. 3 luggage compartment door plate.
Remove the peeling paper from the face of the No. 3 luggage compartment door plate.
- HINT:
- After removing the peeling paper, keep the exposed adhesive free from foreign matter.
Install the No. 3 luggage compartment door plate.
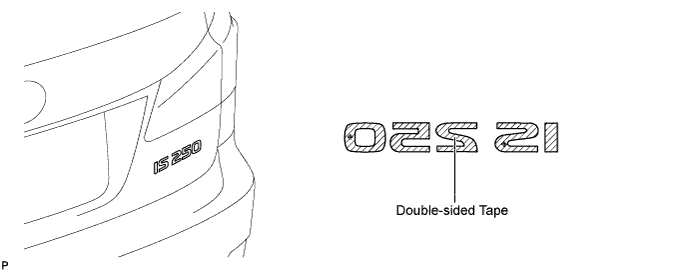

| 3. INSTALL NO. 1 LUGGAGE COMPARTMENT DOOR NAME PLATE |
Clean the vehicle body surface.
Using a heat light, heat the vehicle body surface.
Remove the double-sided tape from the vehicle body.
Wipe off any tape adhesive residue with cleaner.
Clean the No. 1 luggage compartment door name plate. (If reusing the No. 1 luggage compartment door name plate)
Using a heat light, heat the No. 1 luggage compartment door name plate.
Remove the double-sided tape from the No. 1 luggage compartment door name plate.
Wipe off any tape adhesive residue with cleaner.
Apply new double-sided tape to the No. 1 luggage compartment door name plate.
Install the No. 1 luggage compartment door name plate.
Using a heat light, heat the vehicle body and No. 1 luggage compartment door name plate.
Remove the peeling paper from the face of the No. 1 luggage compartment door name plate.
- HINT:
- After removing the peeling paper, keep the exposed adhesive free from foreign matter.
Install the No. 1 luggage compartment door name plate.
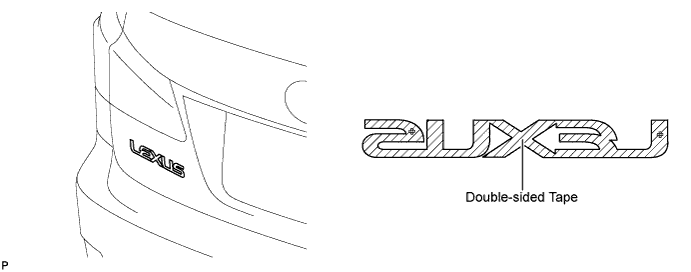
| 4. INSTALL REAR LIGHT ASSEMBLY LH |
Install the rear light assembly with the 3 nuts.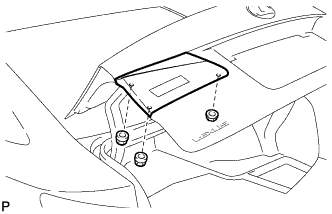
Connect the connector.
| 5. INSTALL REAR LIGHT ASSEMBLY RH |
| 6. INSTALL TELEVISION CAMERA ASSEMBLY (w/ Parking Assist Monitor System) |
Engage the 2 claws to temporarily install the television camera assembly from to the luggage compartment as shown in the illustration.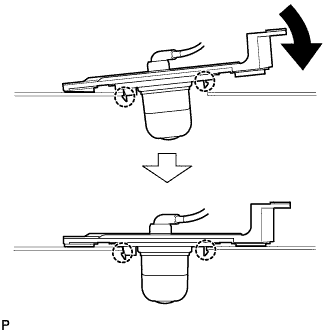
Install the television camera assembly with the 2 screws.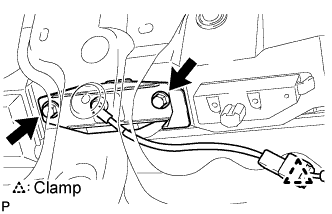
Connect the television camera connector.
Engage the television camera connector clamp.
| 7. INSTALL LUGGAGE KEY ELECTRICAL SWITCH |
| 8. INSTALL LUGGAGE COMPARTMENT DOOR REINFORCEMENT |
| 9. INSTALL LUGGAGE COMPARTMENT DOOR COVER |
| 10. INSTALL LUGGAGE COMPARTMENT DOOR ASSIST GRIP |
| 11. CONNECT CABLE TO NEGATIVE BATTERY TERMINAL |
| 12. PERFORM INITIALIZATION |