INSTALLATION
Removal / installation
| 1. INSTALL FRONT POWER WINDOW REGULATOR MOTOR |

- NOTICE:
- The regulator arm must be below the intermediate position when installing the power window regulator motor.
Using a "torx" socket wrench (T25), install the front power window regulator motor with the 3 screws.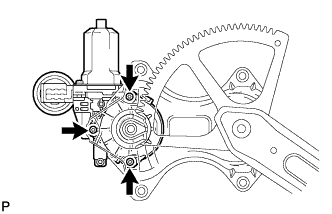

- Torque:
- 5.4 N*m{ 55 kgf*cm , 48 in.*lbf }
- HINT:
- The new front window regulator adopts a self-tapping method. The installation position of the regulator will be threaded when the self-tapping screw is inserted.
| 2. INSTALL FRONT DOOR WINDOW REGULATOR SUB-ASSEMBLY |
Apply MP grease to the sliding parts on the front door window regulator sub-assembly.
Install the temporary bolt to the front door window regulator sub-assembly.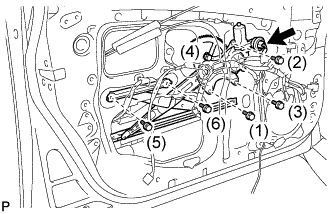
Temporarily install the window regulator.
Tighten the 6 bolts in the order shown in the illustration to install the front window regulator.
- Torque:
- 11 N*m{ 112 kgf*cm , 8.1 ft.*lbf }
Connect the connector.
| 3. INSTALL FRONT DOOR GLASS SUB-ASSEMBLY |
Insert the front door glass sub-assembly into the front door panel along the front door glass run as indicated by the arrows in the illustration.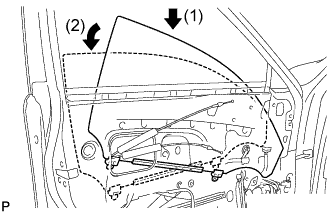
Install the front door glass sub-assembly with the 2 bolts.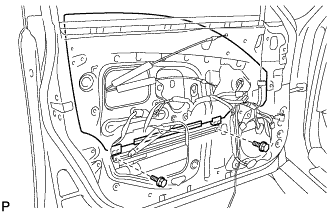
- Torque:
- 5.5 N*m{ 56 kgf*cm , 49 in.*lbf }
Install the hole plug.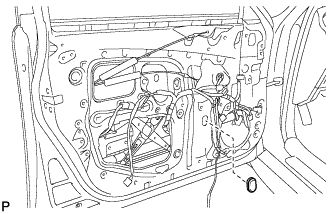
| 4. INSTALL FRONT DOOR SERVICE HOLE COVER |
Apply butyl tape to the front door panel.
Pass the front door lock remote control cable and rear door inside locking cable through a new front door service hole cover.
Install the service hole cover.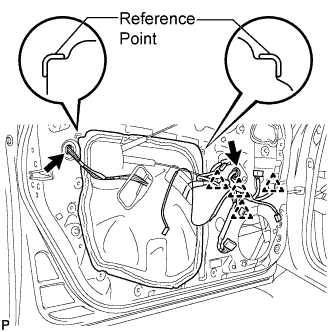
- NOTICE:
- Securely install the front door service hole cover avoiding wrinkles and air bubbles.
Connect each connector and each clamp.
| 5. INSTALL FRONT DOOR INNER GLASS WEATHERSTRIP |
Engage the 4 claws and install the front door inner glass weatherstrip.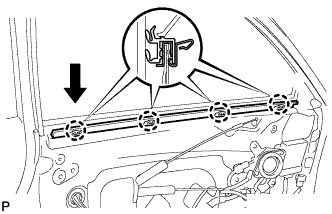
| 6. INSTALL FRONT DOOR TRIM BOARD SUB-ASSEMBLY |
Connect the rear door lock remote control cable and rear door inside locking cable to the front inside handle.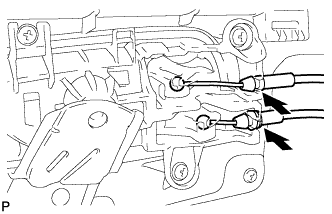
Connect each connector.
Engage the front door trim board with the 4 clips of the front door inner glass weatherstrip.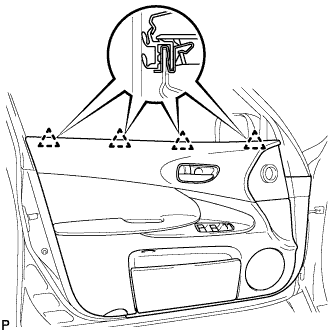
Engage the 9 clips and install the front door trim board to the front door panel.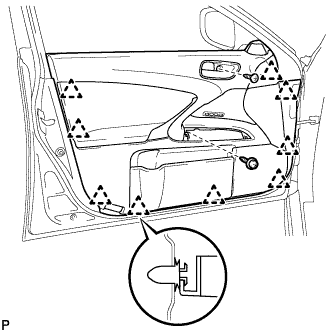
Install the 2 screws.
| 7. INSTALL COURTESY LIGHT ASSEMBLY |
Connect the connector.
Engage the claw and install the courtesy light assembly.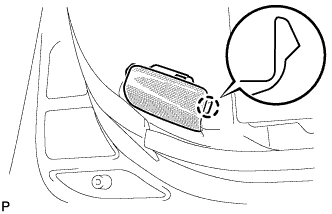
| 8. INSTALL POWER WINDOW REGULATOR MASTER SWITCH ASSEMBLY |
Connect each connector.
Engage the 4 claws and 2 clips, and install the power window regulator master switch assembly.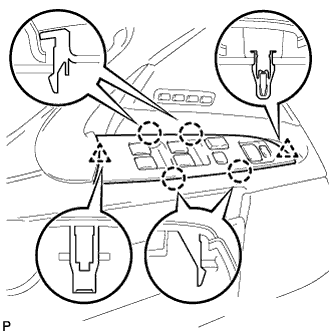
| 9. INSTALL FRONT DOOR INSIDE HANDLE BEZEL PLUG |
Engage the 3 claws and install the front door inside handle bezel plug.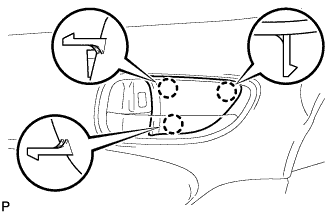
| 10. INSTALL REAR POWER WINDOW REGULATOR MOTOR |
- NOTICE:
- The regulator arm must be below the intermediate position when installing the power window regulator motor.
Using a "torx" socket wrench (T25), install the rear power window regulator motor with the 3 screws.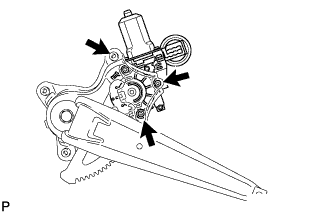
- Torque:
- 5.4 N*m{ 55 kgf*cm , 48 in.*lbf }
- HINT:
- The new rear window regulator adopts a self-tapping method. The installation position of the regulator will be threaded when the self-tapping screw is inserted.
| 11. INSTALL REAR DOOR WINDOW REGULATOR SUB-ASSEMBLY |
Apply MP grease to the sliding parts on the rear door window regulator sub-assembly.
Install the temporary bolt to the rear door window regulator sub-assembly.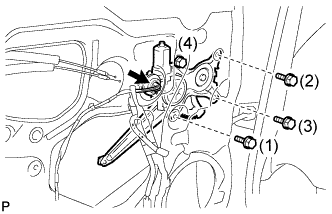
Temporarily install the window regulator.
Tighten the 4 bolts in the order shown in the illustration to install the rear door window regulator.
- Torque:
- 11 N*m{ 112 kgf*cm , 8.1 ft.*lbf }
Connect the connector.
| 12. INSTALL REAR DOOR GLASS SUB-ASSEMBLY |
Slide the rear door glass sub-assembly to install it as shown in the illustration.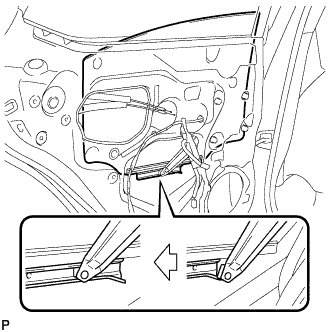
| 13. INSTALL REAR DOOR QUARTER WINDOW GLASS |
Install the rear door quarter window glass to the rear door quarter weatherstrip.
Install the rear door quarter window glass together with the rear door quarter window glass weatherstrip in the direction indicated by the arrow in the illustration.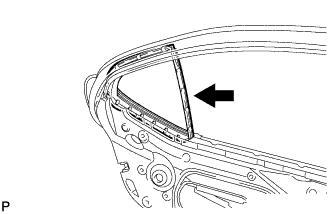
| 14. INSTALL REAR DOOR WINDOW DIVISION BAR SUB-ASSEMBLY |
Insert the rear door window division bar from up above and install it with the 2 bolts and screw.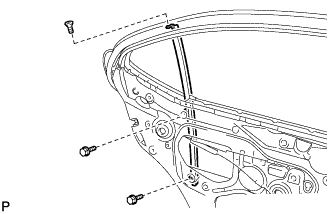
| 15. INSTALL REAR DOOR GLASS RUN |
Install the rear door glass run.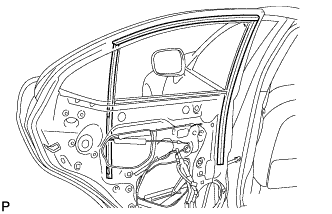
| 16. INSTALL REAR DOOR SERVICE HOLE COVER |
Apply butyl tape to the rear door panel.
Pass the rear door lock remote control cable, rear door inside locking cable and each connector through a new rear door service hole cover.
Install the rear door service hole cover.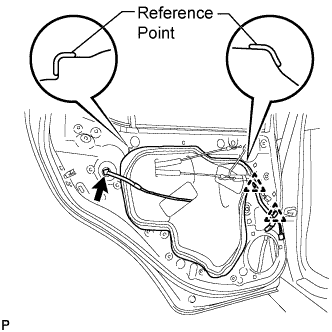
- NOTICE:
- Securely install the rear door service hole cover avoiding wrinkles and air bubbles.
Connect the connector and clamp.
| 17. INSTALL REAR DOOR INNER GLASS WEATHERSTRIP |
Engage the 3 claws to install the rear door inner glass weatherstrip.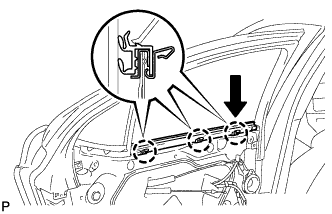
| 18. INSTALL REAR DOOR TRIM BOARD SUB-ASSEMBLY |
Connect the rear door lock remote control cable and rear door inside locking cable to the rear inside handle.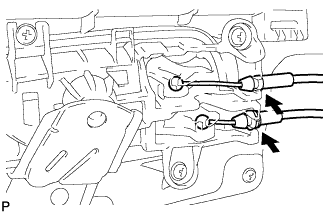
Connect each connector.
Engage the rear door trim board with the 3 clips of the rear door inner glass weatherstrip.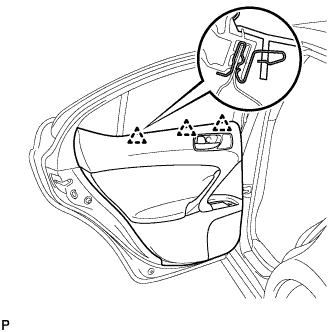
Engage the 8 clips to install the rear door trim board to the rear door panel.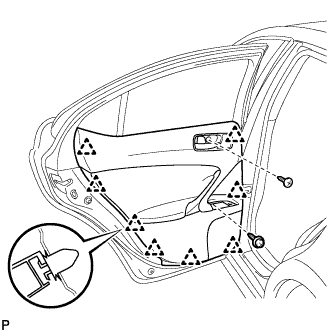
Install the 2 screws.
| 19. INSTALL REAR POWER WINDOW REGULATOR SWITCH ASSEMBLY |
Connect the connector.
Engage the 2 claws and 2 clips, and install the rear power window regulator switch assembly.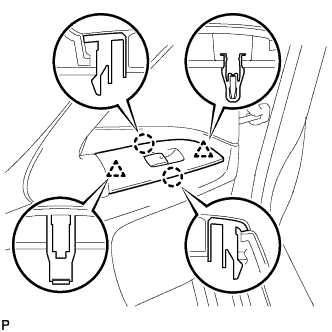
| 20. INSTALL REAR DOOR INSIDE HANDLE BEZEL PLUG |
Engage the 3 claws to install the rear door inside handle bezel plug.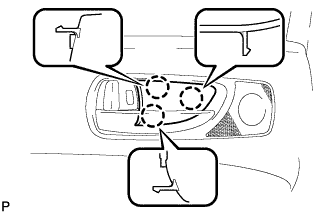
| 21. CONNECT BATTERY NEGATIVE TERMINAL |
| 22. PERFORM INITIALIZATION |
- NOTICE:
- Some systems need initialization after reconnecting the cable to the negative battery terminal (Click here).