REMOVAL
Removal / installation
| 1. REMOVE FRONT DOOR SCUFF PLATE LH (w/o Illumination) |

Put protective tape around the front door scuff plate.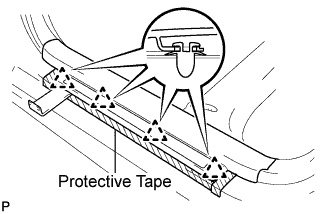

Using a moulding remover, disengage the 4 clips.
Disengage the 7 claws and remove the front door scuff plate LH.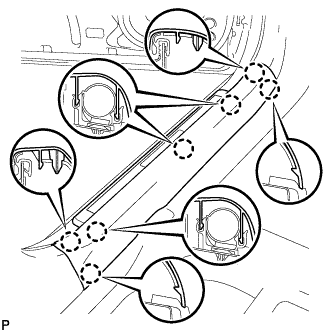
| 2. REMOVE FRONT DOOR SCUFF PLATE LH (w/ Illumination) |
Put protective tape around the front door scuff plate.
Using a moulding remover, disengage the 4 clips.
Disengage the 7 claws and remove the front door scuff plate LH.
Disconnect the connector.
| 3. REMOVE FRONT DOOR OPENING TRIM COVER LH |
Disengage the 6 claws and remove the front door opening trim cover LH.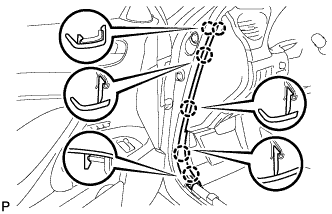
| 4. REMOVE SIDE INSTRUMENT PANEL LH |
Using a moulding remover, disengage the 5 claws and 3 clips, and then remove the side instrument panel LH.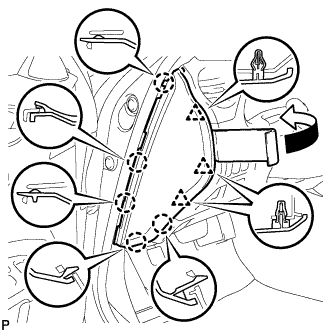
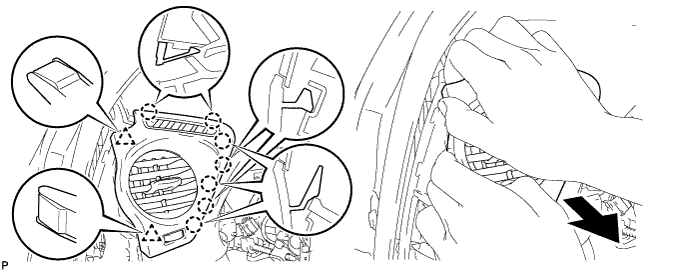
| 5. REMOVE NO. 1 INSTRUMENT PANEL REGISTER ASSEMBLY |
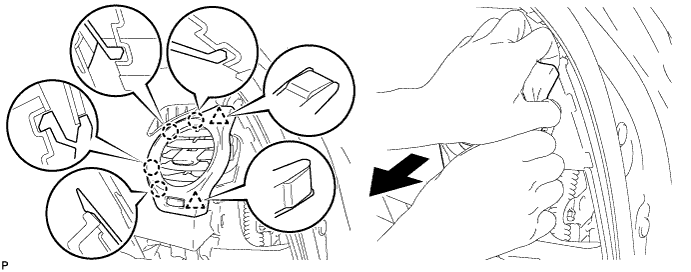
Pull the No. 1 instrument panel register assembly in the direction indicated by the arrow to disengage the 7 claws and 2 clips, and then disconnect the connector and remove it.
| 6. REMOVE NO. 1 INTERIOR ILLUMINATION LIGHT ASSEMBLY |
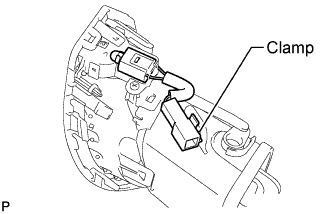
Disengage the clamp and remove the No. 1 interior illumination light assembly.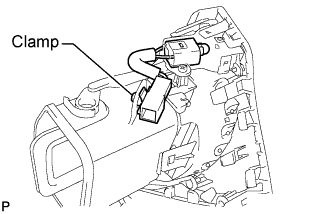
| 7. REMOVE FRONT DOOR SCUFF PLATE RH (w/o Illumination) |
- HINT:
- Use the same procedures for the RH side and the LH side.
| 8. REMOVE FRONT DOOR SCUFF PLATE RH (w/ Illumination) |
- HINT:
- Use the same procedures for the RH side and the LH side.
| 9. REMOVE FRONT DOOR OPENING TRIM COVER RH |
Disengage the 6 claws and remove the front door opening trim cover RH.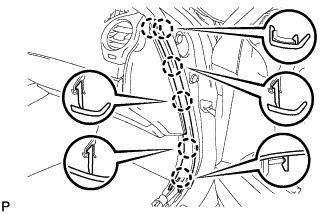
| 10. REMOVE SIDE INSTRUMENT PANEL RH |
Using a moulding remover, disengage the 5 claws and 3 clips, and then remove the side instrument panel RH.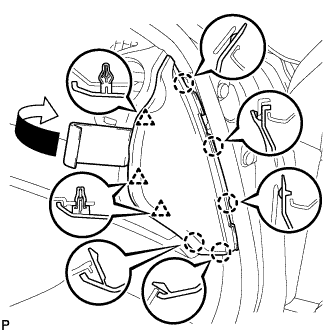
| 11. REMOVE NO. 2 INSTRUMENT PANEL REGISTER ASSEMBLY |
Pull the No. 2 instrument panel register assembly in the direction indicated by the arrow to disengage the 4 claws and 2 clips, and then disconnect the connector and remove it.
| 12. REMOVE NO. 2 INTERIOR ILLUMINATION LIGHT ASSEMBLY |
Disengage the clamp and remove the No. 2 interior illumination light assembly.