| Last Modified: 11-27-2007 | 1.6 A | |
| Service Category: Vehicle Exterior | Section: Window/Glass | |
| Model Year: 2008 | Model: LX570 | Doc ID: RM000001925017X |
| Title: WINDOW / GLASS: BACK WINDOW GLASS: INSTALLATION (2008 LX570) | ||
INSTALLATION
1. CLEAN BACK DOOR GLASS
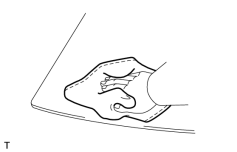
(a) Using a scraper, remove the damaged clips and spacers, adhesive sticking to the glass.
|
(b) Clean the outer circumference of the glass with non-residue solvent. NOTICE:
|
2. INSTALL BACK WINDOW GLASS CLIP RH
(a) Apply Primer G to the glass where the clip will be installed.
HINT:
If the primer is applied to an area that is not specified, apply non-residue solvent to a clean cloth and wipe off the excess primer before it dries.
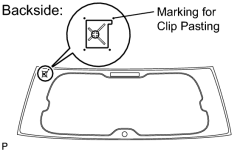
|
(b) Remove the peeling paper from a new clip. Install a clip onto the glass as shown in the illustration. NOTICE:
|
3. INSTALL BACK WINDOW GLASS CLIP LH
(a) Apply Primer G to the glass where the clip will be installed.
HINT:
If the primer is applied to an area that is not specified, apply non-residue solvent to a clean cloth and wipe off the excess primer before it dries.
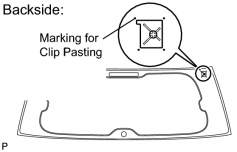
|
(b) Remove the peeling paper from a new clip. Install a clip onto the glass as shown in the illustration. NOTICE:
|
4. INSTALL NO. 1 BACK WINDOW GLASS SPACER
(a) Apply Primer G to the glass where the spacer will be installed.
HINT:
If the primer is applied to an area that is not specified, apply non-residue solvent to a clean cloth and wipe off the excess primer before it dries.
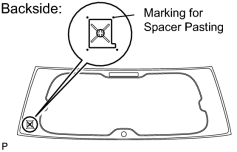
|
(b) Remove the peeling paper from a new spacer. Install a spacer onto the glass as shown in the illustration. NOTICE:
|
5. INSTALL NO. 2 BACK WINDOW GLASS SPACER
(a) Apply Primer G to the glass where the spacer will be installed.
HINT:
If the primer is applied to an area that is not specified, apply non-residue solvent to a clean cloth and wipe off the excess primer before it dries.
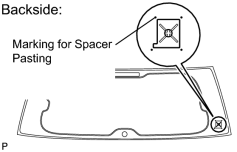
|
(b) Remove the peeling paper from a new spacer. Install a spacer onto the glass as shown in the illustration. NOTICE:
|
6. INSTALL BACK WINDOW OUTSIDE MOULDING
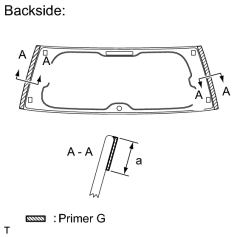
|
(a) Using a brush or sponge, coat the application area of the back window glass outside moulding with Primer G. Standard:
NOTICE:
HINT:
If the primer is applied to an area that is not specified, apply non-residue solvent to a clean cloth and wipe off the excess primer before it dries. |
(b) Remove the peeling paper from 2 new back window outside mouldings. Install the 2 mouldings as shown in the illustration.
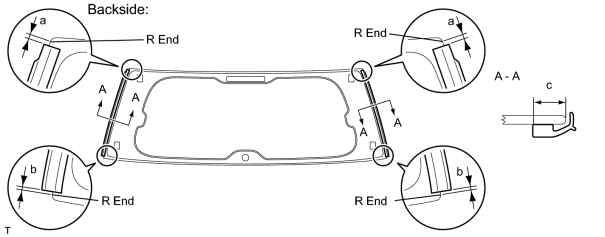
Standard:
|
Area |
Specified Condition |
|---|---|
|
a |
1.5 mm (0.0591 in.) |
|
b |
1.0 mm (0.0394 in.) |
|
c |
11.0 mm (0.433 in.) |
7. INSTALL BACK WINDOW GLASS
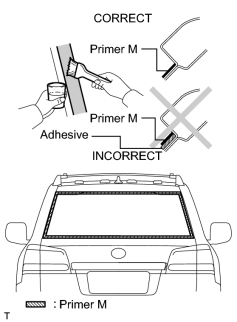
(a) Using a brush or sponge, apply Primer M to the exposed part of the vehicle body.
NOTICE:
- Allow the primer to dry for 3 minutes or more.
- Do not apply primer to the adhesive.
- Throw away any leftover primer.
- Do not apply too much primer.
(b) Using a brush or sponge, apply Primer G to the contact surface of the back window glass.
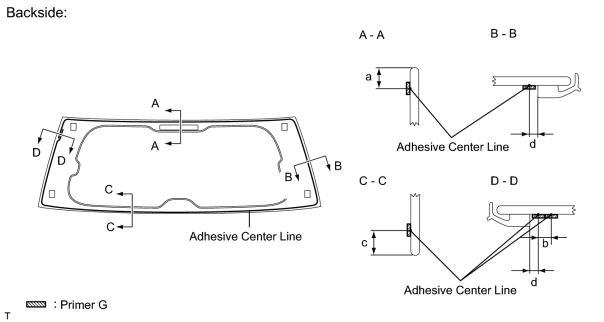
Standard:
|
Area |
Specified Condition |
|---|---|
|
a |
11.0 mm (0.433 in.) |
|
b |
8.0 mm (0.315 in.) |
|
c |
13.0 mm (0.512 in.) |
|
d |
5.0 mm (0.197 in.) |
HINT:
If primer is applied to an area that is not specified, wipe off the primer with a non-residue solvent before it dries.
NOTICE:
- Allow the primer to dry for 3 minutes or more.
- Throw away any leftover primer.
- Do not apply too much primer.
(c) Apply adhesive to the back window glass.
Adhesive:
Toyota Genuine Windshield Glass Adhesive or equivalent
(1) Cut off the tip of the cartridge nozzle as shown in the illustration below.
HINT:
After cutting off the tip, use all adhesive within the time written in the table below.
Usage Time Frame:
|
Temperature |
Usage Time Frame |
|---|---|
|
35°C (95°F) |
15 minutes |
|
20°C (68°F) |
1 hour 40 minutes |
|
5°C (41°F) |
8 hours |
(2) Load the sealer gun with the cartridge.
(3) Apply adhesive to the back window glass as shown in the illustration.
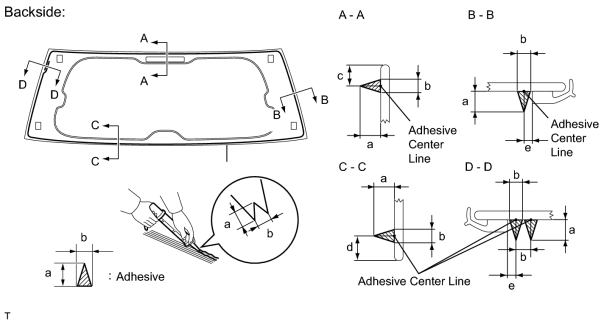
Standard:
|
Area |
Specified Condition |
|---|---|
|
a |
12.0 mm (0.472 in.) |
|
b |
8.0 mm (0.315 in.) |
|
c |
11.0 mm (0.433 in.) |
|
d |
13.0 mm (0.512 in.) |
|
e |
5.0 mm (0.197 in.) |
(d) Install the back window glass to the vehicle body.
(1) Hold the back window glass securely in place with tape or equivalent until the adhesive has hardened.
NOTICE:
- Allow the primer coating to dry for 3 minutes or more.
- Check that the clips are attached to the vehicle body correctly.
- Check the clearance between the vehicle body and glass.
(2) Lightly press the front surface of the back window glass to ensure that the back window glass is securely fit to the vehicle body.
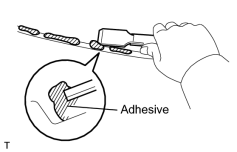
|
(3) Using a scraper, remove any excess or protruding adhesive. HINT:
Apply adhesive onto the glass rim. NOTICE:
Do not drive the vehicle within the time written in the table below. Minimum Time:
|
(4) Connect the 3 connectors.
8. INSTALL REAR WIPER MOTOR ASSEMBLY

9. INSTALL REAR WIPER MOTOR GROMMET
10. INSTALL REAR WIPER ARM
11. CHECK FOR LEAK AND REPAIR
(a) Conduct a leak test after the adhesive has completely hardened.
(b) Seal any leaks with auto glass sealer.
12. INSTALL REAR SPOILER SUB-ASSEMBLY
13. INSTALL BACK DOOR GLASS CHANNEL LH (w/o Power Back Door)
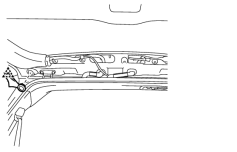
(a) Attach the clip and install the back door glass channel.
14. INSTALL BACK DOOR GLASS CHANNEL RH (w/o Power Back Door)
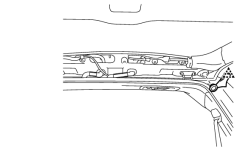
(a) Attach the clip and install the back door glass channel.
15. INSTALL BACK DOOR GARNISH
16. INSTALL BACK DOOR SIDE GARNISH LH
17. INSTALL BACK DOOR SIDE GARNISH RH
18. INSTALL CENTER BACK DOOR GARNISH
19. CONNECT CABLE TO NEGATIVE BATTERY TERMINAL
NOTICE:
When disconnecting the cable, some systems need to be initialized after the cable is reconnected
.

|

|