| Last Modified: 11-27-2007 | 1.6 A | |
| Service Category: Vehicle Exterior | Section: Window/Glass | |
| Model Year: 2008 | Model: LX570 | Doc ID: RM000001927016X |
| Title: WINDOW / GLASS: BACK WINDOW GLASS: REMOVAL (2008 LX570) | ||
REMOVAL
1. DISCONNECT CABLE FROM NEGATIVE BATTERY TERMINAL
CAUTION:
Wait at least 90 seconds after disconnecting the cable from the negative (-) battery terminal to disable the SRS system.
NOTICE:
-
w/ Navigation System:
After the engine switch is turned off, the HDD navigation system requires approximately 6 minutes to record various types of memory and settings. As a result, after turning the engine switch off, wait 6 minutes or more before disconnecting the cable from the negative (-) battery terminal.
-
When disconnecting the cable, some systems need to be initialized after the cable is reconnected
 .
.
2. REMOVE CENTER BACK DOOR GARNISH
3. REMOVE BACK DOOR SIDE GARNISH LH
4. REMOVE BACK DOOR SIDE GARNISH RH
5. REMOVE BACK DOOR GARNISH
6. REMOVE BACK DOOR GLASS CHANNEL LH (w/o Power Back Door)
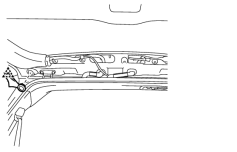
(a) Using a clip remover, remove the clip.
(b) Remove the back door glass channel LH.
7. REMOVE BACK DOOR GLASS CHANNEL RH (w/o Power Back Door)
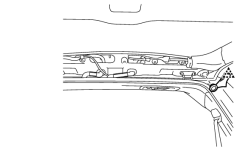
(a) Using a clip remover, remove the clip.
(b) Remove the back door glass channel RH.
8. REMOVE REAR SPOILER SUB-ASSEMBLY
9. REMOVE REAR WIPER ARM
10. REMOVE REAR WIPER MOTOR GROMMET
11. REMOVE REAR WIPER MOTOR ASSEMBLY
12. REMOVE BACK WINDOW MOULDING OUTSIDE LH
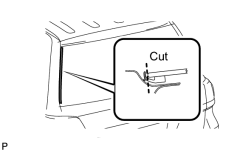
(a) Using a knife, cut off the moulding as shown in the illustration.
NOTICE:
Be careful not to damage the vehicle body.
(b) Pull the shaded area shown in the illustration by the hand to remove the back window moulding outside.
HINT:
Make a partial cut in the moulding. Then pull and remove it by hand.
13. REMOVE BACK WINDOW MOULDING OUTSIDE
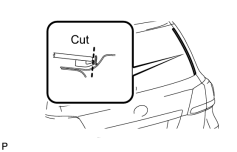
(a) Using a knife, cut off the moulding as shown in the illustration.
NOTICE:
Be careful not to damage the vehicle body.
(b) Pull the shaded area shown in the illustration by the hand to remove the back window moulding outside.
HINT:
Make a partial cut in the moulding. Then pull and remove it by hand.
14. REMOVE BACK WINDOW GLASS
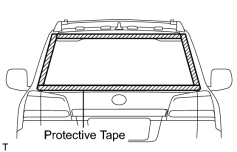
|
(a) Apply protective tape to the outer surface of the vehicle body to prevent scratches. NOTICE:
When separating the back window glass from the vehicle, be careful not to damage the vehicle paint or interior/exterior ornaments. |
(b) Disconnect the 3 connectors.
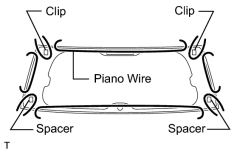
|
(c) From the interior, insert a piano wire between the vehicle body and back window glass as shown in the illustration. NOTICE:
Make sure not to damage the wire harness. |
(d) Tie objects that can serve as handles (for example, wooden blocks) to both wire ends.
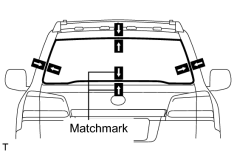
|
(e) Place matchmarks over the glass and vehicle body on the locations indicated in the illustration. HINT:
Matchmarks do not need to be placed if the glass is not going to be reused. |
(f) Cut through the adhesive by pulling the piano wire around the back window glass.
NOTICE:
Leave as much adhesive on the vehicle body as possible when removing the back window glass.
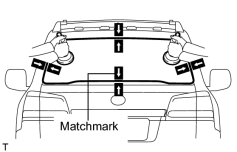
|
(g) Using suction cups, remove the back window glass. |
15. CLEAN VEHICLE BODY
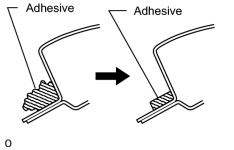
(a) Using a scraper, remove the moulding and adhesive from the back window glass.
(b) Clean and shape the contact surface of the vehicle body.
(1) On the contact surface of the vehicle body, use a knife to cut away excess adhesive as shown in the illustration.
HINT:
Leave as much adhesive on the vehicle body as possible.
NOTICE:
Be careful not to damage the vehicle body.
(2) Clean the contact surface of the vehicle body with cleaner.
HINT:
Even if all the adhesive has been removed, clean the vehicle body.

|

|