| Last Modified: 11-27-2007 | 1.6 A | |
| Service Category: Vehicle Interior | Section: Seat Belt | |
| Model Year: 2008 | Model: LX570 | Doc ID: RM000002LJO00SX |
| Title: SEAT BELT: FRONT SEAT OUTER BELT ASSEMBLY: INSTALLATION (2008 LX570) | ||
INSTALLATION
HINT:
- Use the same procedures for the LH side and RH side.
- The procedures listed below are for the LH side.
-
A bolt without a torque specification is shown in the standard bolt chart
 .
.
1. INSTALL FRONT SHOULDER BELT ANCHOR PLATE SUB-ASSEMBLY
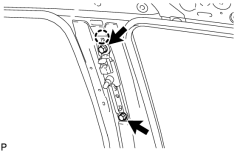
(a) Align the anchor plate positioning hole with the claw, and install the anchor plate with the 2 bolts.
HINT:
First install the lower bolt, and then install the upper bolt.
Torque: 42 N·m (428 kgf·cm, 31 ft·lbf)
2. INSTALL FRONT SEAT OUTER BELT ASSEMBLY
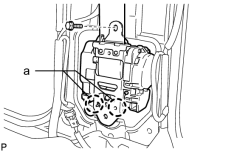
NOTICE:
When installing the retractor, make sure the claws of the vehicle (labeled "a" in the illustration) only contact the installation areas of the retractor.
(a) Align the claws of the vehicle with the seat belt retractor positioning holes.
(b) Install the seat belt with the bolt.
Torque: 8.5 N·m (87 kgf·cm, 75 in·lbf)
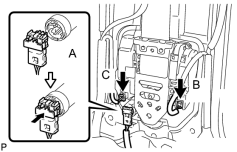
|
(c) Connect the pretensioner connector labeled A as shown in the illustration. |
(d) Connect the tension reducer connector labeled B.
(e) w/ Pre-Collision System:
Connect the pre-collision connector labeled C.
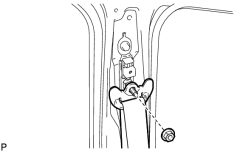
|
(f) Install the shoulder anchor to the shoulder belt anchor adjuster with the nut. Torque: 42 N·m (428 kgf·cm, 31 ft·lbf) |
3. INSTALL CENTER PILLAR GARNISH
4. INSTALL REAR ASSIST GRIP ASSEMBLY
5. INSTALL CENTER LOWER PILLAR GARNISH
HINT:
- When installing the center lower pillar garnish, connect the cable to the negative (-) battery terminal and operate the power seat switch to move the front seat and seatback to the foremost upright position.
- After moving the front seat, disconnect the cable from the negative (-) battery terminal.
NOTICE:
After the engine switch is turned off, the HDD navigation system requires approximately 6 minutes to record various types of memory and settings. As a result, after turning the engine switch off, wait 6 minutes or more before disconnecting the cable from the negative (-) battery terminal.
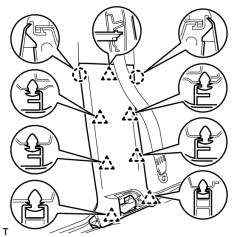
(a) Attach the 2 claws and 7 clips to install the center lower pillar garnish.
|
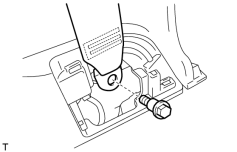
(b) for LH Side: (1) Install the seat belt anchor with the bolt. Torque: 42 N·m (428 kgf·cm, 31 ft·lbf) |
|
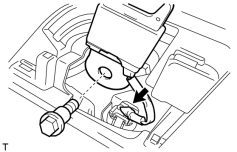
(c) for RH Side: (1) Install the seat belt anchor with the bolt. Torque: 42 N·m (428 kgf·cm, 31 ft·lbf) (2) Connect the connector. |
6. INSTALL CENTER PILLAR GARNISH COVER
7. INSTALL REAR DOOR SCUFF PLATE
8. INSTALL REAR STEP COVER
9. INSTALL FRONT DOOR SCUFF PLATE
10. CONNECT CABLE TO NEGATIVE BATTERY TERMINAL
NOTICE:
When disconnecting the cable, some systems need to be initialized after the cable is reconnected
.
11. CHECK SRS WARNING LIGHT
(a) Check the SRS warning light
.

|

|