| Last Modified: 11-27-2007 | 1.6 A | |
| Service Category: Vehicle Exterior | Section: Exterior Panels/Trim | |
| Model Year: 2008 | Model: LX570 | Doc ID: RM0000038LD002X |
| Title: EXTERIOR PANELS / TRIM: ROOF DRIP SIDE FINISH MOULDING: INSTALLATION (2008 LX570) | ||
INSTALLATION
HINT:
- Use the same procedures for the RH side and LH side.
- The procedures listed below are for the LH side.
-
When installing a clip, heat the vehicle body and clip using a heat light.
Standard:
Item
Temperature
Vehicle Body
40 to 60°C (104 to 140°F)
Clip
20 to 30°C (68 to 86°F)
NOTICE:
Do not heat the vehicle body and clip excessively.
1. INSTALL ROOF RACK BRACKET
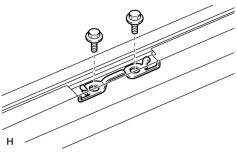
(a) w/o Roof Carrier:
Install the 4 brackets with the 8 bolts.
Torque: 10 N·m (102 kgf·cm, 7 ft·lbf)
(b) w/ Roof Carrier:
Install the 2 brackets with the 4 bolts.
Torque: 10 N·m (102 kgf·cm, 7 ft·lbf)
2. INSTALL NO. 1 ROOF DRIP SIDE FINISH MOULDING CLIP
HINT:
Perform the following procedures when replacing a No. 1 roof drip side finish moulding clip.
NOTICE:
Remove the double-sided tape where the clip will be installed on the body and clean the body with a non-residue type solvent.
|
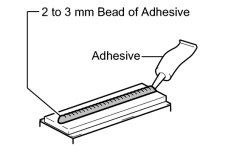
(a) Apply a 2 to 3 mm (0.0788 to 0.118 in.) bead of adhesive (3M DP-105 or equivalent) to a new No. 1 roof drip side finish moulding clip. HINT:
Adhesive strength (tensile strength): 13.7 MPa (140 kgf/cm2, 1991 psi) or more when the temperature is 23°C (73°F). |
(b) Apply primer to the body where the No. 1 roof drip side finish moulding clip will be installed.
NOTICE:
Do not let the primer dry.
|
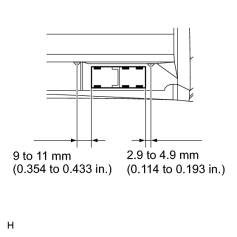
(c) While using the position shown in the illustration as a reference, place the No. 1 roof drip side finish moulding clip onto the roof panel. Then position and install the clip after lightly pressing against it so that the adhesive adheres to the primer. NOTICE:
|
3. INSTALL REAR ROOF DRIP SIDE FINISH MOULDING LH
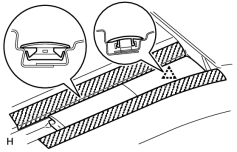
(a) Attach the clip to install the moulding.
4. INSTALL CENTER ROOF DRIP SIDE FINISH MOULDING LH
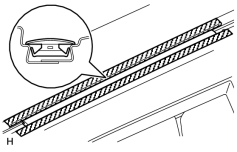
HINT:
Use the same procedure to install the moulding on the other side.
(a) Install the moulding as shown in the illustration.
5. INSTALL ROOF DRIP SIDE FINISH MOULDING LH
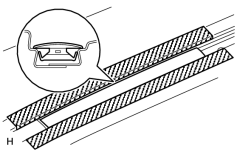
HINT:
Use the same procedure to install the moulding on the other side.
(a) Install the moulding as shown in the illustration.
6. INSTALL ROOF DRIP SIDE FINISH MOULDING JOINT COVER LH
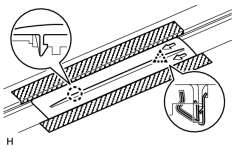
(a) w/o Roof Carrier:
Attach the claws and clips to install the 4 covers.
(b) w/ Roof Carrier:
Attach the claws and clips to install the 2 covers.
7. INSTALL ROOF CARRIER ASSEMBLY (w/ Roof Carrier)
(a) Install the roof carrier assembly
 .
.

|

|