INSTALLATION
Removal / installation
| 1. INSTALL NO.2 RADIATOR ASSEMBLY |

Attach the radiator from the upper part.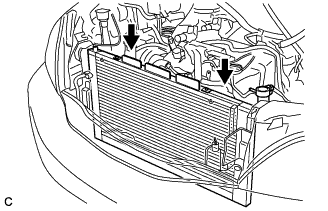

- NOTICE:
- Do not allow the cooler condenser and radiator to come into contact with each other.
Install the radiator and radiator support lowers with the 4 bolts.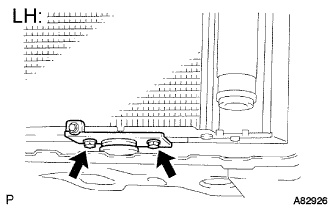
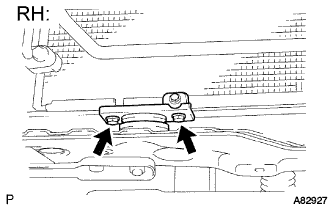
- Torque:
- 5.0 N*m{ 51 kgf*cm , 44 in.*lbf }
| 2. REMOVE RADIATOR SUPPORT SUB-ASSEMBLY LH |
Install the radiator support LH with the 3 boits.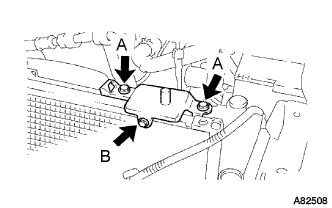
- Torque:
- Bolt A:
- 5.0 N*m{ 51 kgf*cm , 44 in.*lbf }
- Bolt B:
- 3.9 N*m{ 40 kgf*cm , 35 in.*lbf }
| 3. INSTALL RADIATOR SUPPORT SUB-ASSEMBLY RH |
Install the 3 bolts and radiator support RH with the 3 boits.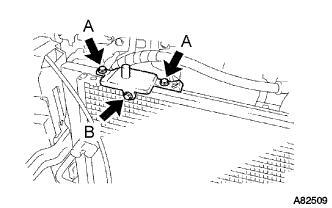
- Torque:
- Bolt A:
- 5.0 N*m{ 51 kgf*cm , 44 in.*lbf }
- Bolt B:
- 3.9 N*m{ 40 kgf*cm , 35 in.*lbf }
| 4. INSTALL RADIATOR SUPPORT CUSHION |
Install the 2 radiator support cushions to the radiator supports.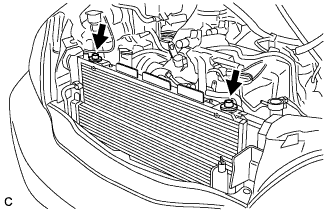
| 5. INSTALL FAN SHROUD |
Install the 4 bolts and fan shroud to the radiator with the 4 bolts.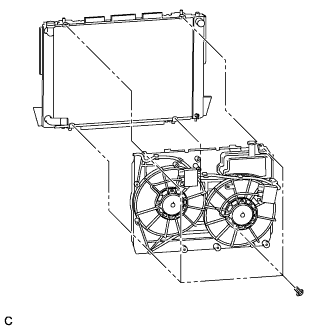
- Torque:
- 7.8 N*m{ 80 kgf*cm , 69 in.*lbf }
Install the radiator reserve tank hose.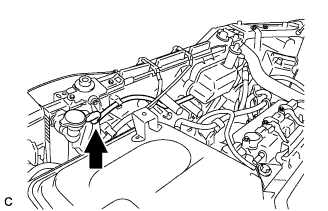
| 6. INSTALL RADIATOR SUPPORT SUB-ASSEMBLY UPPER |
Install the radiator support upper with the 5 boits.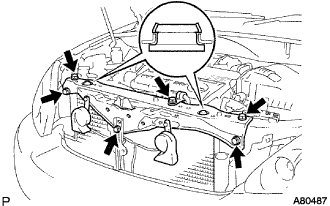
- Torque:
- 7.0 N*m{ 71 kgf*cm , 62 in.*lbf }
- NOTICE:
- Secure the upper member with the retaining claws of the radiator upper support.
Connect the horn connector.
Install the suction tube bracket with the bolt .
- Torque:
- 9.8 N*m{ 100 kgf*cm , 87 in.*lbf }
| 7. INSTALL HOOD LOCK ASSEMBLY |
Install the hood lock assembly with the 2 bolts and nut.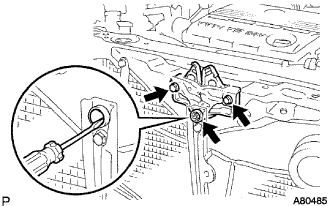
- Torque:
- 8.0 N*m{ 82 kgf*cm , 71 in.*lbf }
Attach the claws and install the hood lock control cable cover.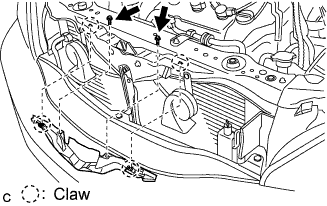
Install the 2 screws.
| 8. INSTALL RADIATOR HOSE INLET |
Install the radiator hose inlet to the No.2 radiator assembly.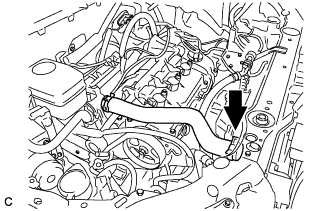
| 9. INSTALL RADIATOR HOSE OUTLET |
Install the radiator hose outlet to the No.2 radiator assembly .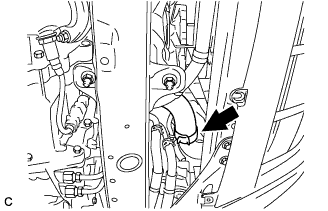
| 10. INSTALL AIR CLEANER CAP W/INLET |
Install the air cleaner filter element to the air cleaner case.
Install the 2 bolts, 4 clamps and air cleaner cap w/ inlet.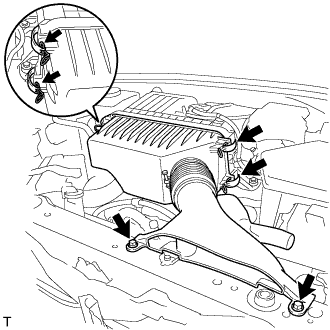
- Torque:
- 7.0 N*m{ 71 kgf*cm , 62 in.*lbf }
| 11. INSTALL COOL AIR INTAKE DUCT SEAL |
Install the 4 clips and cool air intake duct seal.
| 12. ADJUST HOOD LOCK ASSEMBLY |
Horizontally and vertically adjust the hood.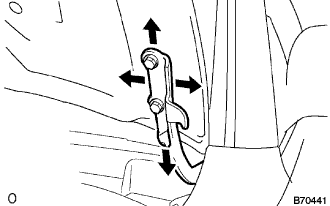
Loosen the 4 hood hinge mounting bolts on the hood side.
Adjust the clearance by moving the hood, so that it will be in the standard range.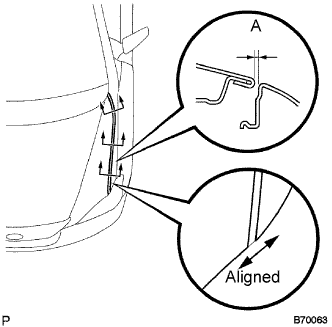
- Standard range A:
- 4.0 +- 1.5 mm (0.157 +- 0.059 in.)
Tighten the hood side hinge bolts after the adjustment.
- Torque:
- 13 N*m{ 133 kgf*cm , 10 ft.*lbf }
Adjust the height of the hood front end using the cushion rubber.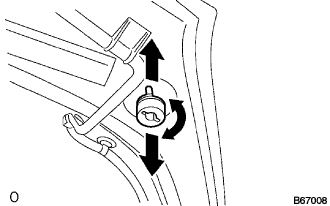
Adjust the cushion rubber so that the hood and the fender will be aligned.
- HINT:
- The cushion rubber moves up and down when turned.
Adjust the hood lock.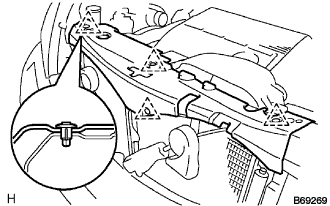
Remove the 4 clips and cool air intake duct seal.
Remove the 2 screws, disengage the 2 claws and remove the hood lock control cable cover.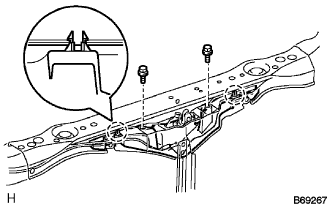
- HINT:
- If the cover is damaged, replace it with a new cover.
Using a screwdriver wrapped with protective tape, remove the nut cap.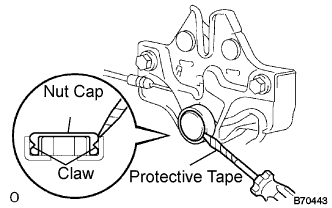
- NOTICE:
- Removing the nut cap damages the claw inside the nut cap. Therefore, the use of a new nut cap is necessary for installation.
Loosen the 3 bolts.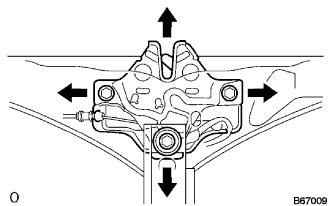
Adjust the hood lock position by moving the striker, so that the striker can enter smoothly.
- Torque:
- 8.0 N*m{ 82 kgf*cm , 71 in.*lbf }
- HINT:
- Perform this procedure after replacement of the centering bolt with the supplied one.
| 13. ADD ENGINE COOLANT |
Tighten the lower drain plug of the radiator.
Loosen the upper drain plug of the radiator.
Install a vinyl tube to the vent plug located on the upper drain plug.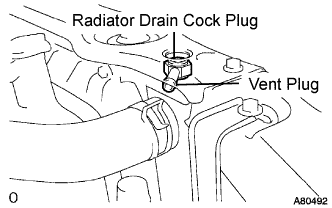
Fill the radiator with engine coolant until the vinyl tube is filled with the coolant.
Tighten the upper drain plug.
- CAUTION:
- Do not use an alcohol type coolant or plain water alone.
- The coolant must be mixed with plain water (preferably de-mineralized water).
- Capacity:
- 9.7 liters (10.3 US qts, 8.5 lmp.qts)
- Do not use an alcohol type coolant or plain water alone.
- HINT:
- Improper coolants may damage engine cooling system.
- Use "Toyota Long Life Coolant" or equivalent. Mix it with plain water according to the manufacturer's instruction.
- Using of coolant which includes more than 50% (freezing protection down to -35°C (-31°F) or 60% (freezing protection down to -50°C (-58°F) of ethylene-glycol is recommended but not more than 70%.
- Observe the coolant level inside the radiator by pressing the inlet and outlet radiator hoses several times by hand. If the coolant level goes down, add the coolant.
- Improper coolants may damage engine cooling system.
Install the radiator cap securely.
Fill the radiator reservoir tank with coolant.
Warm up the engine.
- HINT:
- Press the inlet and outlet radiator hoses several times by hand while warming up the engine.
Stop the engine and wait until the coolant cools down.
Remove the radiator cap and check the coolant level inside the radiator.
If the coolant level is below the full level, perform the steps from (a) through (j) and repeat the operation until the coolant level stays the full level.
Recheck the coolant level inside the radiator reservoir tank. If it is below the full level, add the coolant.
| 14. CHECK FOR ENGINE COOLANT LEAKS |
 |
- CAUTION:
- Do not remove the radiator cap while the engine and radiator are still hot. Thermal expansion will cause hot engine coolant and steam to blow out from the radiator.
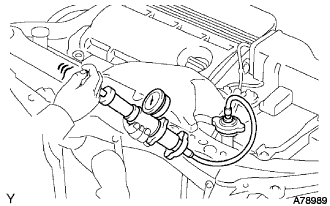
Fill the radiator with coolant and attach a radiator cap tester.
Warm up the engine.
Using a radiator cap tester, increase the pressure inside the radiator to 118 kPa (1.2 kgf*cm, 17 psi), and check that the pressure does not drop.
If the pressure drops, check the hoses, radiator and water pump for leaks. If no external leaks are found, check the heater core, cylinder block and cylinder head.