INSTALLATION
Removal / installation
| 1. INSTALL DUST COVER |

Using SST, steel plate and a press, install a new dust cover.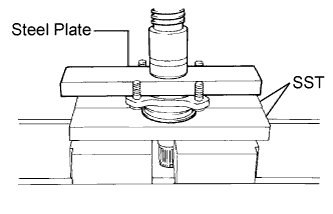

- SST
- 09527-21011
- NOTICE:
- Do not damage the dust cover.
| 2. INSTALL DIFFERENTIAL SIDE GEAR SHAFT SUB-ASSEMBLY |
Install a new snap ring.
Using SST, install the side gear shaft.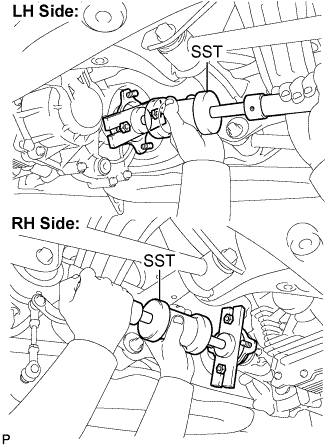
- SST
- 09520-24010
(09520-04010, 09520-32040)
- NOTICE:
- Set the snap ring with the opening side facing downward.
- Do not tap in the side gear shaft at an angle. If it is installed at an angle, replace the snap ring with a new one and tap in the shaft again.
- Do not damage the oil seal.
- Set the snap ring with the opening side facing downward.
Using vernier calipers, measure the distance between the right and left side gear shafts, as shown in the illustration.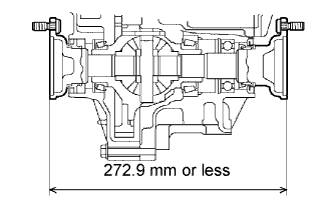
- Standard distance:
- 272.9 mm (107.44 in.) or less
| 3. INSTALL REAR DRIVE SHAFT ASSEMBLY |
Align the matchmarks.
Install the rear drive shaft assembly with the 4 nuts and washers.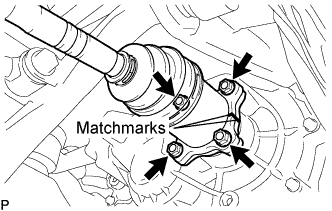
- Torque:
- 56 N*m{ 571 kgf*cm , 41 ft.*lbf }
| 4. TEMPORARILY TIGHTEN REAR SUSPENSION ARM ASSEMBLY NO.2 |
Jack up the rear axle carrier, placing a wooden block to avoid damage.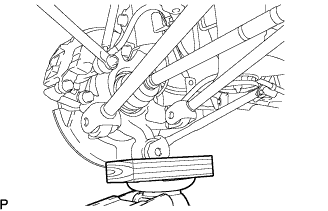
Temporarily tighten the rear suspension arm assembly No.2 with the bolt and nut.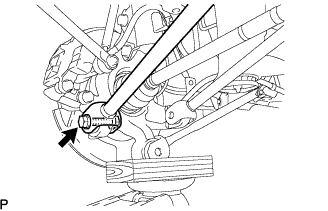
- HINT:
- Insert the bolt from the rear side of the vehicle and lightly tighten the bolt.
| 5. TEMPORARILY TIGHTEN REAR SUSPENSION ARM ASSEMBLY NO.1 |
Temporarily tighten the rear suspension arm assembly No.1 with the bolt and nut.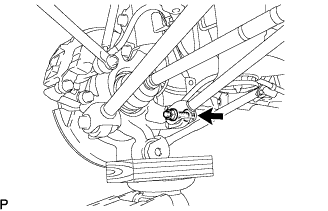
- HINT:
- Insert the bolt from the front side of the vehicle and lightly tighten the bolt.
| 6. TEMPORARILY TIGHTEN REAR STRUT ROD ASSEMBLY |
Temporarily tighten the strut rod assembly rear with the bolt and nut.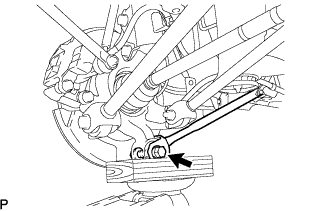
- HINT:
- Insert the bolt from the inside of the vehicle and lightly tighten the bolt.
| 7. STABILIZE SUSPENSION |
Jack up the rear axle carrier, placing a wooden block to avoid damage. Apply load to the suspension so that the rear drive shaft assembly is horizontally positioned.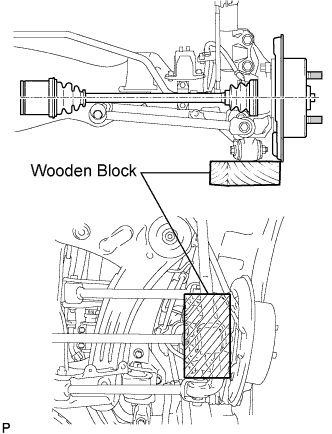
| 8. FULLY TIGHTEN REAR SUSPENSION ARM ASSEMBLY NO.2 |
Fully tighten the bolt.
- Torque:
- 112 N*m{ 1,140 kgf*cm , 83 ft.*lbf }
- NOTICE:
- Turn the bolt while holding the nut.
| 9. FULLY TIGHTEN REAR SUSPENSION ARM ASSEMBLY NO.1 |
Fully tighten the bolt.
- Torque:
- 112 N*m{ 1,140 kgf*cm , 83 ft.*lbf }
- NOTICE:
- Turn the bolt while holding the nut.
| 10. FULLY TIGHTEN REAR STRUT ROD ASSEMBLY |
Fully tighten the bolt.
- Torque:
- 80 N*m{ 816 kgf*cm , 59 ft.*lbf }
- NOTICE:
- Turn the bolt while holding the nut.
| 11. INSTALL HEIGHT CONTROL SENSOR |
Install the height control sensor with the 2 bolts.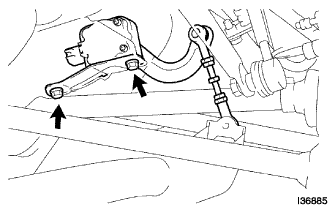
- Torque:
- 7.8 N*m{ 80 kgf*cm , 69 in.*lbf }
Install the height control sensor link with the "torx" nut.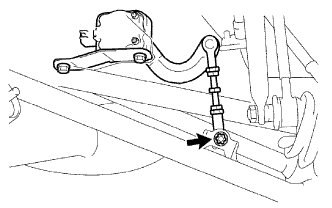
- Torque:
- 5.4 N*m{ 55 kgf*cm , 48 in.*lbf }
Connect the connector.
| 12. INSTALL REAR AXLE SHAFT NUT |
Using a socket wrench (30mm), install a new rear axle shaft nut.
- Torque:
- 294 N*m{ 3,000 kgf*cm , 217 ft.*lbf }
Using a chisel and hammer, stake the rear axle shaft nut.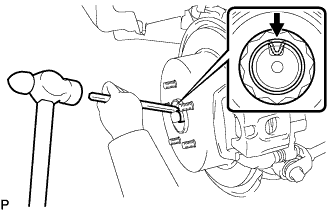
| 13. INSPECT AND ADJUST REAR WHEEL ALIGNMENT |
| 14. INSTALL EXHAUST PIPE ASSEMBLY (for RH Side) |
| 15. INSTALL REAR WHEEL |
| 16. CONNECT CABLE TO NEGATIVE BATTERY TERMINAL (for RH Side) |
| 17. ADD AND INSPECT HYBRID TRANSAXLE FLUID |
Check that the oil surface is within 5 mm (0.20 in.) from the lowest position of the inner surface of the transaxle filler plug opening.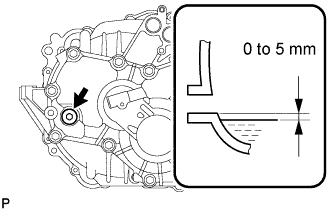
- Transaxle fluid quantity:
- 1.8 L (1.9 US qts, 1.6 Imp. qts)
- NOTICE:
- Stop the vehicle on a flat road.
- Recheck the transaxle oil level after driving when exchanging oil.
- Insufficient or excessive amounts of transaxle oil may be the cause of some trouble.
- Stop the vehicle on a flat road.
Check for leaks if the quantity of oil is low.
Using a socket hexagon wrench 10 mm, install the filler plug and a new gasket.
- Torque:
- 39 N*m{ 398 kgf*cm , 29 ft.*lbf }
| 18. HEADLIGHT AIM ONLY (for RH Side) |
| 19. PERFORM INITIALIZATION (for RH Side) |