P2A00 Air-Fuel Ratio (A/F) sensor circuit slow response:Under condition (a), (b) and (c), A/F sensor output voltage...
Diagnostic trouble codes
DESCRIPTION
- DTC P2A00 indicates malfunctions related to the bank 1 A/F sensor.
- DTC P2A03 indicates malfunctions related to the bank 2 A/F sensor.
- Bank 1 refers to the bank that includes cylinder No. 1.
- Bank 2 refers to the bank that includes cylinder No. 2.
- Sensor 1 refers to the sensor mounted in front of the Three-Way Catalytic Converter (TWC) and located near the engine assembly.
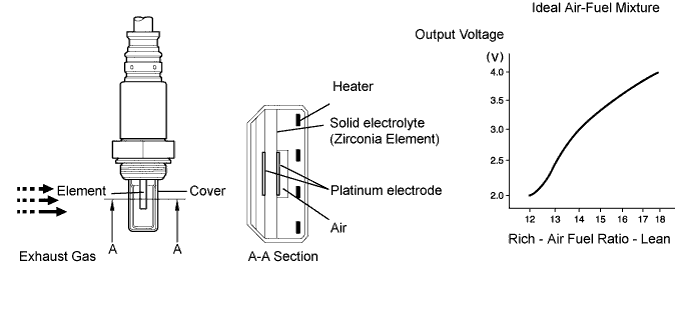
The A/F sensor is the planar type and is integrated with the heater, which heats the solid electrolyte (zirconia element). This heater is controlled by the ECM. When the intake air volume is low (the exhaust gas temperature is low), a current flows into the heater to heat the sensor, in order to facilitate accurate oxygen concentration detection. In addition, the sensor and heater portions are narrower than the conventional type. The heat generated by the heater is conducted to the solid electrolyte though the alumina, therefore the sensor activation is accelerated.
In order to obtain a high purification rate of the carbon monoxide (CO), hydrocarbon (HC) and nitrogen oxide (NOx) components in the exhaust gas, a TWC is used. For the most efficient use of the TWC, the air-fuel ratio must be precisely controlled so that it is always close to the stoichiometric level.
*: Value changes inside the ECM. Since the A/F sensor is the current output element, a current is converted to a voltage inside the ECM. Any measurements taken at the A/F sensor or ECM connectors will show a constant voltage.

| DTC No. |
DTC Detection Condition |
Trouble Area |
| P2A00 P2A03 |
|
|
WIRING DIAGRAM
Refer to DTC P2195 (Click here).INSPECTION PROCEDURE
- HINT:
- Intelligent tester only:
- Malfunctioning areas can be identified by performing the A/F Control function provided in the Active Test. The A/F Control function can help to determine whether the Air-fuel Ratio (A/F) sensor, Heated Oxygen (HO2) sensor and other potential trouble areas are malfunctioning.
- Connect the intelligent tester to the DLC3.
- Put the engine in inspection mode (Click here).
- Start the engine and turn the tester ON.
- Warm up the engine at an engine speed of 2,500 rpm for approximately 90 seconds.
- On the intelligent tester, enter the following menus: Powertrain / Engine / Active Test / Control the Injection Volume for A/F Sensor.
- Perform the A/F Control operation with the engine in an idling condition (press the Right or Left button to change the fuel injection volume).
- Monitor the output voltages of the A/F and HO2 sensors (AFS B1S1 and O2S B1S2 or AFS B2S1 and O2S B2S2) displayed on the tester.
- HINT:
- The A/F Control operation lowers the fuel injection volume by 12.5 % or increases the injection volume by 25 %.
- The A/F Control operation lowers the fuel injection volume by 12.5 % or increases the injection volume by 25 %.
- Each sensor reacts in accordance with increases in the fuel injection volume.
- Each sensor reacts in accordance with increases in the fuel injection volume.
- Standard:
Tester Display
(Sensor)
Injection Volume
Status
Voltage
AFS B1S1 or AFS B2S1
(A/F)
+25 %
Rich
Less than 3.0
AFS B1S1 or AFS B2S1
(A/F)
-12.5 %
Lean
More than 3.35
O2S B1S2 or O2S B2S2
(HO2)
+25 %
Rich
More than 0.55
O2S B1S2 or O2S B2S2
(HO2)
-12.5 %
Lean
Less than 0.4
- NOTICE:
- The Air-Fuel Ratio (A/F) sensor has an output delay of a few seconds and the Heated Oxygen (HO2) sensor has a maximum output delay of approximately 20 seconds.
| Case |
A/F Sensor (Sensor 1) Output Voltage |
HO2 Sensor (Sensor 2) Output Voltage |
Main Suspected Trouble Area |
||
| 1 |
Injection Volume +25 % -12.5 % |
 |
Injection Volume +25 % -12.5 % |
|
- |
| Output Voltage More than 3.35 V Less than 3.0 V |
 |
Output Voltage More than 0.55 V Less than 0.4 V |
 |
||
| 2 |
Injection Volume +25 % -12.5 % |
|
Injection Volume +25 % -12.5 % |
|
|
| Output Voltage Almost no reaction |
 |
Output Voltage More than 0.55 V Less than 0.4 V |
|
||
| 3 |
Injection Volume +25 % -12.5 % |
|
Injection Volume +25 % -12.5 % |
|
|
| Output Voltage More than 3.35 V Less than 3.0 V |
|
Output Voltage Almost no reaction |
|
||
| 4 |
Injection volume +25 % -12.5 % |
|
Injection Volume +25 % -12.5 % |
|
|
| Output Voltage Almost no reaction |
|
Output Voltage Almost no reaction |
|
||
- HINT:
- DTC P2A00 or P2A03 may be also set, when the air-fuel ratio is stuck rich or lean.
- A low A/F sensor voltage could be caused by a rich air-fuel mixture. Check for conditions that would cause the engine to run rich.
- A high A/F sensor voltage could be caused by a lean air-fuel mixture. Check for conditions that would cause the engine to run lean.
- Read freeze frame data using the intelligent tester. The ECM records vehicle and driving condition information as freeze frame data the moment a DTC is stored. When troubleshooting, freeze frame data can help determine if the vehicle was running or stopped, if the engine was warmed up or not, if the air-fuel ratio was LEAN or RICH, and other data from the time the malfunction occurred.
- DTC P2A00 or P2A03 may be also set, when the air-fuel ratio is stuck rich or lean.
| 1. CHECK ANY OTHER DTCS OUTPUT (IN ADDITION TO DTC P2A00 AND/OR P2A03) |

Connect the intelligent tester to the DLC3.
Turn the ignition switch ON.
Turn the tester ON.
Enter the following menus: Powertrain / Engine / DTC.
Read DTCs.
- Result:
Display (DTC Output)
Proceed to
P2A00 and/or P2A03
A
P2A00 and/or P2A03 and other DTCs
B
- HINT:
- If any DTCs other than P2A00 or P2A03 are output, troubleshoot those DTCs first.
|
|
||||

| A | |
 |
| 2. READ VALUE USING INTELLIGENT TESTER (OUTPUT VOLTAGE OF A/F SENSOR) |
Connect the intelligent tester to the DLC3.
Put the engine in inspection mode (Click here).
Start the engine.
Turn the tester ON.
Warm up the Air-Fuel Ratio (A/F) sensor at an engine speed of 2,500 rpm for 90 seconds.
On the tester, enter the following menus: Powertrain / Engine / Data List / Custom List/ AFS B1S1 or AFS B2S1 and Engine Speed / Record.
Check the the A/F sensor voltage three times, when the enigne is in each of the following conditions:
While idling (check for at least 30 seconds)
At an engine speed of approximately 2,500 rpm (without any sudden changes in engine speed)
Raise the engine speed to 4,000 rpm and then quickly release the accelerator pedal so that the throttle valve is fully closed.
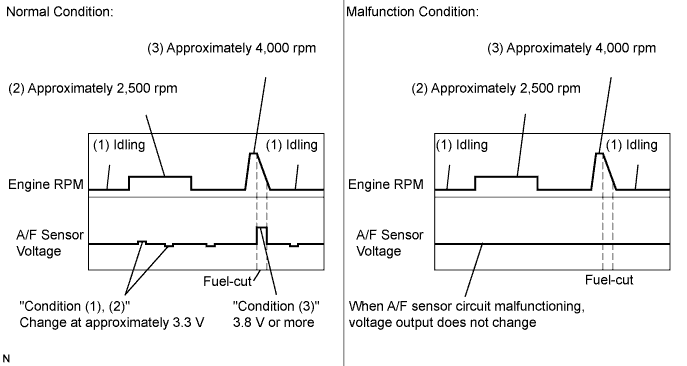
- Standard voltage:
Condition
A/F Sensor Voltage Variation
Reference
(1) and (2)
Changes at approximately 3.3 V
Between 3.1 V and 3.5 V
(3)
Increases to 3.8 V or more
This occurs during engine deceleration
when fuel-cut performed
- HINT:
- For more information, see the diagrams below.
- HINT:
- If the output voltage of the A/F sensor remains at approximately 3.3 V (see Malfunction Condition diagram) under any conditions, including those above, the A/F sensor may have an open circuit. (this will also happen if the A/F sensor heater has an open circuit.)
- If the output voltage of the A/F sensor remains at either approximately 3.8 V or more, or 2.8 V or less (see Malfunction Condition diagram) under any conditions, including those above, the A/F sensor may have a short circuit.
- The ECM (Included in HV Control ECU) stops fuel injection (fuel cut) during engine deceleration. This causes a lean condition and result in a momentary increase in the A/F sensor output voltage.
- The ECM must establish a closed throttle valve position learning value to perform fuel cut. If the battery terminal has been reconnected, the vehicle must be driven over 10 mph (16 km/h) to allow the ECM terminal has been reconnected, the vehicle must be driven over 10 mph (16 km/h) to allow the ECM to learn the closed throttle valve position.
- When the vehicle is driven: The output voltage of the A/F sensor may be below 2.8 V during fuel enrichment. For the vehicle, this translates to a sudden increase in speed with the accelerator pedal fully depressed when trying to overtake another vehicle. The A/F sensor is functioning normally.
- The A/F sensor is a current output element; therefore, the current is converted into a voltage inside the ECM. Measuring the voltage at the connectors of the A/F sensor or ECM will show a constant voltage result.
- If the output voltage of the A/F sensor remains at approximately 3.3 V (see Malfunction Condition diagram) under any conditions, including those above, the A/F sensor may have an open circuit. (this will also happen if the A/F sensor heater has an open circuit.)
|
|
||||

| OK | |
|
| 3. PERFORM CONFIRMATION DRIVING PATTERN |
| NEXT | |
|
| 4. CHECK WHETHER DTC OUTPUT RECURS (DTC P2A00 AND/OR P2A03) |
Read DTCs using the intelligent tester.
Enter the following menus: Powertrain / Engine / DTC / Pending.
- Result:
Display (DTC Output)
Proceed to
P2A00 and/or P2A03
A
No output
B
|
|
||||
| A | |
|
| 5. REPLACE AIR FUEL RATIO SENSOR |
| NEXT | |
|
| 6. PERFORM CONFIRMATION DRIVING PATTERN |
| NEXT | |
|
| 7. CHECK WHETHER DTC OUTPUT RECURS (DTC P2A00 AND/OR P2A03) |
Read DTCs using the intelligent tester.
Enter the following menus: Powertrain / Engine / DTC / Pending.
- Result:
Display (DTC Output)
Proceed to
No output
A
P2A00 and/or P2A03
B
|
|
||||
| A | |
|
| 8. CONFIRM WHETHER VEHICLE HAS RUN OUT OF FUEL IN PAST |
|
|
||||
| YES | ||
 |
||
| ||
| 9. INSPECT AIR FUEL RATIO SENSOR |
Disconnect the A3 or A4 A/F sensor connector.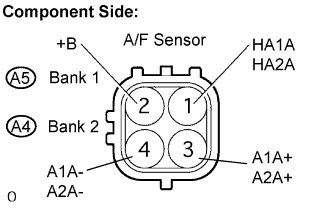
Measure the resistance between the terminals of the A/F sensor connector.
- Standard resistance:
Tester Connection
Specified Condition
HA1A, HA2A (1) - +B (2)
1.8 Ω to 3.4 Ω at 20°C (68°F)
HA1A, HA2A (1) - A1A-, A2A- (4)
10 kΩ or higher
Reconnect the A/F sensor connector.
|
|
||||
| OK | |
|
| 10. INSPECT A/F RELAY |
Remove the A/F relay from the engine room R/B.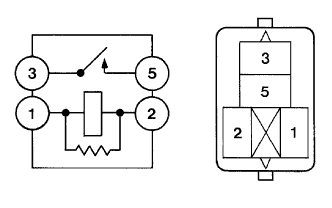
Measure A/F relay resistance.
- Standard resistance:
Tester Connection
Specified Condition
3 - 5
10 kΩ or higher
3 - 5
Below 1 Ω
(when battery voltage applied to terminals 1 and 2)
Reinstall the A/F relay.
|
|
||||
| OK | |
|
| 11. CHECK HARNESS AND CONNECTOR (A/F SENSOR -HV CONTROL ECU) |
Disconnect the A3 and A4 A/F sensor connector.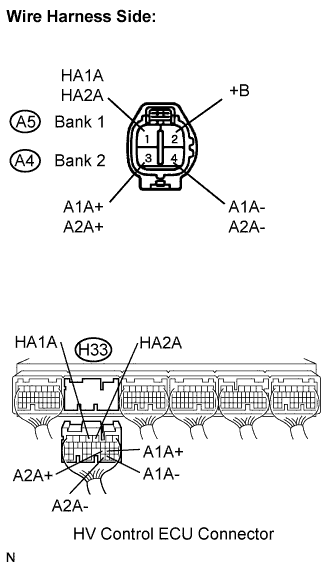
Turn the ignition switch ON.
Measure the voltage between the +B terminal of the A/F sensor connector and body ground.
- Standard voltage:
Tester Connection
Specified Condition
+B (2) - Body ground
9 to 14 V
Turn the ignition switch off.
Disconnect the H33 HV Control ECU connector.
Measure the resistance between the terminals of the A/F sensor and HV Control ECU.
- Standard resistance (Check for open):
Tester Connection
Specified Condition
HA1A ( A4-1) - HA1A (H33-4)
Below 1 Ω
A1A+ (A4-3) - A1A+ (H33-22)
Below 1 Ω
A1A- (A4-4) - A1A- (H33-30)
Below 1 Ω
HA2A (A3-1) - HA2A (H33-3)
Below 1 Ω
A2A+ (A3-3) - A2A+ (H33-23)
Below 1 Ω
A2A- (A3-4) - A2A- (H33-31)
Below 1 Ω
- Standard resistance (Check for short):
Tester Connection
Specified Condition
HA1A( A4-1) or HA1A (H33-4) - Body ground
10 kΩ or higher
A1A+ (A4-3) or A1A+ (H33-22) - Body ground
10 kΩ or higher
A1A- (A4-4) or A1A- (H33-30) - Body ground
10 kΩ or higher
HA2A (A3-1) or HA2A (H33-3) - Body ground
10 kΩ or higher
A2A+ (A3-3) or A2A+ (H33-23) - Body ground
10 kΩ or higher
A2A- (A3-4) or A2A- (H33-31) - Body ground
10 kΩ or higher
Reconnect the HV Control ECU connector.
Reconnect the A/F sensor connector.
|
|
||||
| OK | |
|
| 12. CHECK AIR INDUCTION SYSTEM |
Check the air induction system for vacuum leakage.
- OK:
- No leakage from air induction system.
|
|
||||
| OK | |
|
| 13. CHECK PCV HOSE |
- OK:
- PCV hose is connected correctly and is not damaged.
|
|
||||
| OK | |
|
| 14. CHECK FUEL PRESSURE |
Check the fuel pressure (Click here).
- Standard:
- 304 to 343 kPa (3.1 to 3.5 kgf/cm2, 44.1 to 49.7 psi)
|
|
||||
| OK | |
|
| 15. INSPECT FUEL INJECTOR |
Check the injector injection (Click here).
- Standard:
- 13 cm3 (0.8 cu in.) or less
|
|
||||
| OK | |
|
| 16. REPLACE AIR FUEL RATIO SENSOR |
| NEXT | |
|
| 17. PERFORM CONFIRMATION DRIVING PATTERN |
| NEXT | |
|
| 18. CHECK WHETHER DTC OUTPUT RECURS (DTC P2A00 AND/OR P2A03) |
Read DTCs using the intelligent tester.
Enter the following menus: DIAGNOSIS / ENHANCED OBD II / DTC INFO / PENDING CODES.
- Result:
Display (DTC Output)
Proceed to
No output
A
P2A00 and/or P2A03
B
|
|
||||
| A | |
|
| 19. CONFIRM WHETHER VEHICLE HAS RUN OUT OF FUEL IN PAST |
|
|
||||
| YES | ||
|
||
| ||