INSTALLATION
Removal / installation
| 1. INSTALL QUARTER WINDOW ASSEMBLY LH |

Clean and shape the contact surface of the vehicle body.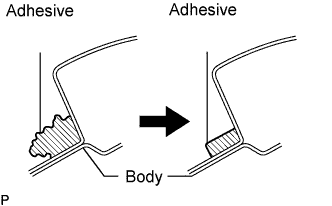

Using a knife, cut away any rough adhesive on the contact surface of the vehicle body to ensure the appropriate surface shape.
- HINT:
- Leave as much adhesive on the vehicle body as possible.
Clean the contact surface of the vehicle body with a piece of shop rag saturated with cleaner.
- HINT:
- Even if all the adhesive has been removed, clean the vehicle body.
Using a brush, coat the exposed part of the vehicle body with Primer M.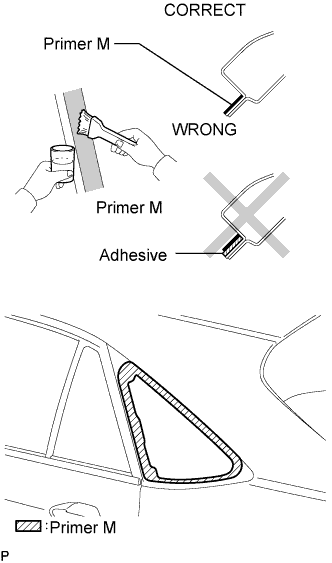
- NOTICE:
- Allow the primer coating to dry for 3 minutes or more.
- Do not coat the adhesive with Primer M.
- Do not keep any of the opened Primer M for later use.
- Allow the primer coating to dry for 3 minutes or more.
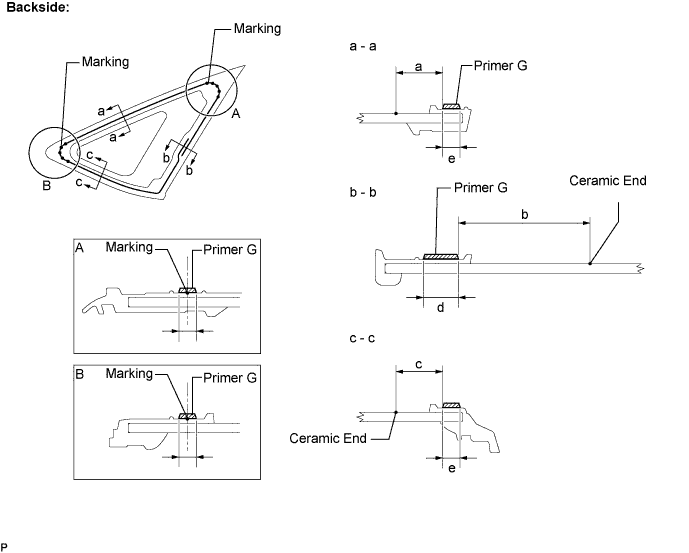
Using a brush or sponge, coat the edge of the glass and the contact surface with Primer G.
- NOTICE:
- Allow the primer coating to dry for 3 minutes or more.
- Do not keep any of the opened Primer G for later use.
- Allow the primer coating to dry for 3 minutes or more.
- Standard dimension:
Area
Dimension
a
9.0 mm (0.354 in.)
b
52.0 mm (2.047 in.)
c
17.0 mm (0.669 in.)
d
12.0 mm (0.472 in.)
e
6.0 mm (0.236 in.)
- HINT:
- If an area other than that specified is coated by accident, wipe off the primer with a clean shop rag before it dries.
Apply adhesive (Adhesive: Part No. 08850-00801 or equivalent).
Cut off the tip of the cartridge nozzle, as shown in the illustration.
- HINT:
- After cutting off the tip, use all adhesive within the time described in the table below.
- Tackfree time:
Temperature
Tackfree Time
35°C (95°F)
15 minutes
20°C (68°F)
1 hour 40 minutes
5°C (41°F)
8 hours
Load the sealer gun with the cartridge.
Coat the glass with adhesive, as shown in the illustration.
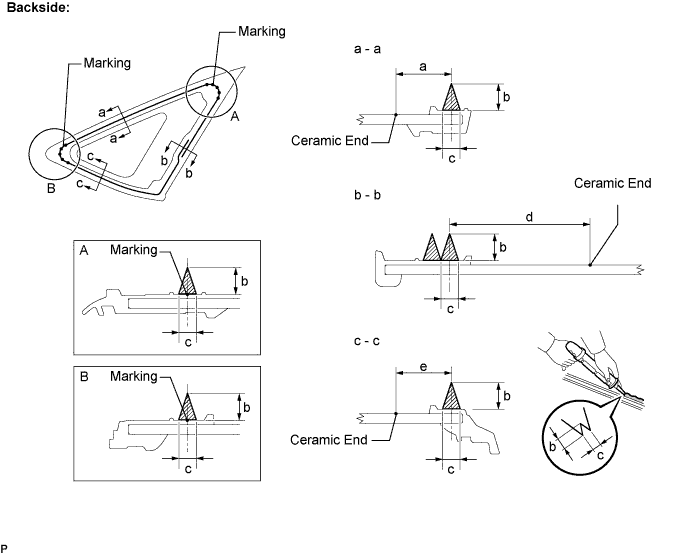
- Standard dimension:
Area
Dimension
a
12.0 mm (0.472 in.)
b
8.0 mm (0.315 in.)
c
6.0 mm (0.236 in.)
d
550 mm (21.654 in.)
e
20 mm (0.787 in.)
Install the glass to the vehicle body.
Hold the glass in place securely with tape or equivalent to the vehicle body until the adhesive has hardened.
- NOTICE:
- Allow the primer coating to dry for 3 minutes or more.
- Check that the clips are attached to the vehicle body correctly.
- Check the clearance between the vehicle body and glass.
- Allow the primer coating to dry for 3 minutes or more.
Lightly press the front surface of the glass to ensure a close fit.
Using a scraper, remove any excess or protruding adhesive.
- NOTICE:
- Take care not to drive the vehicle for the time described in the table below.
- Minimum time:
Temperature
Minimum time prior to driving vehicle
35°C (95°F)
1 hour 30 minutes
20°C (68°F)
5 hours
5°C (41°F)
24 hours
| 2. CHECK FOR LEAKS AND REPAIR |
Conduct a leak test after the adhesive has completely hardened.
Seal any leaks with auto glass sealer.
| 3. INSTALL ROOF SIDE GARNISH ASSEMBLY INNER LH |
Engage the 7 clips and install the roof side garnish assembly inner.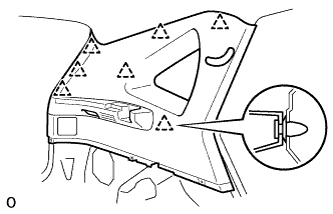
Install the 3 clips.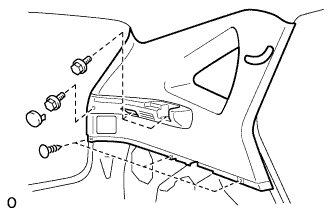
Install the 3 bolts and tonneau cover holder cap.
Engage the 4 claws and install the seat belt bezel.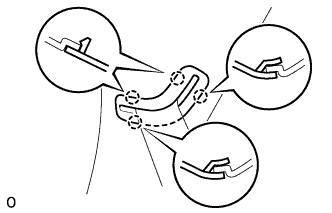
| 4. INSTALL ROOM LIGHT ASSEMBLY NO.2 |
Connect the connector.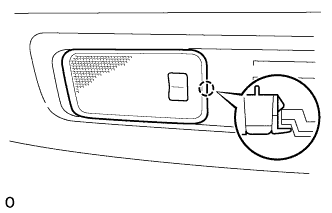
Engage the claw and install the room light assembly No.2.
| 5. INSTALL DECK TRIM SIDE PANEL ASSEMBLY LH |
Engage the 2 clips and install the deck trim side panel assembly.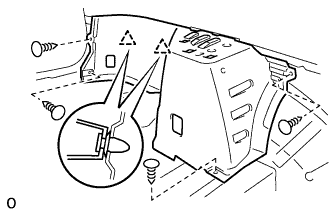
Install the 4 clips.
| 6. INSTALL ROPE HOOK |
Install the 2 rope hooks with the 2 bolts.
- Torque:
- 8.0 N*m{ 80 kgf*cm , 71 in.*lbf }
- HINT:
- Use the same procedure to install the other side.
| 7. INSTALL REAR SEAT SIDE COVER LH |
Engage the 4 clips and install the rear seat side cover.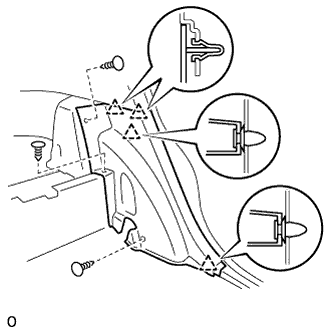
Install the 3 clips.
| 8. INSTALL REAR NO.1 SEAT BELT ASSEMBLY OUTER LH |
Install the rear No.1 seat outer belt assembly with the bolt.
- Torque:
- 42 N*m{ 428 kgf*cm , 31 ft.*lbf }
| 9. INSTALL DECK SIDE TRIM COVER LH |
Engage the 5 claws and install the deck side trim cover.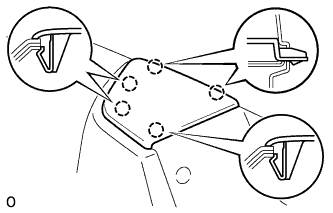
| 10. INSTALL REAR FLOOR FINISH SIDE PLATE LH |
Engage the 2 clips and install the rear floor finish side plate.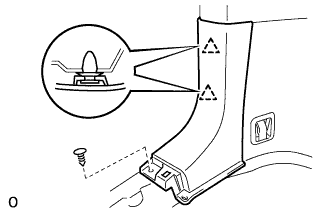
Install the clip.
| 11. INSTALL REAR FLOOR FINISH PLATE |
Engage the 2 claws and 6 clips, and install the rear floor finish plate.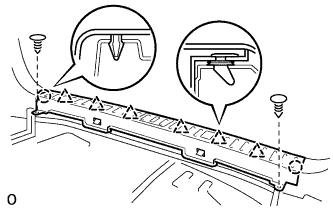
Install the 2 clips.
| 12. INSTALL DECK SIDE TRIM BOX LH |
Install the deck side trim box with the 2 clips.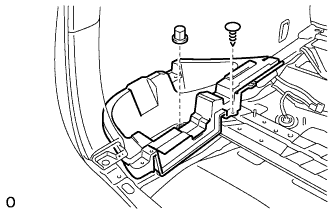
| 13. INSTALL DECK SIDE TRIM BOX RH |
| 14. INSTALL JACK CARRIER ASSY |
| 15. INSTALL BACK DOOR WEATHERSTRIP |
| 16. INSTALL NO.2 DECK BOARD SUB-ASSEMBLY |
Install the deck No.2 board sub-assembly with the 4 bolts and 2 nuts.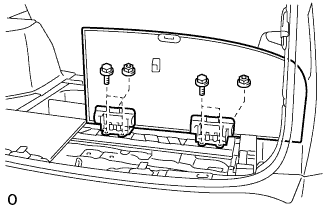
| 17. INSTALL NO.3 DECK BOARD SUB-ASSEMBLY |
Install the deck No.3 board sub-assembly with the 2 bolts and 2 nuts.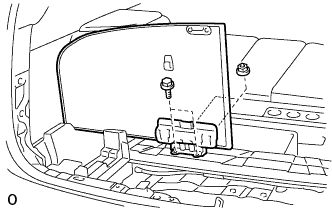
| 18. INSTALL DECK FLOOR BOX REAR |
Install the deck floor box rear with the 2 clips.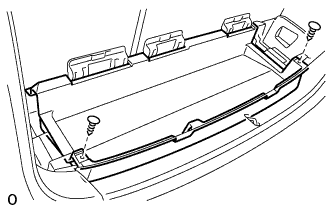
| 19. INSTALL DECK FLOOR BOX FRONT |
Install the deck floor box front with the 2 clips.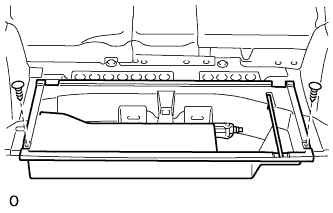
| 20. INSTALL TONNEAU COVER ASSEMBLY |
| 21. INSTALL DECK BOARD SUB-ASSEMBLY |
Install the deck board sub-assembly with the 2 bolt.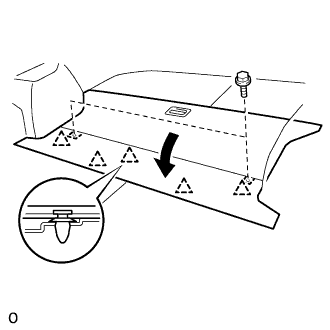
Engage the 5 clips.
| 22. INSTALL REAR DOOR OPENING TRIM WEATHERSTRIP LH |
| 23. INSTALL REAR DOOR SCUFF PLATE LH |
Connect the connector. (w/ illumination scuff plate)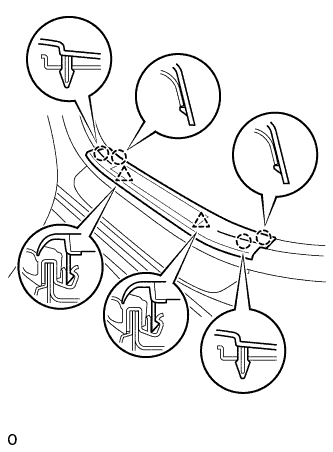
Engage the 4 claws and 2 clips, and install the rear door scuff plate.
| 24. CONNECT CABLE TO NEGATIVE BATTERY TERMINAL |
| 25. PERFORM INITIALIZATION |
- NOTICE:
- Some systems need initialization when disconnecting the cable from the negative (-) battery terminal (Click here).