REASSEMBLY
Removal / installation
| 1. INSTALL REAR SEAT TRACK ASSEMBLY INNER |
| 2. INSTALL REAR SEAT TRACK ASSEMBLY OUTER |
| 3. INSTALL REAR SEAT TRACK ADJUSTING HANDLE |
| 4. INSTALL FOLD SEAT CUSHION FRAME NO.2 |

Install the 2 fold seat cushion frame No.2 with the 4 nuts.
- Torque:
- 42 N*m{ 428 kgf*cm , 31 ft.*lbf }
| 5. INSTALL REAR SEATBACK FRAME SUB-ASSEMBLY LOWER |
Temporarily install the rear seatback frame sub-assembly lower with the 5 "torx" bolts.
Using a "torx" socket wrench (T55), tighten the 2 "torx" bolts.
- Torque:
- 80 N*m{ 816 kgf*cm , 59 ft.*lbf }
Using a "torx" socket wrench (T45), tighten the 3 "torx" bolts.
- Torque:
- 42 N*m{ 428 kgf*cm , 31 ft.*lbf }
| 6. INSTALL RECLINING CONTROL LINK SUB-ASSEMBLY |
Install the reclining control link sub-assembly with the bolt and 4 nuts.
- Torque:
- Bolt:
- 21 N*m{ 214 kgf*cm , 16 ft.*lbf }
- Nut:
- 42 N*m{ 428 kgf*cm , 31 ft.*lbf }
Install the 2 springs and 2 new E-rings.
| 7. INSTALL SEAT TRACK STOP PLATE |
Install the seat track stop plate with the 2 nuts.
- Torque:
- 18 N*m{ 184 kgf*cm , 13 ft.*lbf }
Install the 2 seat track stop plate cables.
Install the clamp.
| 8. INSTALL REAR SEATBACK FRAME SUB-ASSEMBLY |
Temporarily install the rear seatback frame sub-assembly with the 2 bolts and 2 "torx" bolts.
Tighten the 2 bolts.
- Torque:
- 55 N*m{ 561 kgf*cm , 41 ft.*lbf }
Using a "torx" socket wrench (T45), tighten the 2 "torx" bolts.
- Torque:
- 42 N*m{ 428 kgf*cm , 31 ft.*lbf }
| 9. INSTALL REAR SEAT RECLINING CONTROL CABLE |
| 10. INSTALL REAR SEAT COVER NO.2 |
| 11. INSTALL REAR SEAT COVER NO.1 |
| 12. INSTALL REAR SEAT RECLINING COVER INNER RH |
| 13. INSTALL FOLD SEAT STOPPER BAND ASSEMBLY NO.1 |
| 14. INSTALL REAR SEAT SHOULDER BELT COVER |
| 15. INSTALL REAR CENTER SEAT OUTER BELT ASSEMBLY |
Check the degree of tilt when the ELR begins to lock.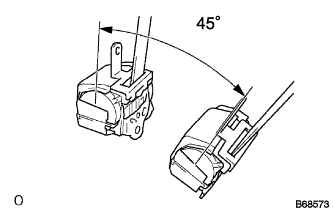

Check that the belt does not lock at less than 15 degrees of tilt in any direction but locks at over 45 degrees of tilt when gently moving the installed retractor.
- NOTICE:
- Do not disassemble the retractor.
Install the rear center seat outer belt assembly with the bolt and nut.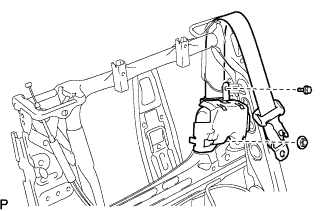
- Torque:
- Bolt:
- 7.5 N*m{ 77 kgf*cm , 66 in.*lbf }
- Nut:
- 42 N*m{ 428 kgf*cm , 31 ft.*lbf }
| 16. INSTALL SEPARATE TYPE REAR SEATBACK PAD |
| 17. INSTALL SEPARATE TYPE REAR SEATBACK COVER |
Using hog ring pliers, install the separate type rear seatback cover to the separate type rear seatback pad with new hog rings.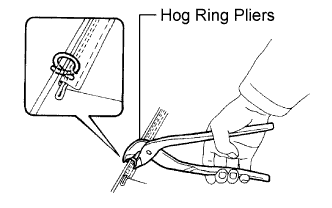
- NOTICE:
- Be careful not to damage the cover.
- When installing the hog rings, take care to minimize wrinkles as much as possible.
- Be careful not to damage the cover.
| 18. INSTALL SEPARATE TYPE REAR SEATBACK COVER WITH PAD |
Install the separate type rear seatback cover with pad to the rear seatback frame sub-assembly.
Install the hook and new hog rings.
Install the rear seat belt hook with the bolt.
- Torque:
- 6.0 N*m{ 61 kgf*cm , 53 in.*lbf }
Install the 2 clips.
Install the floor anchor side of the rear seat belt assembly outer center with the bolt.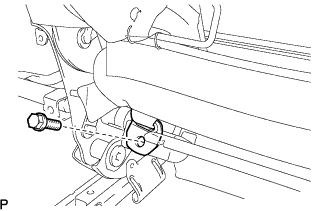
- Torque:
- 42 N*m{ 428 kgf*cm , 31 ft.*lbf }
Check if the ELR locks.
- NOTICE:
- The check should be performed with the outer belt assembly installed.
With the belt assembly installed, check that the belt locks when it is pulled out quickly.
| 19. INSTALL REAR SEATBACK LOCK BEZEL UPPER |
| 20. INSTALL REAR SEAT HEADREST SUPPORT |
| 21. INSTALL REAR SEAT HEADREST SUPPORT |
| 22. INSTALL REAR SEAT LOCK CONTROL LEVER SUB-ASSEMBLY |
| 23. INSTALL REAR SEATBACK LOCK STRIKER COVER |
| 24. INSTALL REAR SEAT HEADREST ASSEMBLY |
| 25. INSTALL REAR SEAT BELT ASSEMBLY INNER |
Install the rear seat belt assembly inner with the bolt.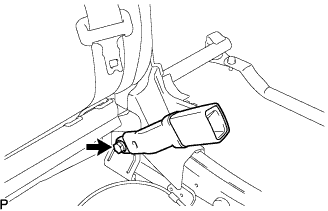
- Torque:
- 42 N*m{ 428 kgf*cm , 31 ft.*lbf }
| 26. INSTALL REAR SEAT CUSHION PAD |
| 27. INSTALL SEPARATE TYPE REAR SEAT CUSHION COVER |
Using hog ring pliers, install the separate type rear seat cushion cover to the rear seat cushion pad with new hog rings.
- NOTICE:
- Be careful not to damage the cover.
- When installing the hog rings, take care to minimize wrinkles as much as possible.
- Be careful not to damage the cover.
| 28. INSTALL REAR SEAT CUSHION FRAME SUB-ASSEMBLY |
| 29. INSTALL SEPARATE TYPE REAR SEAT CUSHION ASSEMBLY |
Temporarily install the separate type rear seat cushion assembly with the 2 bolts and 2 "torx" bolts.
Tighten the 2 bolts.
- Torque:
- 18 N*m{ 184 kgf*cm , 13 ft.*lbf }
Install new hog rings.
Using a "torx" socket wrench (T45), tighten the 2 "torx" bolts.
- Torque:
- 21 N*m{ 214 kgf*cm , 16 ft.*lbf }
| 30. INSTALL REAR SEAT CUSHION MOULDING REAR RH |
| 31. INSTALL REAR SEAT CUSHION MOULDING RH |
| 32. INSTALL CENTER SEATBACK FRAME SUB-ASSEMBLY |
| 33. INSTALL NO.2 CENTER SEATBACK COVER |
| 34. INSTALL NO.1 SEATBACK COVER |
| 35. INSTALL REAR SEAT HEADREST SUPPORT |
| 36. INSTALL REAR SEAT HEADREST SUPPORT |
| 37. INSTALL REAR SEAT CENTER ARMREST SUPPORT |
| 38. INSTALL REAR SEAT ARMREST ASSEMBLY CENTER |
Temporarily install the rear seat armrest assembly center with the nut and rear seat center armrest support.
Using a "torx" socket wrench (T45), install the rear seat armrest assembly center with the 2 "torx" bolts.
- Torque:
- 21 N*m{ 214 kgf*cm , 16 ft.*lbf }
| 39. INSTALL REAR SEATBACK MOULDING RH |
| 40. INSTALL REAR SEATBACK MOULDING LH |
| 41. INSTALL REAR SEAT CUSHION SPRING NO.2 |
Using a "torx" socket wrench (T45), install the rear seat cushion spring No.2 with the "torx" bolt.
- Torque:
- 21 N*m{ 214 kgf*cm , 16 ft.*lbf }
| 42. INSTALL REAR SEATBACK HINGE SUB-ASSEMBLY CENTER |
Using a "torx" socket wrench (T45), install the 2 rear seatback hinge sub-assembly centers with the 2 "torx" bolts.
- Torque:
- 21 N*m{ 214 kgf*cm , 16 ft.*lbf }
| 43. INSTALL RECLINING COVER PROTECTOR RH |
| 44. INSTALL CENTER SEATBACK ASSEMBLY |
Temporarily install the center seatback assembly with the 3 bolts and "torx" bolt.
Tighten the 3 bolts.
- Torque:
- 21 N*m{ 214 kgf*cm , 16 ft.*lbf }
Using a "torx" socket wrench (T45), tighten the "torx" bolt.
- Torque:
- 21 N*m{ 214 kgf*cm , 16 ft.*lbf }
Install the screw.
| 45. INSTALL CENTER SEAT HINGE COVER UPPER LH |
| 46. INSTALL RECLINING COVER PROTECTOR LH |
| 47. INSTALL REAR SEATBACK BOARD CARPET ASSEMBLY |
| 48. INSTALL REAR SEATBACK COVER |
| 49. INSTALL REAR SEAT HEADREST ASSEMBLY CENTER |