REMOVAL
Removal / installation
| 1. REMOVE REAR SEAT TRACK BRACKET COVER INNER |

40/20/40 Split Seat Type (Click here)
| 2. REMOVE REAR SEAT ASSEMBLY RH |
40/20/40 Split Seat Type (Click here)
| 3. REMOVE REAR SEATBACK COVER (for 60/40 Split Seat Type) |
Using a moulding remover, disengage the 8 claws and remove the 2 rear seatback covers.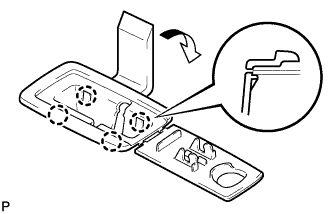

| 4. REMOVE REAR SEATBACK BOARD CARPET ASSEMBLY (for 60/40 Split Seat Type) |
Release the 4 rubber bands on the backside of the rear seatback board carpet assembly.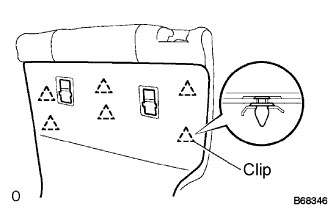
Disengage the 6 clips and remove the rear seatback board carpet assembly.
| 5. REMOVE RECLINING COVER PROTECTOR LH |
40/20/40 Split Seat Type (Click here)
| 6. REMOVE CENTER SEAT HINGE COVER UPPER LH |
40/20/40 Split Seat Type (Click here)
| 7. REMOVE CENTER SEATBACK ASSEMBLY (for 60/40 Split Seat Type) |
Remove the screw.
Using a "torx" socket wrench (T45), remove the 2 "torx" bolts.
Remove the 3 bolts and center seatback assembly.
| 8. REMOVE CENTER SEAT ASSEMBLY (for 40/20/40 Split Seat Type) |
Release the rubber band on the backside of the rear seatback board sub-assembly.
Remove the hog rings.
Remove the 4 bolts and center seat assembly.
| 9. REMOVE REAR SEAT CUSHION MOULDING RH |
40/20/40 Split Seat Type (Click here)
| 10. REMOVE REAR SEAT CUSHION MOULDING REAR RH |
40/20/40 Split Seat Type (Click here)
| 11. REMOVE SEPARATE TYPE REAR SEAT CUSHION ASSEMBLY |
40/20/40 Split Seat Type (Click here)
| 12. REMOVE REAR SEAT TRACK BRACKET COVER INNER |
Move the rear seat assembly LH to the rearmost position by operating the rear seat track adjusting handle.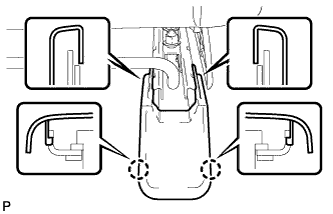
Using a screwdriver, disengage the 4 claws.
- HINT:
- Tape the screwdriver tip before use.
Pull the 2 rear seat track bracket covers toward the rear of the vehicle and remove them.
| 13. REMOVE REAR SEAT ASSEMBLY LH |
Using a clip remover, remove the 3 clips.
Remove the bolt and disconnect the floor anchor side of the fold seat stopper band assembly No.2.
Move the rear seat assembly LH to the rearmost position by operating the rear seat track adjusting handle.
Remove the 2 bolts on the front side.
Move the rear seat assembly LH fully forward by operating the rear seat track adjusting handle.
Remove the 3 bolts on the rear side.
Move the rear seat assembly LH to the center position and adjust the seatback to the vertical position.
Remove the rear seat assembly LH.
| 14. REMOVE REAR SEAT CUSHION MOULDING LH |
Remove the 2 screws.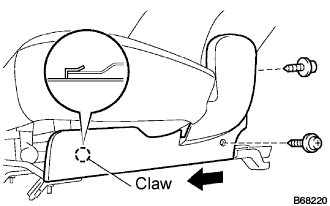
Disengage the claw and remove the rear seat cushion moulding LH as shown in the illustration.
| 15. REMOVE REAR SEAT CUSHION MOULDING REAR LH |
Remove the 3 screws.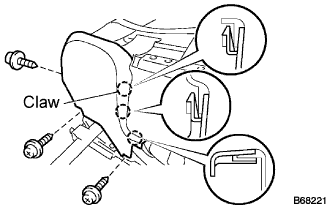
Disengage the 3 claws and remove the rear seat cushion moulding rear LH.
| 16. REMOVE SEPARATE TYPE REAR SEAT CUSHION ASSEMBLY |
Using a "torx" socket wrench (T45), remove the 2 "torx" bolts.
Release the 2 rubber bands on the backside of the rear seatback board carpet assembly.
Remove the hog rings.
Remove the 2 bolts and separate type rear seat cushion assembly.
| 17. REMOVE REAR SEAT BELT ASSEMBLY INNER |
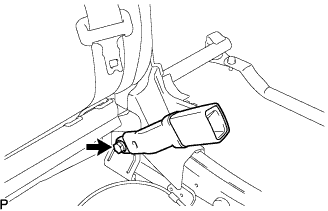
Disengage the bolt and remove the rear seat belt assembly inner.