DISASSEMBLY
Removal / installation
| 1. REMOVE REAR DOOR INSIDE HANDLE BEZEL PLUG |

Using a screwdriver wrapped with protective tape, disengage the 3 claws and remove the rear door inside handle bezel plug.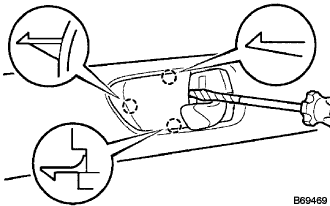

| 2. REMOVE REAR DOOR ARMREST BASE PANEL ASSEMBLY |
Using a screwdriver wrapped with protective tape, disengage the 2 claws and 2 clips.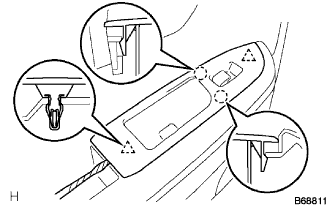
Disconnect the connector and remove the rear door armrest base panel assembly.
| 3. REMOVE REAR DOOR ARMREST COVER |
Remove the rear door armrest cover.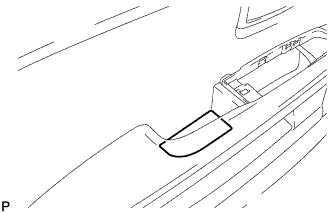
| 4. REMOVE REAR DOOR TRIM BOARD SUB-ASSEMBLY |
Remove the 2 screws.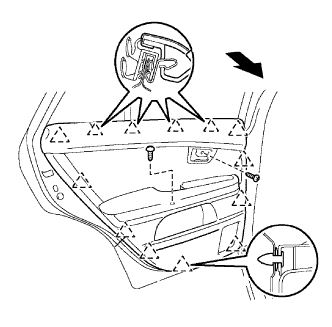
Pulling the front door trim board sub-assembly in the direction of the arrow shown in the illustration, disengage the 13 clips.
Disconnect the cable and each connector from the inside handle and the rear door trim board sub-assembly, remove the rear door trim board sub-assembly.
| 5. REMOVE REAR DOOR GLASS WEATHERSTRIP INNER |
Remove the rear door glass weatherstrip inner as shown in the illustration.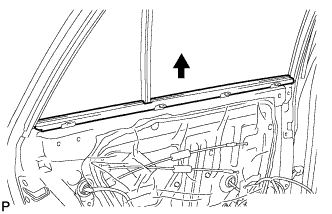
| 6. REMOVE REAR DOOR ARMREST SET BRACKET |
Remove the 2 screws and the rear door armrest set bracket.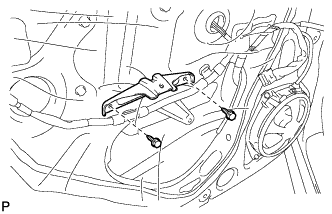
| 7. REMOVE REAR SPEAKER |
Disconnect the connector.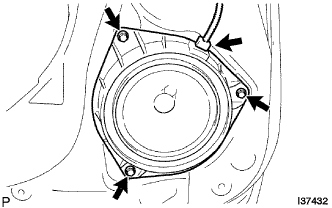
Remove the 3 bolts and the rear speaker.
| 8. REMOVE REAR DOOR SERVICE HOLE COVER |
Disconnect each connector and remove the rear door service hole cover.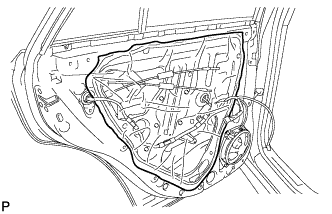
- HINT:
- Remove the remaining tape on the door side.
| 9. REMOVE REAR DOOR GLASS RUN |
Connect the window regulator switch assembly.
Fully lower the door glass.
Remove the rear door glass run.
| 10. REMOVE REAR DOOR WINDOW DIVISION BAR SUB-ASSEMBLY |
Remove the 2 bolts, the screw, and the rear door window division bar sub-assembly.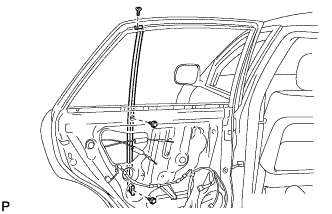
| 11. REMOVE REAR DOOR QUARTER WINDOW GLASS |
Remove the rear door quarter window glass and the rear door quarter window weatherstrip as a unit as shown in the illustration.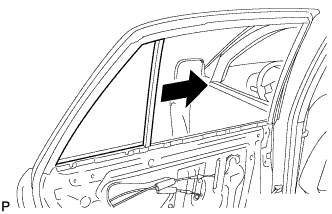
Remove the rear door quarter window glass from the rear door quarter window weatherstrip.
| 12. REMOVE REAR DOOR GLASS SUB-ASSEMBLY |
Remove the rear door glass sub-assembly from the rear door window regulator sub-assembly as shown in the illustration.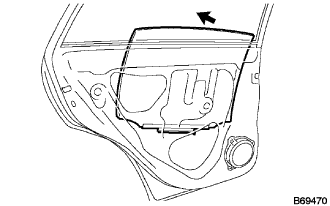
- NOTICE:
- Do not damage the door glass.
Disconnect the window regulator switch assembly.
| 13. REMOVE REAR DOOR WINDOW REGULATOR SUB-ASSEMBLY |
Disconnect the connector.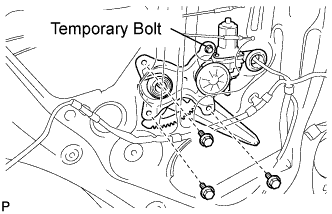
Loosen the temporary bolt.
- NOTICE:
- If the temporary bolt is removed, the rear door window regulator may fall and become deformed.
Remove the 3 bolts and the rear door window regulator sub-assembly and the power window regulator motor assembly rear as a unit.
Remove the temporary bolt from the regulator.
| 14. REMOVE POWER WINDOW REGULATOR MOTOR ASSEMBLY REAR |
Using a "torx" driver (T25), remove the 3 screws and the power window regulator motor assembly rear.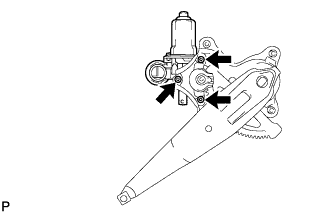
| 15. REMOVE REAR DOOR LOCK ASSEMBLY |
Disconnect the connector.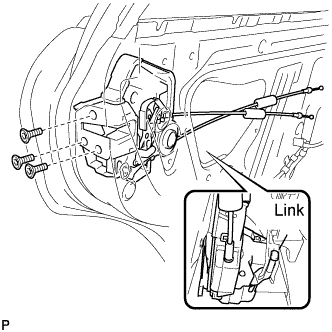
Using a "torx" socket wrench (T30), remove the 3 screws.
Slide the rear door lock assembly downward, pull out the link from the outside handle frame, and remove the rear door lock assembly and cables as a unit.
| 16. REMOVE DOOR LOCK WIRING HARNESS SEAL |
| 17. REMOVE REAR DOOR OUTSIDE HANDLE COVER |
Using a "torx" socket wrench (T30), loosen the screw.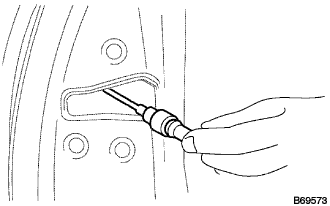
- HINT:
- Screw cannot be removed because it is integrated into the rear door outside handle frame sub-assembly.
Disengage the 2 claws and remove the rear door outside handle cover.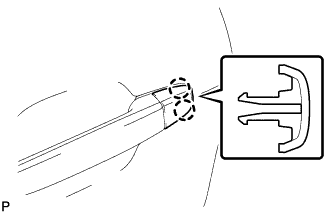
| 18. REMOVE REAR DOOR OUTSIDE HANDLE ASSEMBLY |
Pull and hold the release plate of the outside handle frame as shown in the illustration.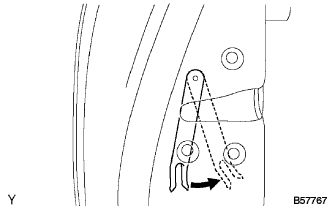
- NOTICE:
- The release plate may interfere with the outside handle and may be damaged when removing the handle, unless the release plate of the outside handle frame is pulled and held.
Remove the rear door outside handle assembly as shown in the illustration.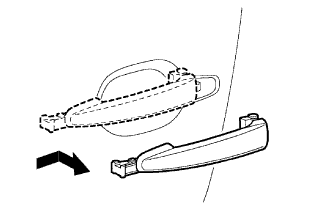
| 19. REMOVE REAR DOOR OUTSIDE HANDLE PAD |
Disengage the 3 claws and remove the rear door outside handle pad.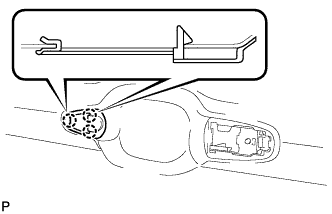
| 20. REMOVE REAR DOOR OUTSIDE HANDLE PAD REAR |
Disengage the 2 claws and remove the rear door outside handle pad rear.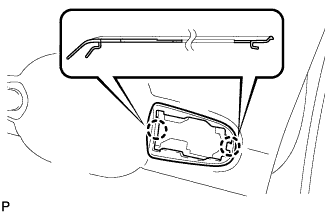
| 21. REMOVE REAR DOOR OUTSIDE HANDLE FRAME SUB-ASSEMBLY |
Using a "torx" socket wrench (T30), loosen the screw and rear door outside handle frame sub-assembly.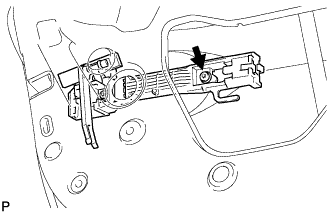
- HINT:
- Screw cannot be removed because it is integrated into the rear door outside handle frame sub-assembly.
| 22. REMOVE REAR DOOR CHECK COVER |
Disengage the pin and remove the rear door check cover.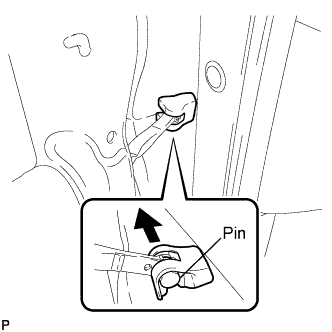
| 23. REMOVE REAR DOOR CHECK ASSEMBLY |
Remove the bolt, 2 nuts, and the rear door check assembly.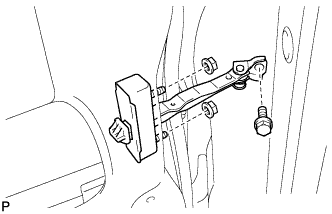
| 24. REMOVE REAR DOOR WEATHERSTRIP |
Remove the clip <A>, disengage the 19 clips and remove the rear door weatherstrip.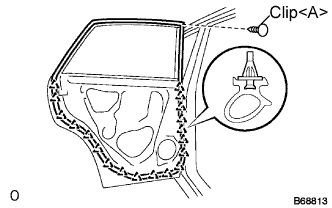
| 25. REMOVE REAR DOOR BELT MOULDING ASSEMBLY |
Put protective tape under the moulding.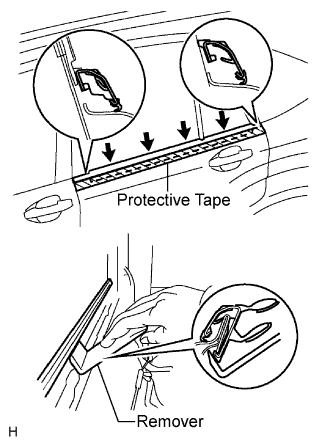
Using a moulding remover, disengage the claws and remove the rear door belt moulding assembly LH.
- HINT:
- Tape the remover tip before use.
| 26. REMOVE REAR DOOR WINDOW FRAME MOULDING SUB-ASSEMBLY |
Remove the screw.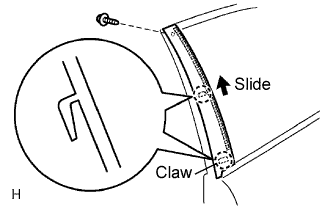
Using a heat light, heat the moulding.
- Heating temperature:
- 40 to 60°C (104 to 140°F)
- NOTICE:
- Do not heat the moulding excessively.
Slide the moulding upward to remove it.
- NOTICE:
- If reusing the moulding, take care not to damage the moulding.