INSTALLATION
Removal / installation
| 1. INSTALL HEATER WATER PUMP ASSEMBLY |

Install the heater water pump assembly with the 2 bolts.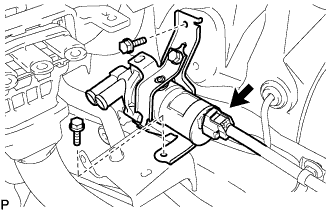

- Torque:
- 9.8 N*m{ 100 kgf*cm , 87 in.*lbf }
Install the 2 heater water hoses with the 2 clips.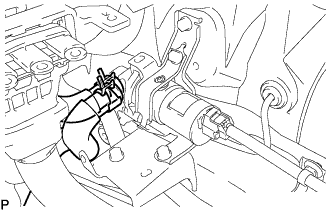
Engage the 2 clamps to install the harness protector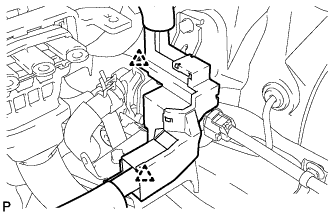
| 2. INSTALL W/CONVERTER INVERTER ASSEMBLY |
- CAUTION:
- Wear insulating gloves.
Install the w/ converter inverter assembly with the 2 nuts and bolt.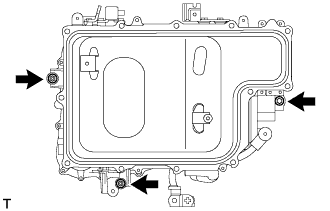
- Torque:
- 21 N*m{ 214 kgf*cm , 15 ft.*lbf }
- NOTICE:
- 2 people are needed to install the w/ converter inverter assembly.
| 3. INSTALL INVERTER BRACKET NO.4 |
Install the inverter bracket No.4 with the 2 bolts.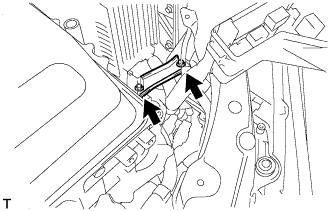
- Torque:
- 21 N*m{ 214 kgf*cm , 15 ft.*lbf }
| 4. INSTALL ENGINE ROOM RELAY BLOCK ASSEMBLY |
Install the engine room relay block assembly.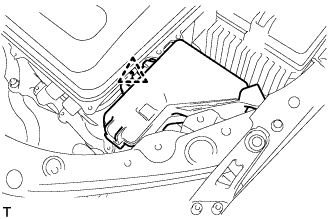
| 5. REMOVE INVERTER COVER |
Remove the 2 bolts and inverter cover to the w/ converter inverter assembly.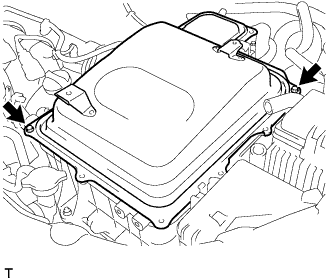
| 6. CONNECT NO.3 WIRE FRAME |
- CAUTION:
- Wear insulating gloves.
- NOTICE:
- Make sure that the inverter converter is temporarily installed before working on the converter inverter assembly. (Click here)
- Do not allow any foreign objects or waterdrops to enter the w/ converter inverter assembly.
- Make sure that the inverter converter is temporarily installed before working on the converter inverter assembly. (Click here)
After connecting the connector, press the lever down to connect the No.3 wire frame and install the bolt to the w/ converter inverter assembly.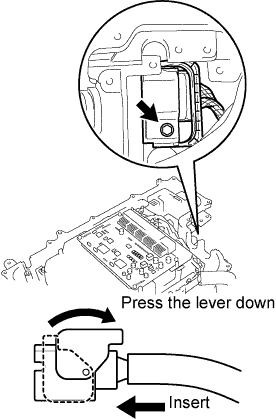
- Torque:
- 10 N*m{ 102 kgf*cm , 7 ft.*lbf }
Connect the No.3 wire frame (high voltage cable of the rear motor) with the 5 bolts to the w/ converter inverter assembly.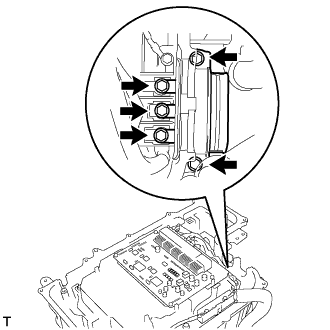
- Torque:
- 10 N*m{ 102 kgf*cm , 7 ft.*lbf }
| 7. CONNECT MG ECU CONNECTOR |
- CAUTION:
- Wear insulating gloves.
- NOTICE:
- Make sure that the inverter converter is temporarily installed before working on the converter inverter assembly. (Click here)
- Do not allow any foreign objects or waterdrops to enter the w/ converter inverter assembly.
- Make sure that the inverter converter is temporarily installed before working on the converter inverter assembly. (Click here)
Connect the 2 connectors and 2 grommets to the w/ converter inverter assembly.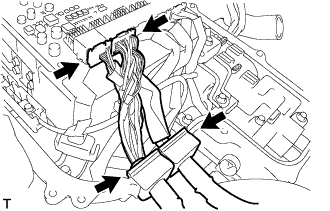
| 8. CONNECT HIGH VOLTAGE CABLE OF FRONT MOTOR |
- CAUTION:
- Wear insulating gloves.
- NOTICE:
- Make sure that the inverter converter is temporarily installed before working on the converter inverter assembly. (Click here)
- Do not allow any foreign objects or waterdrops to enter the w/ converter inverter assembly.
- Make sure that the inverter converter is temporarily installed before working on the converter inverter assembly. (Click here)
Connect the high voltage cable of the Generator with the 5 bolts to the w/ converter inverter assembly.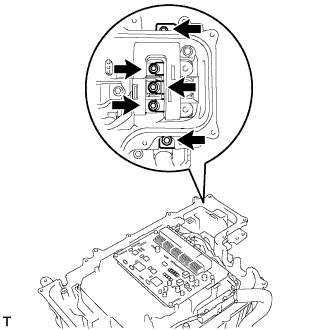
- Torque:
- 10 N*m{ 102 kgf*cm , 7 ft.*lbf }
Connect the high voltage cable of the Motor with the 5 bolts to the w/ converter inverter assembly.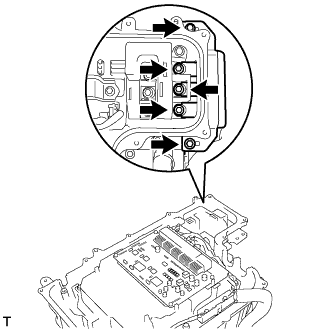
- Torque:
- 10 N*m{ 102 kgf*cm , 7 ft.*lbf }
| 9. CONNECT ENGINE WIRE NO.4 |
- CAUTION:
- Wear insulating gloves.
- NOTICE:
- Make sure that the inverter converter is temporarily installed before working on the converter inverter assembly. (Click here)
- Do not allow any foreign objects or waterdrops to enter the w/ converter inverter assembly.
- Make sure that the inverter converter is temporarily installed before working on the converter inverter assembly. (Click here)
Connect the engine wire No.4 with the connector, clamp and grommet to the w/ converter inverter assembly.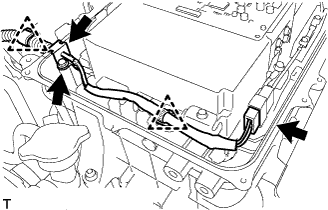
Connect the engine wire No.4 with the bolt to the w/ converter inverter assembly.
- Torque:
- 5.4 N*m{ 55 kgf*cm , 48 in.*lbf }
| 10. CHECK HIGH VOLTAGE CABLE CONNECTION |
- CAUTION:
- Wear insulating gloves.
- NOTICE:
- Make sure that the inverter converter is temporarily installed before working on the converter inverter assembly. (Click here)
- Do not allow any foreign objects or waterdrops to enter the w/ converter inverter assembly.
- Make sure that the inverter converter is temporarily installed before working on the converter inverter assembly. (Click here)
Check that each connector and terminal is firmly installed.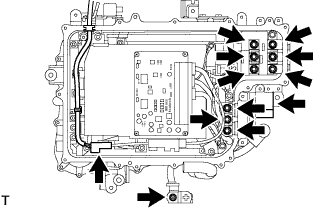
- NOTICE:
- Make sure that the connectors are fully engaged.
- Make sure that the bolts are fully tightened.
- Make sure that the connectors are fully engaged.
| 11. INSTALL INVERTER COVER |
Install the inverter cover with the 12 bolts to the w/ converter inverter assembly.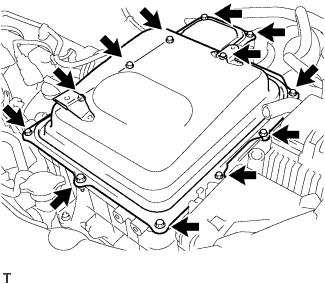
- Torque:
- 10 N*m{ 102 kgf*cm , 7 ft.*lbf }
Install the interlock bracket with the bolt to the w/ converter inverter assembly.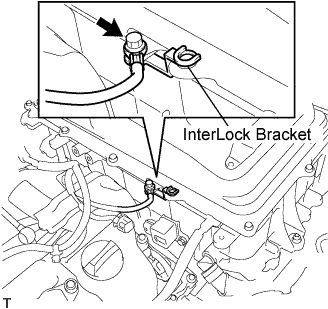
- Torque:
- 10 N*m{ 102 kgf*cm , 7 ft.*lbf }
| 12. INSTALL POWER STEERING ECU BRACKET |
Install the power steering ECU bracket with the bolt to the w/ converter inverter assembly.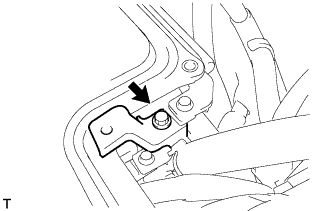
- Torque:
- 8.0 N*m{ 82 kgf*cm , 71 in.*lbf }
| 13. CONNECT WATER HOSE |
Connect the water hose with the clamp to the w/ converter inverter assembly.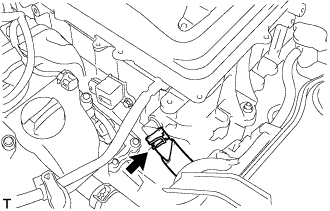
| 14. INSTALL INVERTER RESERVE TANK SUB-ASSEMBLY |
Connect the 2 water hoses with the 2 clamps to the inverter reserve tank sub-assembly.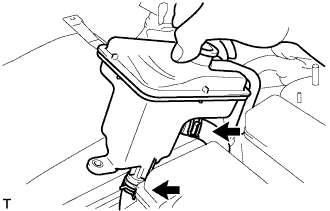
Install the inverter reserve tank with the 2 bolts to the w/ converter inverter assembly.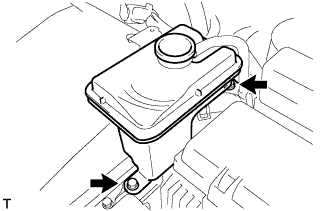
- Torque:
- 10 N*m{ 102 kgf*cm , 7 ft.*lbf }
| 15. CONNECT ENGINE ROOM WIRE NO.2 |
Connect the engine room wire No.2 with the nut.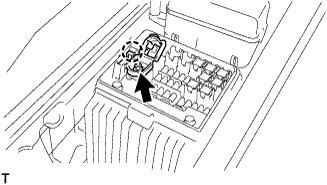
- Torque:
- 8.5 N*m{ 87 kgf*cm , 75 in.*lbf }
| 16. CONNECT CIRCUIT BREAKER SENSOR NO.1 |
Connect the circuit breaker sensor No.1 connector.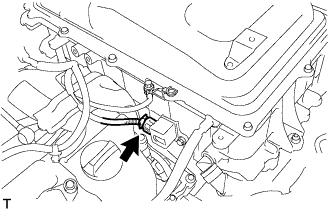
| 17. INSTALL POWER STEERING ECU ASSEMBLY |
Install the power steering ECU assembly with the 2 bolts.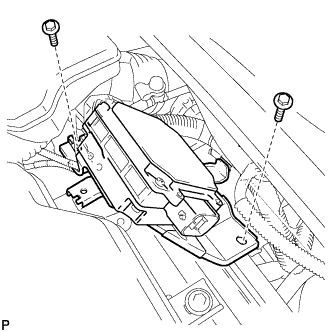
- Torque:
- 8.0 N*m{ 82 kgf*cm , 71 in.*lbf }
Connect the 2 wire harness clamps to the power steering ECU assembly.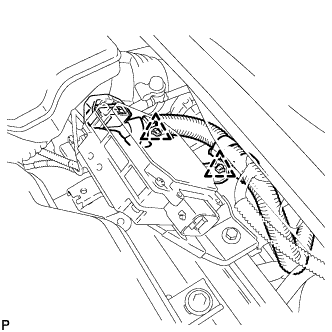
Connect the 2 power steering ECU assembly connectors and securely lock the connectors.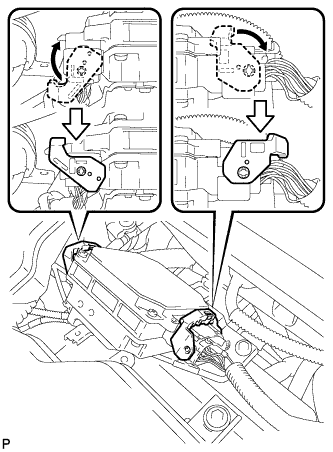
Install the ground cable terminal to the power steering ECU assembly with the bolt.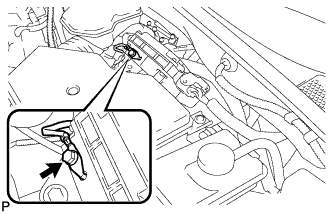
- Torque:
- 6.0 N*m{ 61 kgf*cm , 53 in.*lbf }
| 18. INSTALL INVERTER BRACKET NO.5 |
Install the inverter bracket No.5 with the bolt.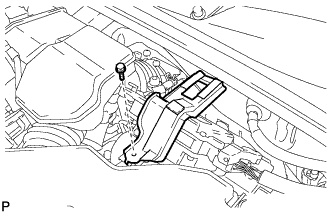
- Torque:
- 10 N*m{ 102 kgf*cm , 7 ft.*lbf }
| 19. INSTALL AIR CLEANER W/ RESONATOR |
Install the air cleaner hose No.1 to the throttle body assembly with the hose clamp.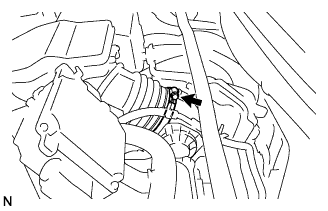
Install the air cleaner case w/ resonator with the 5 bolts.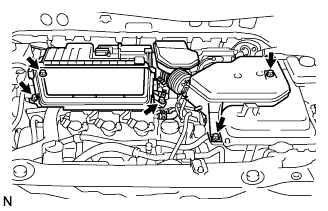
- Torque:
- 5.0 N*m{ 51 kgf*cm , 44 in.*lbf }
Connect the MAF meter connector.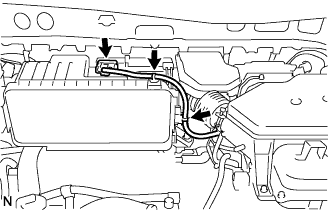
Connect the 2 wire harness clamps to the air cleaner.
Connect the ventilation hose No.2.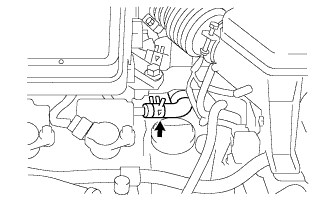
| 20. INSTALL AIR CLEANER CAP W/ INLET |
Install the air cleaner filter element to the air cleaner case.
Install the 2 bolts, 4 clamps and air cleaner cap w/ inlet.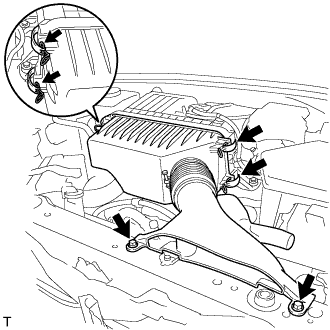
- Torque:
- 7.0 N*m{ 71 kgf*cm , 62 in.*lbf }
| 21. INSTALL COOL AIR INTAKE DUCT SEAL |
Install the 4 clips and cool air intake duct seal.
| 22. INSTALL COWL TOP PANEL SUB-ASSEMBLY OUTER |
Remove the 4 shock absorber nuts.
Install the 4 bolts, 2 nuts and cowl top panel sub-assembly.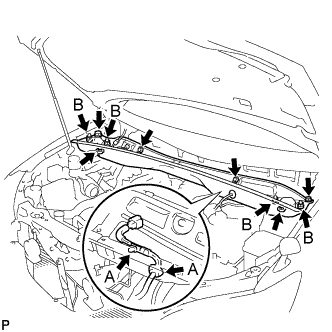
- Torque:
- 5.0 N*m{ 51 kgf*cm , 44 in.*lbf }
Install the 4 shock absorber nuts (B).
- Torque:
- 80 N*m{ 815 kgf*cm , 59 ft.*lbf }
Install the wire harness clamp and grommet (A).
| 23. INSTALL WINDSHIELD WIPER MOTOR ASSEMBLY |
Install the windshield wiper motor and link assembly with the 5 bolts.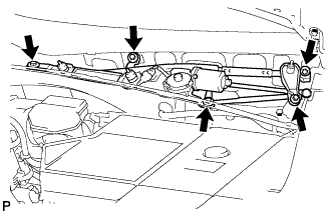
- Torque:
- 7.0 N*m{ 71 kgf*cm , 62 in.*lbf }
Connect the connector.
| 24. INSTALL COWL TOP VENTILATOR LOUVER SUB-ASSEMBLY |
| 25. INSTALL FRONT WIPER ARM AND BLADE ASSEMBLY LH |
Operate the front wiper, and stop the front wiper motor at the automatic stop position.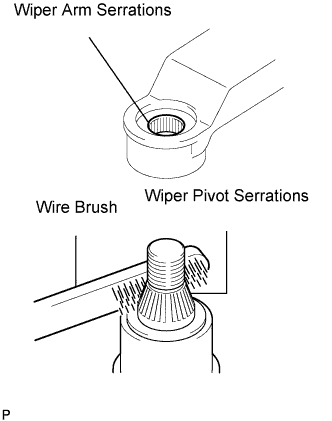
Clean the wiper arm serrations.
Clean the wiper pivot serrations with a wire brush (when reinstalling).
Install the front wiper arm and blade assembly LH with the nut at the position as shown in the illustration.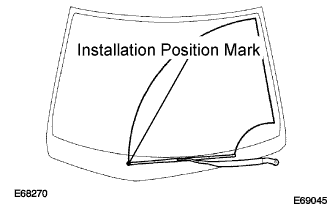
- Torque:
- 24 N*m{ 245 kgf*cm , 18 ft.*lbf }
- HINT:
- Hold the arm hinge by hand to fasten the nut.
| 26. INSTALL FRONT WIPER ARM AND BLADE ASSEMBLY RH |
Clean the wiper arm serrations.
Clean the wiper pivot serrations with a wire brush (when reinstalling).
Install the front wiper arm and blade assembly RH with the 2 nuts at the position as shown in the illustration.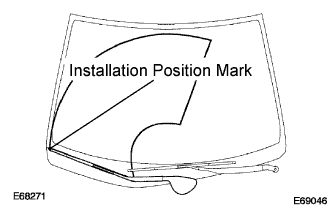
- Torque:
- 24 N*m{ 245 kgf*cm , 18 ft.*lbf }
- HINT:
- Hold the arm hinge by hand to fasten the nut.
Operate the front wipers while spraying water or washer fluid on the windshield.
Make sure that the wipers function properly and there is no interference with the vehicle body.
| 27. INSTALL ENGINE ROOM COVER SIDE |
Install the 5 clips and engine room cover side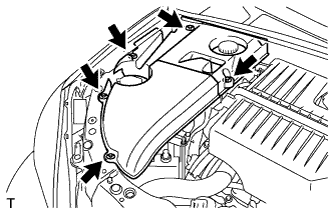
| 28. INSTALL ENGINE ROOM SIDE LH COVER |
Fit the clips and install the engine room side LH cover.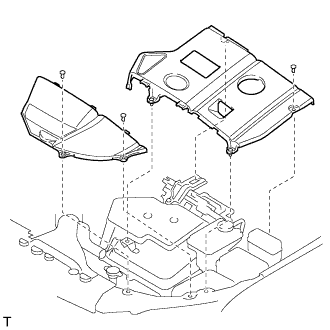
| 29. INSTALL SERVICE PLUG GRIP |
- NOTICE:
- Before connecting the service plug, check that no parts and tools remain and that the high voltage terminals and connectors are connected securely.
Wear insulation gloves, then insert the service plug.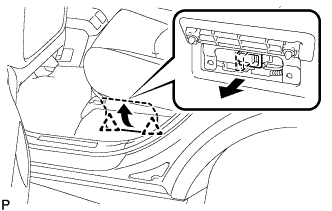
Push down on the grip to lock.
Close the battery service hole cover.
- NOTICE:
- Check that the 2 battery service hole cover clips are securely connected to the battery carrier bracket (click sound).
| 30. CONNECT CABLE TO NEGATIVE BATTERY TERMINAL |
| 31. ADD HYBRID VEHICLE COOLANT |
Loosen the bleeder plug shown in the illustration and connect a hose.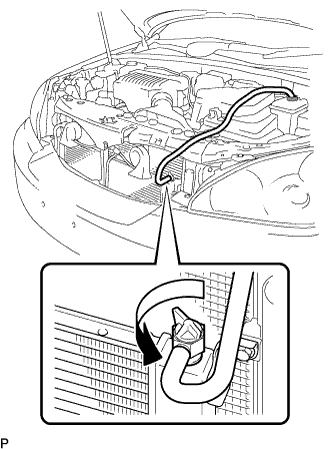
- NOTICE:
- Insert one end of the hose into the reserve tank.
Add coolant from the reserve tank.
Add coolant until the level of coolant in the hose attached to the bleeder plug reaches the same level as the FULL line of the reserve tank.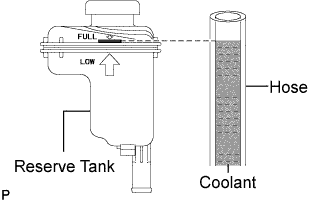
- Coolant quantity:
- 3.4 L (3.6 US qts, 3.0 Imp. qts.)
When using the intelligent tester:
Connect the intelligent tester to the DLC3.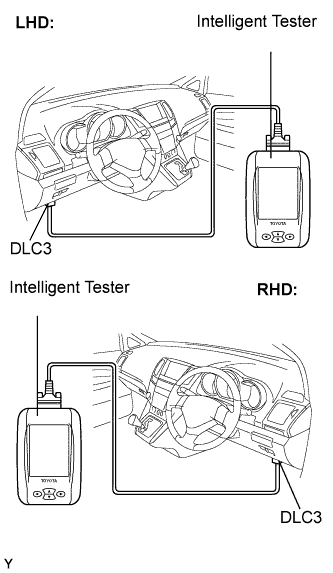
Turn the ignition switch to the ON position.
Select the inspection mode (Click here).
On the tester, enter the following menus: Powertrain / Hybrid Control / Active test / Water Pump.
Keep the coolant at the FULL level in the reserve tank to compensate for the drop in coolant level when the air bleeds.
- Standard:
- Air bleeding from the coolant system is completed when the noise made by the water pump becomes smaller and the circulation of coolant in the reserve tank improves.
- HINT:
- Loud noise made by the water pump and poor circulation of coolant in the reserve tank indicates that there is air in the coolant system.
When not using the intelligent tester:
Put the vehicle into the READY-on state. [*1]
Turn the ignition switch off and add coolant to the FULL level because the coolant level drops as the air bleeds. [*2]
- NOTICE:
- Be sure to turn the ignition switch off before adding LLC.
- Do not work on the components in the engine compartment while the vehicle is in the READY-on state because the engine is in intermittent operation.
- Be sure to turn the ignition switch off before adding LLC.
Repeat steps [*1] and [*2] until air bleeding from the coolant system is completed.
- Standard:
- Air bleeding from the coolant system is completed when the noise made by the water pump becomes smaller and the circulation of coolant in the reserve tank improves.
- HINT:
- Loud noise made by the water pump and poor circulation of coolant in the reserve tank indicates that there is air in the coolant system.
When the air is completely bled from the coolant system, tighten the plug.
Add coolant to the FULL mark of the reserve tank.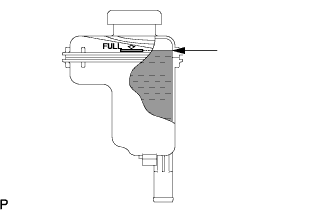
| 32. CHECK HYBRID VEHICLE COOLANT LEAKS |
| 33. PERFORM INITIALIZATION |
- NOTICE:
- Some systems need initialization when disconnecting the cable from the negative battery terminal. (Click here)