P3004-131
Diagnostic trouble codes
DESCRIPTION
| DTC No. |
INF Code |
DTC Detection Condition |
Trouble Area |
| P3004 |
131 |
EV battery fuse is blown out, service plug grip is disconnected, SMR1 and SMR3 remain open, or the system main relay is open. |
|
| P3004 |
132 |
Inverter voltage sensor has a malfunction, or resistance of the system main resistor increases. |
|
WIRING DIAGRAM
- Refer to the wiring diagrams for DTC P0AA1-224. (Click here)
INSPECTION PROCEDURE
- CAUTION:
- Before inspecting the high-voltage system, take safety precautions to prevent electrical shocks, such as wearing insulated gloves and removing the service plug grip. After removing the service plug grip, put it in your pocket to prevent other technicians from reconnecting it while you are working on the high-voltage system.
- After disconnecting the service plug grip, wait for at least 5 minutes before touching any of the high-voltage connectors or terminals.
- Before inspecting the high-voltage system, take safety precautions to prevent electrical shocks, such as wearing insulated gloves and removing the service plug grip. After removing the service plug grip, put it in your pocket to prevent other technicians from reconnecting it while you are working on the high-voltage system.
- HINT:
- At least 5 minutes is required to discharge the high-voltage capacitor inside the w/ converter inverter assembly.
| 1. READ OUTPUT DTC (HV) |

Connect the intelligent tester to the DLC3.
Turn the ignition switch to the ON position.
Select the following menu items: Powertrain / Hybrid Control / DTC.
Read output DTC. (Click here)
- Result:
- DTC P0A95, P0AA1-244, P0AA2-225, P0AA4-228 or P0AA5-229 is output.
|
|
||||

| NO | |
 |
| 2. INSPECT HV RELAY ASSEMBLY (SMR1 AND SYSTEM MAIN RELAY) |
- CAUTION:
- Be sure to wear insulated gloves.
Turn the ignition switch off and remove the service plug grip. (Click here)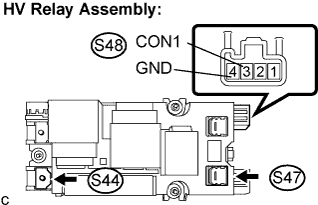

- NOTICE:
- Do not put the vehicle into the READY-on state with the service plug grip removed as this may cause a malfunction.
Remove the HV relay assembly from the vehicle. (Click here)
Measure the resistance according to the value(s) in the table below.
- Standard Resistance:
Tester Connection
Specified Condition
S47-1 - S44-1
28.5 to 31.5 Ω
(when apply battery voltage between terminals CON1 (S48-3) and GND (S48-4))
Measure the resistance according to the value(s) in the table below.
- Standard Resistance:
Tester Connection
Specified Condition
CON1 (S48-3) - GND (S48-4)
20 to 60 Ω
-35 to 80°C (-22 to 176 °F)
|
|
||||
| OK | |
|
| 3. INSPECT HV RELAY ASSEMBLY (SMR3) |
- CAUTION:
- Be sure to wear insulated gloves.
Turn the ignition switch off and remove the service plug grip. (Click here)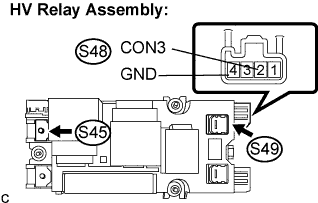
- NOTICE:
- Do not put the vehicle into the READY-on state with the service plug grip removed as this may cause a malfunction.
Remove the HV relay assembly from the vehicle. (Click here)
Measure the resistance according to the value(s) in the table below.
- Standard Resistance:
Tester Connection
Specified Condition
S45-1 - S49-1
Below 1 Ω
(when apply battery voltage between terminals CON3 (S48-2) and GND (S48-4))
Measure the resistance according to the value(s) in the table below.
- Standard Resistance:
Tester Connection
Specified Condition
CON3 (S48-2) - GND (S48-4)
20 to 60 Ω
-35 to 80°C (-22 to 176 °F)
|
|
||||
| OK | |
|
| 4. INSPECT MAIN BATTERY CABLE NO.2 (-) |
- CAUTION:
- Be sure to wear insulated gloves and protective goggles.
Measure the resistance according to the value(s) in the table below.
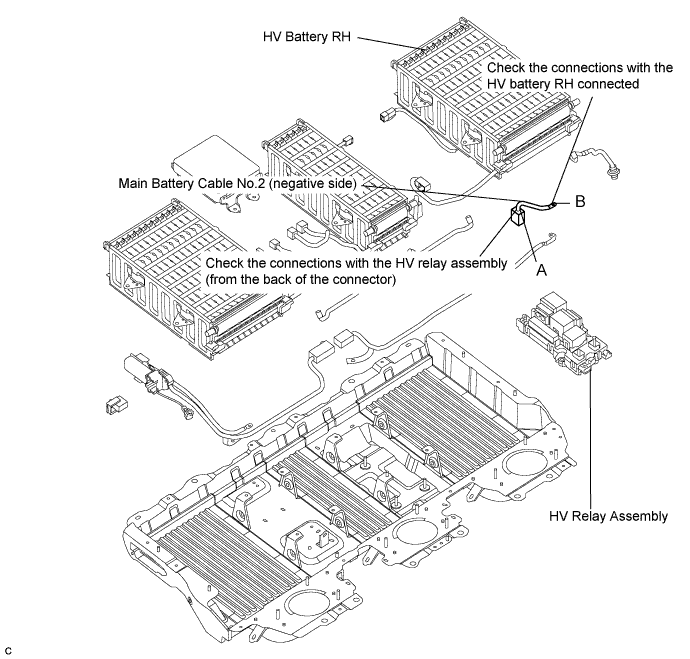
- Standard Resistance:
Tester Connection
Specified Condition
A - B
Below 1 Ω
- HINT:
- Check the connections with the main battery cable No.2 (negative side) connected.
|
|
||||
| OK | |
|
| 5. INSPECT MAIN BATTERY CABLE NO.2 (-), HV RELAY ASSEMBLY AND HV BATTERY |
- CAUTION:
- Be sure to wear insulated gloves and protective goggles.
- HINT:
- Check the connections with the main battery cable No.2 (negative side) connected.
Check that the nut that tightens the main battery cable No.2 (negative side) is properly engaged with the connector on the HV battery terminal (RH side).
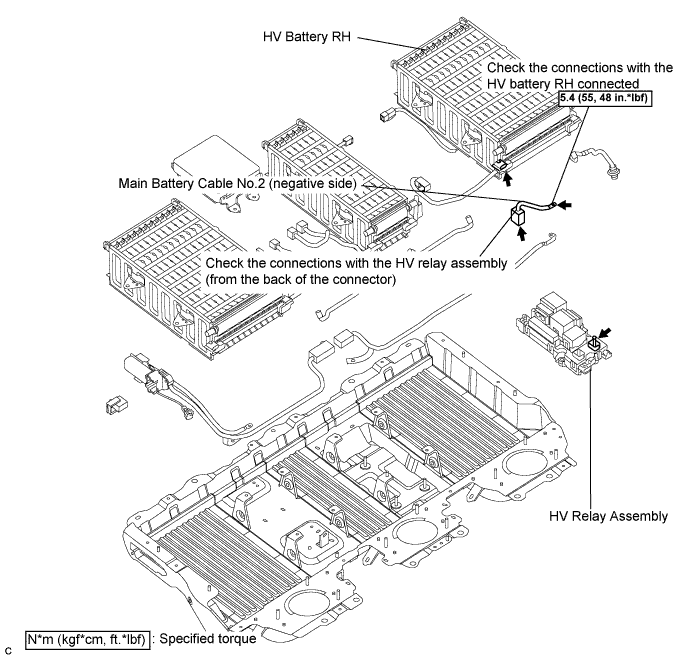
- OK:
- There is no poor connection.
- NOTICE:
- The nut that tightens the main battery cable No.2 is not reusable.
- Do not overtighten this nut.
- The nut that tightens the main battery cable No.2 is not reusable.
Check if the main battery cable No.2 (negative side ) is properly engaged with the connector on the HV relay assembly side.
- OK:
- Connector is connected securely and there is no poor connection.
|
|
||||
| OK | |
|
| 6. INSPECT HV BATTERY |
- CAUTION:
- Be sure to wear insulated gloves and protective goggles.
Measure the voltage according to the value(s) in the table below.
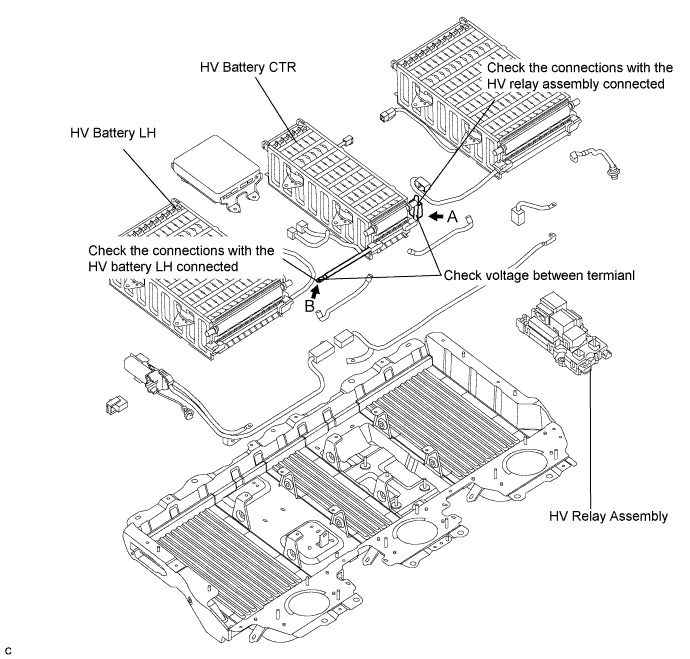
- Standard Voltage:
Tester Connection
Specified Condition
A (+) - B (-)
40 to 80 V
- NOTICE:
- Connect the tester correctly.
|
|
||||
| OK | |
|
| 7. INSPECT HV BATTERY AND HV RELAY ASSEMBLY |
- CAUTION:
- Be sure to wear insulated gloves and protective goggles.
- HINT:
- Check the connections with the HV battery CTR cable.
Check if the cable on the HV relay assembly side connector in the HV battery CTR is properly engaged.
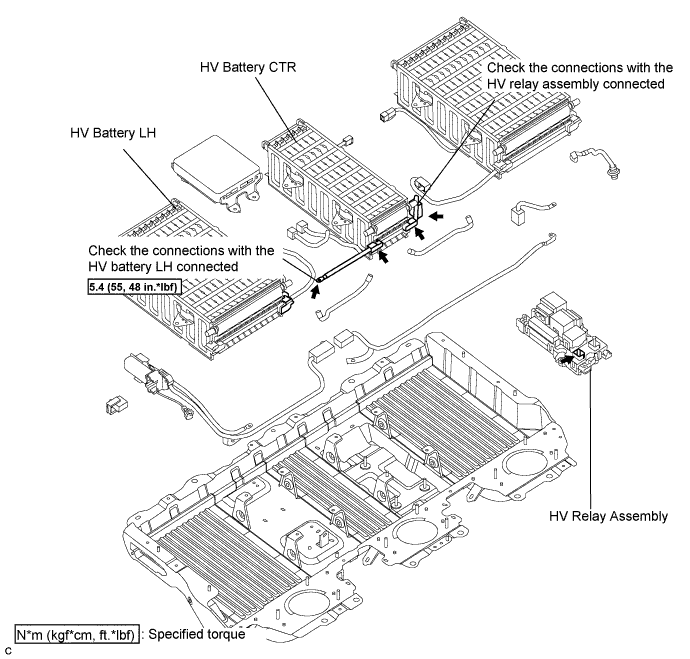
- OK:
- Connector is connected securely and there is no poor connection.
Check that the nut that tightens the HV battery CTR cable on the HV battery LH side is not loose.
- OK:
- There is no poor connection.
- NOTICE:
- The nut that tightens the main battery cable No.2 is not reusable.
- Do not overtighten this nut.
- The nut that tightens the main battery cable No.2 is not reusable.
|
|
||||
| OK | |
|
| 8. INSPECT FRAME WIRE NO.3 |
- CAUTION:
- Be sure to wear insulated gloves and protective goggles.
Check that the service plug grip is removed.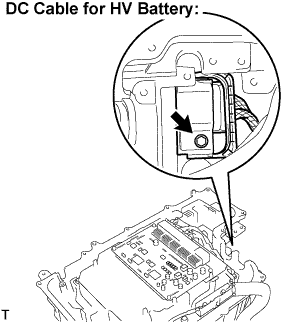
Remove the inverter cover. (Click here)
- NOTICE:
- Wrap the interlock round terminal for the inverter cover with vinyl tape to prevent it from shorting to ground. Be sure to prevent water in the reservoir tank from entering the inverter.
Disconnect the frame wire No.3 (DC cable for the HV battery) from the w/ converter inverter assembly.
Disconnect the frame wire No.3 (DC cable for the w/ converter inverter assembly) from the HV relay assembly.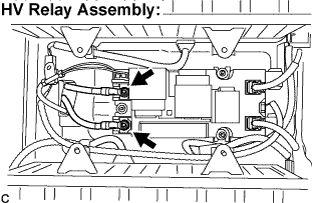
Measure the resistance according to the value(s) in the table below.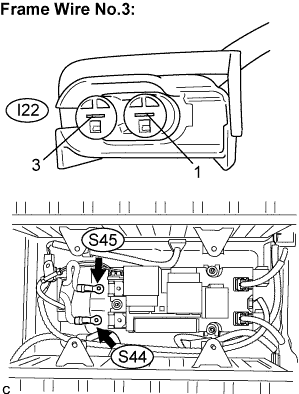
- Standard Resistance:
Tester Connection
Specified Condition
I22-3 - S44-1
Below 1 Ω
I22-1 - S45-1
Below 1 Ω
|
|
||||
| OK | |
|
| 9. INSPECT W/ CONVERTER INVERTER ASSEMBLY (VH VOLTAGE) |
- CAUTION:
- Be sure to wear insulated gloves.
Turn the ignition switch to the ON position.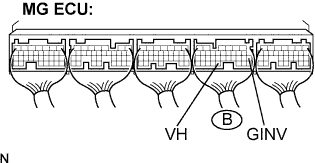
- HINT:
- Turning the ignition switch to the ON position with the service grip and inverter cover removed causes interlock switch system DTC (P0A0D-350) to be output.
Measure the voltage according to the value(s) in the table below.
- Standard Voltage:
Tester Connection
Specified Condition
VH (B-31) - GINV (B17)
0.3 to 0.7 V
|
|
||||
| OK | |
|
| 10. CHECK CONNECTION CODITION OF HV CONTROL ECU CONNECTOR (LOOSENESS AND POOR CONTACT) |
Check the connections of all HV control ECU connectors.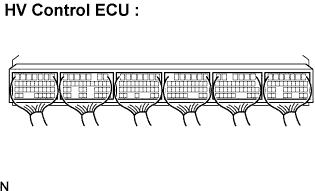
- OK:
- Connectors are connected securely and there is no poor connection.
|
|
||||
| OK | |
|
| 11. CHECK HARNESS AND CONNECTOR (HV CONTROL ECU - HV RELAY ASSEMBLY) |
- CAUTION:
- Be sure to wear insulated gloves and protective goggles.
Check that the service plug grip is removed.
Disconnect the H30 connector from the HV control ECU.
Measure the resistance according to the value(s) in the table below.
- Standard Resistance:
Tester Connection
Specified Condition
CON1 (H30-3) - CON1 (S48-3)
Below 1 Ω
CON3 (H30-1) - CON3 (S48-2)
Below 1 Ω
|
|
||||
| OK | |
|
| 12. CHECK FOR INTERMINTTENT PROBLEMS |
- HINT:
- After the check, if DTCs P3004-131 and 132 are output again, replace the HV control ECU. If they are not output, replace the HV relay assembly.
|
|
||||
| OK | ||
 |
||
| ||