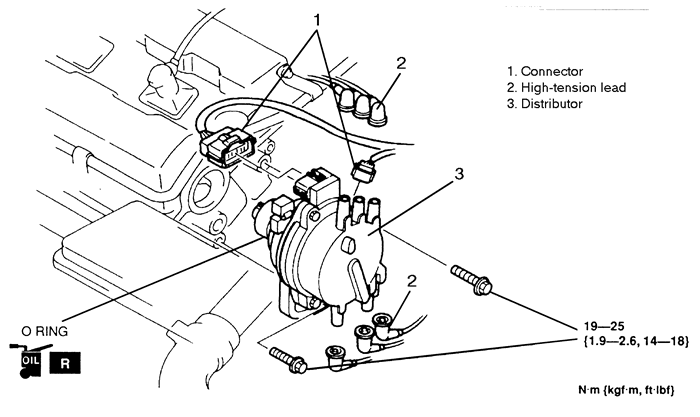
| Fig. 1: Distributor assembly -- Millenia 2.5L (KLD)
engines
|
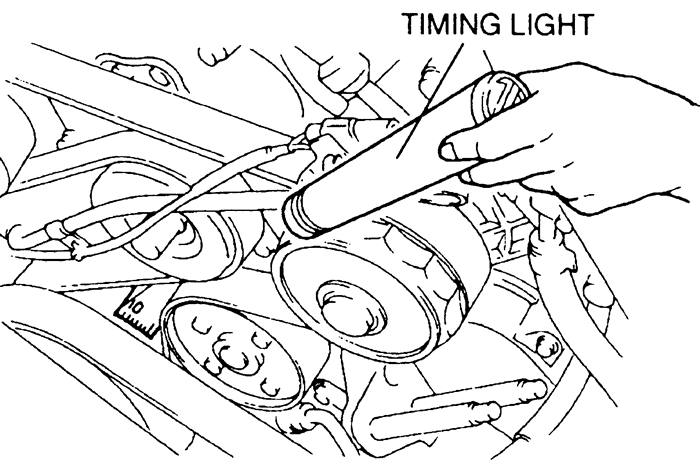
| Fig. 2: Aim the timing light in the appropriate position
|
- Disconnect the negative battery cable.
- Remove the distributor cap and position it aside,
leaving the ignition wires connected.
- On SOHC engines, remove the air intake hose from
it's position next to the distributor.
- Disconnect the distributor electrical connector(s)
from the side of the distributor.
- Using a wrench on the crankshaft pulley, rotate the
crankshaft to position the No. 1 piston on Top Dead Center (TDC) of the
compression stroke; the crankshaft pulley mark should align with the timing
indicator.
- Using chalk or paint, mark the position of the distributor
housing on the cylinder head. Also mark the position of the distributor
rotor in relation to the distributor housing.
- Remove the distributor hold-down bolt(s) and remove
the distributor.
-
Inspect the O-ring on the distributor housing and replace it, if it
is damaged or worn.
To install:
- Apply clean engine oil to a new O-ring and install
it on the distributor.
- Install the distributor in the cylinder head. Make
sure the distributor rotor is pointing toward the No. 1 spark plug tower
position on the distributor cap.
- Install the distributor mounting bolts. Align the
marks made on the distributor housing and cylinder head during removal
and loosely tighten the bolts.
- Connect the distributor wiring and, if equipped,
vacuum hoses.
- Install the distributor cap and secure the screws.
- Connect the spark plug wires to the distributor cap
in their original locations.
- Connect the negative battery cable. Check and adjust
the ignition timing.
- Disconnect the spark plug wire and remove the spark
plug from the No. 1 cylinder. Place a finger over the spark plug hole.
- Turn the crankshaft pulley in the normal direction
of rotation until compression is felt; the piston is approaching TDC on
the compression stroke. Continue rotating the crankshaft pulley until
the pulley mark aligns with the mark on the timing belt cover.
- Apply clean engine oil to a new O-ring and install
it on the distributor.
- Install the distributor in the cylinder head. Make
sure the distributor rotor is pointing toward the No. 1 spark plug tower
position on the distributor cap.
- Install the distributor mounting bolts. Align the
marks made on the distributor housing and cylinder head during removal
and loosely tighten the bolts.
- Connect the distributor wiring and, if equipped,
vacuum hoses.
- Install the distributor cap and secure the screws.
- Install the spark plug in the No. 1 cylinder and
connect the spark plug wire.
- Connect the spark plug wires to the distributor cap
in their original locations.
- Connect the negative battery cable. Check and adjust
the ignition timing.
NOTE: The ignition coil and module are integral to the
distributor. The assembly must be replaced as a whole.
- Disconnect the negative battery cable.
- Remove the air cleaner.
- Remove the distributor cap and position aside, leaving
the spark plug wires connected. Before removing the distributor, mark
the position of the No. 1 spark plug wire tower on the distributor cap.
- Disconnect the distributor electrical connectors.
- Using a wrench on the crankshaft pulley, rotate the
crankshaft to position the No. 1 piston at TDC on the compression stroke.
The crankshaft pulley notch should align with the timing plate indicator
and the distributor rotor should be pointing to the No. 1 spark plug tower
position on the distributor cap.
- Using chalk or paint, mark the position of the distributor
housing on the cylinder head.
- Remove the distributor hold-down bolts and remove
the distributor.
-
Inspect the O-ring on the distributor housing and replace it if it
is damaged or worn.
To install:
- Using clean engine oil, lubricate the distributor
O-ring.
-
Install the distributor. Make sure the distributor rotor aligns with
the No. 1 spark plug tower position on the distributor cap and the distributor
housing mark aligns with the cylinder head or cylinder block mark.
NOTE: There are existing marks on the distributor
shaft and housing, which when aligned, indicate the No. 1 spark plug wire
tower position.
- Install and loosely tighten the distributor hold-down
bolts.
- Connect the electrical connectors to their original
locations. Install the distributor cap.
- Install the air cleaner.
- Connect the negative battery cable. Start the engine,
and check or adjust the ignition timing.
- Using clean engine oil, lubricate the distributor
O-ring.
- Disconnect the spark plug wire from the No. 1 cylinder
spark plug. Remove the spark plug from the No. 1 cylinder and press a
thumb over the spark plug hole.
- Using a wrench on the crankshaft pulley, rotate the
crankshaft until pressure is felt at the spark plug hole, indicating the
piston is approaching TDC on the compression stroke. Continue rotating
the crankshaft until the crankshaft pulley mark aligns with the timing
cover indicator.
- Position the distributor rotor so it aligns with
the No. 1 spark plug wire tower on the distributor cap.
- Install the distributor. Align the mark that was
made on the distributor housing with the mark that was made on the cylinder
block. Loosely tighten the distributor hold-down bolts.
- Connect the electrical connectors to their original
locations. Install the distributor cap.
- Install the spark plug in the No. 1 cylinder and
connect the spark plug wire.
- Install the air cleaner.
- Connect the negative battery cable. Start the engine,
and check or adjust the ignition timing.
NOTE: The ignition module and coil are both located in
the distributor. Disassembly is required to examine or replace the components.
- Disconnect the negative battery cable.
- Remove the resonance air duct.
- Tag and disconnect the spark plug wires from the
distributor cap. Disconnect the electrical connectors from the top of
the distributor.
- Using chalk or paint, mark the position of the distributor
housing on the cylinder head. Remove the distributor hold-down bolts and
remove the distributor.
-
To remove the ignition module or coil, remove the bolt from the cap,
separate the distributor parts, and replace components as necessary. Reassemble
the distributor, making sure that the packing is in position, and tighten
the bolt to 9-17 inch lbs. (1-2 Nm).
To install:
-
Align the distributor shaft with the camshaft end and install the distributor.
NOTE: The tangs on the distributor shaft are different
sizes, allowing the distributor to be installed in only one position.
- Install the distributor hold-down bolts. Align the
mark that was made on the distributor housing with the mark that was made
on the cylinder head and loosely tighten the bolts.
- Connect the electrical connectors to the distributor
and the spark plug wires to the distributor cap.
- Install the resonance air duct.
- Connect the negative battery cable. Start the engine,
and check or adjust the ignition timing.
-
Align the distributor shaft with the camshaft end and install the distributor.
NOTE: The tangs on the distributor shaft are different
sizes, allowing the distributor to be installed in only 1 position.
- Install the distributor hold-down bolts. Align the
mark that was made on the distributor housing with the mark that was made
on the cylinder head and loosely tighten the bolts.
- Connect the electrical connectors to the distributor
and the spark plug wires to the distributor cap.
- Install the resonance air duct.
- Connect the negative battery cable. Start the engine
and check or adjust the ignition timing.
- Disconnect the negative battery cable.
- Remove the fresh air duct.
- Remove the distributor cap and position aside, leaving
the spark plug wires connected. Before removing the distributor, mark
the position of the No. 1 spark plug wire tower on the distributor cap.
- Disconnect the distributor electrical connector.
- Using a wrench on the crankshaft pulley, rotate the
crankshaft to position the No. 1 piston at TDC on the compression stroke.
The crankshaft pulley notch should align with the timing plate indicator
and the distributor rotor should be pointing to the No. 1 spark plug tower
position on the distributor cap.
- Using chalk or paint, mark the position of the distributor
housing on the cylinder head.
- Remove the distributor hold-down bolt(s) and remove
the distributor.
-
Inspect the O-ring on the distributor housing and replace it if it
is damaged or worn.
To install:
- Using clean engine oil, lubricate the distributor
O-ring.
-
Install the distributor. Make sure the distributor rotor aligns with
the No. 1 spark plug tower position on the distributor cap and the distributor
housing mark aligns with the cylinder head or cylinder block mark.
NOTE: There are existing marks on the distributor
shaft and housing, which when aligned, indicate the No. 1 spark plug wire
tower position.
- Install and loosely tighten the distributor hold-down
bolt(s).
- Connect the electrical connectors to their original
locations. Install the distributor cap.
- Install the fresh air duct.
- Connect the negative battery cable. Start the engine
and check or adjust the ignition timing.
- Using clean engine oil, lubricate the distributor
O-ring.
- Disconnect the spark plug wire from the No. 1 cylinder
spark plug. Remove the spark plug from the No. 1 cylinder and press a
thumb over the spark plug hole.
- Using a wrench on the crankshaft pulley, rotate the
crankshaft until pressure is felt at the spark plug hole, indicating the
piston is approaching TDC on the compression stroke. Continue rotating
the crankshaft until the crankshaft pulley mark aligns with the timing
cover indicator.
- Position the distributor rotor so it aligns with
the No. 1 spark plug wire tower on the distributor cap.
- Install the distributor. Align the mark that was
made on the distributor housing with the mark that was made on the cylinder
block. Loosely tighten the distributor hold-down bolts.
- Connect the electrical connectors to their original
locations. Install the distributor cap.
- Install the spark plug in the No. 1 cylinder and
connect the spark plug wire.
- Install fresh air duct.
- Connect the negative battery cable. Start the engine
and check or adjust the ignition timing.
NOTE: The ignition module and coil are both located in
the distributor. Disassembly is required to examine or replace the components.
- Disconnect the negative battery cable.
- Remove the 2 fresh air duct nuts and 3 bolts. Loosen
the spring clamp at the front of the air cleaner assembly and slide it
forward. Remove the fresh air duct.
- Loosen the clamp on the front of the air flow meter
and disconnect the air duct. Disconnect the air flow meter electrical
connector at the left side of the air cleaner.
- Disconnect the evaporative canister hose from the
routing clip on the front of the air cleaner. Remove the fuel pressure
regulator control solenoid from the air cleaner and position aside.
- Remove the nuts and bolt and remove the air cleaner
assembly.
- Tag and disconnect the spark plug wires from the
distributor cap. Disconnect the electrical connectors from the top of
the distributor.
- Using chalk or paint, mark the position of the distributor
housing on the cylinder head. Remove the distributor hold-down bolts and
remove the distributor.
-
To remove the ignition module or coil, remove the bolt from the cap,
separate the distributor parts, and replace components as necessary. Reassemble
the distributor, making sure that the packing is in position, and tighten
the bolt to 27-46 inch lbs. (3-5 Nm).
To install:
-
Align the distributor shaft with the camshaft end and install the distributor.
NOTE: The tangs on the distributor shaft are different
sizes, allowing the distributor to be installed in only one position.
- Install the distributor hold-down bolts. Align the
mark that was made on the distributor housing with the mark that was made
on the cylinder head and loosely tighten the bolts.
- Connect the electrical connectors to the distributor
and the spark plug wires to the distributor cap.
- Install the air cleaner assembly and tighten the
nuts and bolt to 18 ft. lbs. (25 Nm).
- Install the fuel pressure regulator solenoid and
connect the evaporative canister hose into the routing clip.
- Connect the air flow meter electrical connector.
Connect the air duct and tighten the clamp.
- Align the fresh air duct and install the hose to
the air cleaner assembly. Loosen the spring clamp and slide it into position.
Install the fresh air duct nuts and bolts and tighten to 71-88 inch lbs.
(8-10 Nm).
- Connect the negative battery cable. Start the engine,
and check or adjust the ignition timing.
-
Align the distributor shaft with the camshaft end and install the distributor.
NOTE: The tangs on the distributor shaft are different
sizes, allowing the distributor to be installed in only 1 position.
- Install the distributor hold-down bolts. Align the
mark that was made on the distributor housing with the mark that was made
on the cylinder head and loosely tighten the bolts.
- Connect the electrical connectors to the distributor
and the spark plug wires to the distributor cap.
- Install the air cleaner assembly and tighten the
nuts and bolt to 18 ft. lbs. (25 Nm).
- Install the fuel pressure regulator solenoid and
connect the evaporative canister hose into the routing clip.
- Connect the air flow meter electrical connector.
Connect the air duct and tighten the clamp.
- Align the fresh air duct and install the hose to
the air cleaner assembly. Loosen the spring clamp and slide it into position.
Install the fresh air duct nuts and bolts and tighten to 71-88 inch lbs.
(8-10 Nm).
- Connect the negative battery cable. Start the engine
and check or adjust the ignition timing.
- Disconnect the negative battery cable.
- Turn the crankshaft pulley, in the normal direction
of rotation, until the No. 1 cylinder piston is at Top Dead Center (TDC)
on the compression stroke. The mark on the crankshaft pulley should be
aligned with the T on the timing belt cover.
- Label and remove the spark plug wires from the distributor
cap. Remove the distributor cap.
- Disconnect the wiring harness from the distributor.
- Mark the position of the distributor housing on the
cylinder head.
-
Remove the distributor mounting bolt and remove the distributor. Remove
and discard the distributor O-ring.
To install:
- Apply clean engine oil to a new O-ring and install
it on the distributor.
- Install the distributor in the cylinder head. Make
sure the distributor rotor is pointing toward the No. 1 spark plug tower
position on the distributor cap.
- Install the distributor mounting bolt. Align the
marks made on the distributor housing and cylinder head during removal
and loosely tighten the bolts.
- Connect the distributor wiring.
- Install the distributor cap and secure the screws.
- Connect the spark plug wires to the distributor cap
in their original locations.
- Connect the negative battery cable. Check and adjust
the ignition timing.
- Disconnect the spark plug wire and remove the spark
plug from the No. 1 cylinder. Place a finger over the spark plug hole.
- Turn the crankshaft pulley in the normal direction
of rotation until compression is felt; the piston is approaching TDC on
the compression stroke. Continue rotating the crankshaft pulley until
the pulley mark aligns with the T mark on the timing belt cover.
- Apply clean engine oil to a new O-ring and install
it on the distributor.
- Install the distributor in the cylinder head. Make
sure the distributor rotor is pointing toward the No. 1 spark plug tower
position on the distributor cap.
- Install the distributor mounting bolt. Align the
marks made on the distributor housing and cylinder head during removal
and loosely tighten the bolt.
- Connect the distributor wiring.
- Install the distributor cap and secure the screws.
- Install the spark plug in the No. 1 cylinder and
connect the spark plug wire.
- Connect the spark plug wires to the distributor cap
in their original locations.
- Connect the negative battery cable. Check and adjust
the ignition timing.
NOTE: The ignition module and coil are both located in
the distributor. Disassembly is required to examine or replace the components.
- Disconnect the negative battery cable.
- Tag and disconnect the spark plug wires from the
distributor cap. Disconnect the electrical connectors from the top of
the distributor.
- Using chalk or paint, mark the position of the distributor
housing on the cylinder head. Remove the distributor hold-down bolts and
remove the distributor.
-
To remove the ignition module or coil, remove the bolt from the cap,
separate the distributor parts, and replace components as necessary. Reassemble
the distributor, making sure that the packing is in position, and tighten
the bolt to 27-46 inch lbs. (3-5 Nm).
To install:
-
Align the distributor shaft with the camshaft end and install the distributor.
NOTE: The tangs on the distributor shaft are different
sizes, allowing the distributor to be installed in only one position.
- Install the distributor hold-down bolts. Align the
mark that was made on the distributor housing with the mark that was made
on the cylinder head and tighten the bolts to 14-18 ft. lbs. (19-25 Nm).
- Connect the electrical connectors to the distributor
and the spark plug wires to the distributor cap.
- Connect the negative battery cable. Start the engine,
and check or adjust the ignition timing.
-
Align the distributor shaft with the camshaft end and install the distributor.
NOTE: The tangs on the distributor shaft are different
sizes, allowing the distributor to be installed in only 1 position.
- Install the distributor hold-down bolts. Align the
mark that was made on the distributor housing with the mark that was made
on the cylinder head and tighten the bolts to 14-18 ft. lbs. (19-25 Nm).
- Connect the electrical connectors to the distributor
and the spark plug wires to the distributor cap.
- Connect the negative battery cable. Start the engine
and check or adjust the ignition timing.