- Apply the parking brake. Place the shift lever in
NEUTRAL on manual transaxles, and P on automatic transaxles.
- Locate the timing marks on the crankshaft pulley
and the timing indicator scale on the engine front cover. If the marks
are hard to see, clean them with degreaser and a stiff brush.
- Start the engine and bring to normal operating temperature.
Make sure all accessories are OFF.
- Connect a tachometer and timing light to the engine
according to the manufacturer's instructions.
- Verify that the idle speed is for the 1995-97 Protege
1.5L (Z5D) engine, between 650-750 rpms on manual, and 700-800 rpms on
automatic transaxles. Idle speed on the 1993 MX3 1.6L (B6-ZE) and Protege
1.8L (BPD) engines should be between 700-800 rpms. Adjust the idle speed
as necessary.
- On the 1993-95 MX3, 1.8L (K8), 1993-95 626, MX6 2.5L
(KL) and Millenia 2.5L (KLD) engines, check the idle speed and adjust,
if necessary; it should be 600-700 rpm.
- On the 1993-94 929 3.0L (JE and ZE) engines, the
idle speed should be 680-720 rpm.
-
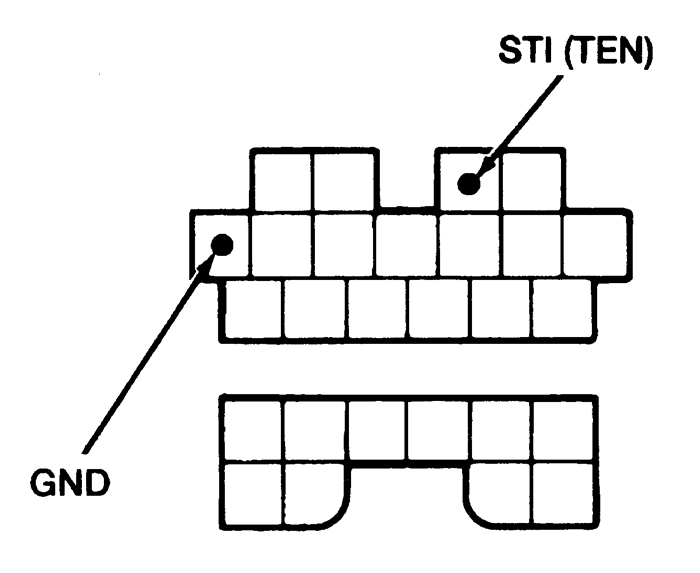
Connect a jumper wire between the TEN terminal and the GND
terminal of the data link connector.
| Fig. 1: Connect a jumper wire to the Data Link Connector
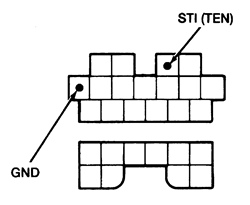
|
- Verify that the timing mark (white) on the crankshaft
pulley, and the T mark on the timing belt cover are aligned. Aim the timing
light at the timing marks; the timing should be on the 1995-97 Protege
1.5L (Z5D), 1995 Protege 1.8L (BPD) 0-1 degrees.
- On the 1995 MX3 1.6L (B6-ZE), 1993-95 MX3, 1.8L (K8),
1993-95 626, MX6 2.5L (KL) and Millenia 2.5L (KLD) engines, the timing
should be 9-11 degrees.
- On the 1993-94 929 3.0L (JE and ZE) engines, the
timing should be 11-13 degrees BTDC.
-
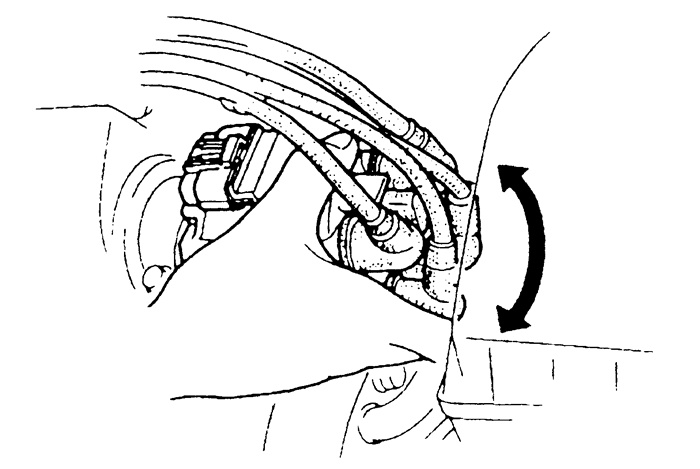
If the timing marks are not aligned, loosen the distributor hold-down
bolt and turn the distributor housing to adjust. When the marks align,
tighten the distributor hold-down bolts to 14-19 ft. lbs. (19-25 Nm) and
recheck the timing.
| Fig. 2: Adjust the distributor position -- 1995-97
Protege 1.5L (Z5D) and 1.8L (BPD) shown
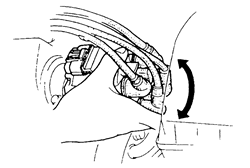
|
- Remove the jumper wire.
- Increase the engine speed and verify that the timing
advances.
- Remove all test equipment.
- Apply the parking brake. If equipped with manual
transaxle, place the shift lever in neutral. If equipped with automatic
transaxle, place the shift lever in P.
- Locate the timing marks on the crankshaft pulley
and the timing indicator scale on the engine front cover. If the marks
are hard to see, clean them with degreaser and a wire brush.
- Start the engine and bring to normal operating temperature.
Make sure all accessories are OFF.
- Connect a tachometer and timing light to the engine
according to the manufacturer's instructions.
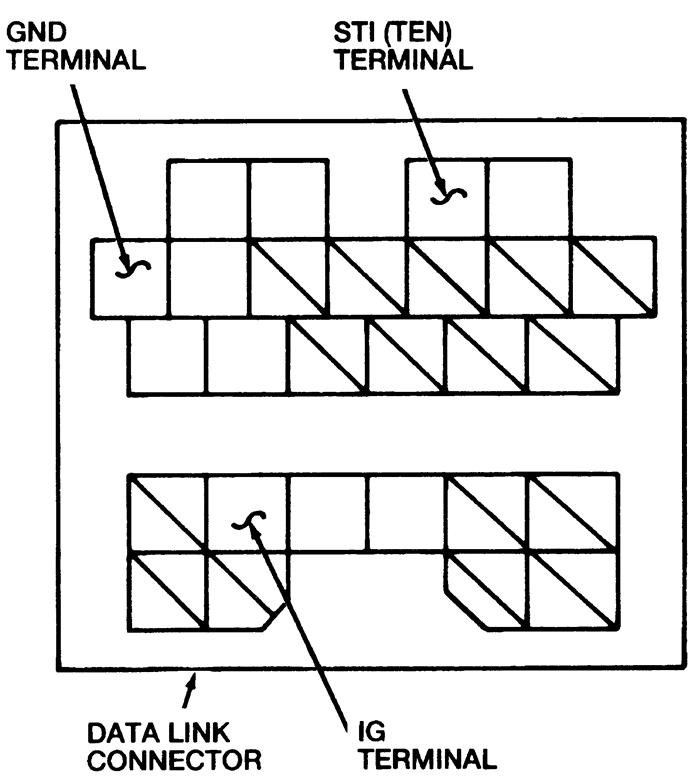
- If equipped with manual transaxle, remove the shorting
bar from the double wire SPOUT connector. If equipped with automatic transaxle,
connect a jumper wire between the STI TEN terminal and the GND
terminal on the data link connector.
- Check the idle speed and adjust, if necessary; it
should be 700 ± 50 rpm.
- Aim the timing light at the timing marks; the timing
should be 10 ± 1 degrees if equipped with manual transaxle or 12 ± 1 degrees
if equipped with automatic transaxle.
- If the timing marks are not aligned, loosen the distributor
hold-down bolt and turn the distributor housing to adjust. When the marks
align, tighten the hold-down bolt to 19 ft. lbs. (25 Nm). Recheck the
timing after the bolt has been tightened.
- If equipped with manual transaxle, install the shorting
bar to the double wire SPOUT connector. If equipped with automatic transaxle,
remove the jumper wire from the data link connector.
-
Remove all test equipment.
| Fig. 3: Data link connector (ATX only) -- 1993
626 and MX6 2.0L (FS) engines
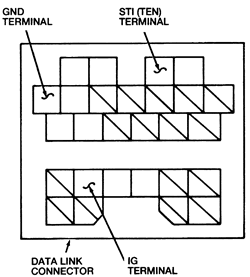
|
- Apply the parking brake. Place the shift lever in
neutral.
- Locate the timing marks on the crankshaft pulley
and the timing indicator scale on the engine front cover. If the marks
are hard to see, clean them with degreaser and a stiff brush.
- Start the engine and bring to normal operating temperature.
Make sure all accessories are off.
- Connect a tachometer and timing light to the engine
according to the manufacturer's instructions.
- Verify that the idle speed is between 650-750 rpm;
adjust if necessary.
- Connect a jumper wire between the TEN terminal
and theGND terminal of the data link connector.
- Verify that the idle speed is now 500-800 rpm.
- Aim the timing light at the timing marks; the timing
should be 12 ± 1 degrees,
- If the timing marks are not aligned, loosen the distributor
hold-down bolt and turn the distributor housing to adjust. When the marks
align, tighten the hold-down bolt to 19 ft. lbs. (25 Nm). Recheck the
timing after the bolt has been tightened.
- Remove the jumper wire.
- Remove all test equipment.
- Apply the parking brake. Place the shift lever in
P.
- Locate the timing marks on the crankshaft pulley
and the timing indicator scale on the engine front cover. If the marks
are hard to see, clean them with degreaser and a stiff brush.
- Start the engine and bring to normal operating temperature.
Make sure all accessories are off.
- Check the idle speed and adjust, if necessary; it
should be 700 ± 50 rpm.
- Connect a tachometer and timing light to the engine
according to the manufacturer's instructions.
-
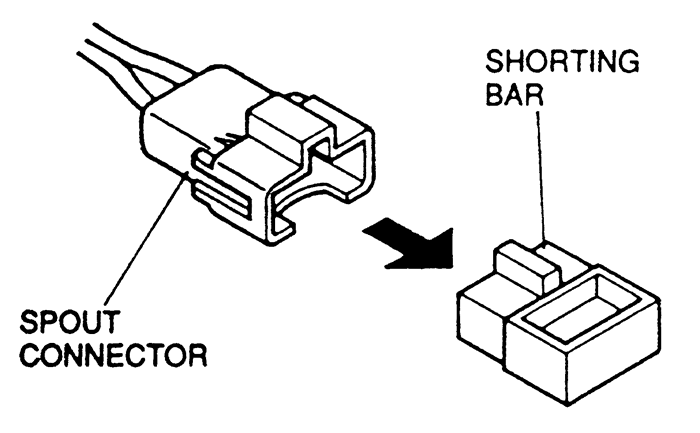
Remove the shorting bar from the double wire SPOUT connector.
| Fig. 4: Removing the shorting bar -- 1994-97
626 and MX6 2.0L (FS) engines with an automatic transmission
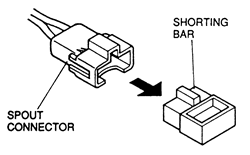
|
- Check the idle speed, it should be 500-800 rpm.
- Aim the timing light at the timing marks; the timing
should be 10 ± 1 degrees,
- If the timing marks are not aligned, loosen the distributor
hold-down bolt and turn the distributor housing to adjust. When the marks
align, tighten the hold-down bolt to 19 ft. lbs. (25 Nm). Recheck the
timing after the bolt has been tightened.
- Install the shorting bar to the double wire SPOUT
connector.
- Remove all test equipment.
NOTE: The ignition timing can NOT be adjusted on this
engine. Follow this procedure for inspection only.
- Apply the parking brake. Place the shift lever in
P.
- Locate the timing marks on the crankshaft pulley
and timing belt cover. If the marks are hard to see, clean them off with
some degreasing cleaner and a wire brush.
- Start the engine and allow it to come to normal operating
temperature. Make sure all accessories are OFF.
- Connect a tachometer and inductive timing light according
to the manufacturer's instructions.
- Check the idle speed and adjust, if necessary; it
should be 650 ± 50 rpm.
- Connect terminals TEN and GND on the
data link connector with a jumper wire.
- Check the idle speed, it should be 550-750 rpm.
- Connect the diagnostic tool to the ignition timing
checking harness with the arrow facing the connector.
- Aim the timing light at the timing marks. The timing
should be 6-8°BTDC.
- If it isn't in the correct range, inspect the on-board
diagnostic system, the camshaft position sensor and/or the crankshaft
position sensor.
- Stop the engine. Remove the jumper wire and test
equipment.
- Apply the parking brake. Place the shift lever in
NEUTRAL on manual transaxles, and P on automatic transaxles.
- Locate the timing marks on the crankshaft pulley
and the timing indicator scale on the engine front cover. If the marks
are hard to see, clean them with degreaser and a stiff brush.
- Start the engine and bring to normal operating temperature.
Make sure all accessories are OFF.
- Connect a tachometer and timing light to the engine
according to the manufacturer's instructions.
- Verify that the idle speed is between 800-900 rpm
on manual, and 750-850 rpm on automatic transaxles. Adjust the idle speed
as necessary.
- Connect a jumper wire between the TEN terminal
and the GND terminal of the data link connector.
- Verify that the timing mark (white) on the crankshaft
pulley, and the indicator pin are aligned. Aim the timing light at the
timing marks; the timing should be 0 ± 1 degrees,
-
If the timing marks are not aligned:
- Remove the ignition coil bracket, and move aside
for clearance.
- Loosen the camshaft position sensor lockbolts,
and turn the camshaft position sensor to adjust.
- When the marks align, tighten the lockbolts to
14-18 ft. lbs. (19-25 Nm). Recheck the timing after the bolts have been
tightened.
- Remove the jumper wire.
- Increase the engine speed and verify that the timing
advances.
- Remove all test equipment.
- Warm up the engine to normal operating temperature.
- Turn all electrical loads OFF - headlight switch,
fan switch and rear window defrost switch.
- Connect special tool 49 T088 0A0 (NGS) to the data
link connector-2 and select the PID/DATA MONITOR AND RECORD function.
- Select the RPM on the NGS display.
- Wait until the cooling fan stops.
- Apply the parking brake. Place the shift lever in
NEUTRAL on manual transaxles, and P on automatic transaxles.
- Locate the timing marks on the crankshaft pulley
and the timing indicator scale on the engine front cover. If the marks
are hard to see, clean them with degreaser and a stiff brush.
- Connect a timing light to the high-tension lead No.
1.
- Connect special tool 49 B019 9A0 (system selector)
to the data link connector.
- Set switch A to position 1.
- Set the test switch to SELF TEST.
- Verify that the idle speed is within the specification
of 650-975 rpm.
- Verify that the timing mark (white) on the crankshaft
pulley, and the T mark on the timing belt cover are aligned. Aim the timing
light at the timing marks; the timing should be 9°-11°BTDC (yellow timing
mark).
-
If the timing marks are not aligned:
- Remove the ignition coil bracket, and move aside
for clearance.
- Loosen the camshaft position sensor lockbolts,
and turn the camshaft position sensor to adjust.
- When the marks align, tighten the lockbolts to
14-18 ft. lbs. (19-25 Nm). Recheck the timing after the bolts have been
tightened.
- Disconnect the special tool.
- Increase the engine speed and verify that the timing
advances.
- Remove all remaining test equipment.
Before making any adjustment, make sure of the condition of the engine
(spark plugs, leaks in hoses, etc.). Make sure all accessories are OFF
and warm the engine to normal operating temperature.
-
Connect a timing light and a tachometer to the data link connector
terminal IG-. When using an externally powered timing light and/or tachometer,
connect it to the power connector (blue: 1-pin).
CAUTION
Grounding the power connector terminal (blue: 1-pin) will burn out
the 20A wiper fuse.
- Make sure that the cooling fan does not operate.
- Connect the SST 49 B019 9AO and set the test switch
to "self test" or connect data link connector terminals TEN
and GRD with a jumper wire.
-
Check the idle speed and set it to specification:
- A/T - park 800±50 rpm.
-
Verify that the timing mark (white) on the crankshaft pulley and the
timing cover are aligned. Specification is:
- M/T - 9-11°BTDC.
- A/T - 7-9°BTDC.
- If the marks are not aligned, loosen the crankshaft
position sensor lockbolt, and turn the crankshaft position sensor to make
the adjustment. Torque the lockbolt to 14-18 ft. lbs. (19-25 Nm).
- Disconnect the SST 49 B019 9AO.
- Verify that the ignition timing is within specification.
- Disconnect all other test equipment and check for
proper operation.
- Apply the parking brake. Place the shift lever in
NEUTRAL on manual transaxles, and P on automatic transaxles.
- Locate the timing marks on the crankshaft pulley
and the timing indicator scale on the engine front cover. If the marks
are hard to see, clean them with degreaser and a stiff brush.
- Start the engine and bring to normal operating temperature.
Make sure all accessories are OFF.
- Connect a tachometer and timing light to the engine
according to the manufacturer's instructions.
- Verify that the idle speed is between 700-800 rpm.
Adjust the idle speed as necessary.
- Connect a jumper wire between the TEN terminal
and the GND terminal of the data link connector.
- Verify that the timing mark (yellow) on the crankshaft
pulley, and the T mark on the timing belt cover are aligned. Aim the timing
light at the timing marks; the timing should be 10 ± 1 degrees for the
DOHC engine and 5 ± 1 degree for the SOHC engine.
- If the timing marks are not aligned, loosen the distributor
hold-down bolts and turn the distributor housing to adjust. When the marks
align, tighten the hold-down bolt to 18 ft. lbs. (25 Nm). Recheck the
timing after the bolt has been tightened.
- Remove the jumper wire.
- Increase the engine speed and verify that the timing
advances.
- Remove all test equipment.