CAUTION
When draining the coolant, keep in mind that cats and dogs are attracted
by the ethylene glycol antifreeze, and are quite likely to drink any that
is left in an uncovered container or in puddles on the ground. This will
prove fatal in sufficient quantity. Always drain the coolant into a sealable
container. Coolant should be reused unless it is contaminated or several
years old.
- Properly relieve the fuel system pressure. Disconnect
the negative battery cable and drain the cooling system.
- Disconnect the air intake hose from the throttle
body. Remove the hose and air cleaner assembly if necessary.
- Disconnect the accelerator cable. Disconnect and
plug the fuel lines.
- Label and disconnect all necessary vacuum hoses and
electrical connectors. Disconnect the coolant hoses.
- Disconnect the EGR tube, if equipped.
- If equipped, remove the air valve and remove the
fuel rail attaching bolts. Remove the fuel rail and injectors as an assembly.
- Remove the intake manifold support bracket. If necessary,
remove the bolt retaining the dipstick tube bracket to the intake manifold.
- Remove the intake manifold-to-cylinder bolts/nuts
and remove the intake manifold assembly.
-
If necessary, remove the throttle body and separate the intake manifold
upper and lower halves.
To install:
- Clean all gasket mating surfaces.
- If separated, connect the upper and lower intake
manifolds using a new gasket. Tighten the nuts/bolts to 19 ft. lbs. (25
Nm). If removed, install the throttle body using a new gasket. Tighten
the retaining nuts/bolts to 19 ft. lbs. (25 Nm).
-
Install the intake manifold assembly to the cylinder head using a new
gasket. Tighten the nuts/bolts to 19 ft. lbs. (25 Nm) on all except 2.2L
engine. On 2.2L engine, tighten to 22 ft. lbs. (30 Nm).
NOTE: Tighten the bolts in the center of the manifold
first and works outward toward the ends.
- If equipped, install the bolt retaining the dipstick
tube to the intake manifold. Install the intake manifold bracket. Tighten
the attaching nuts/bolts to 38 ft. lbs. (52 Nm) on all except 323, Protege
and MX-3. On 323, Protege and MX-3, tighten the attaching nuts/bolts to
19 ft. lbs. (25 Nm).
- On Miata, install the fuel rail and injector assembly
on the intake manifold using new insulators. Tighten the fuel rail mounting
bolts to 19 ft. lbs. (25 Nm). Install the air valve and tighten the bolts
to 57 inch lbs. (6 Nm).
- Connect the EGR tube, if equipped. Connect the coolant
and vacuum hoses, electrical connectors and fuel lines.
- Connect the accelerator cable. Install the air cleaner
assembly, if removed, and connect the air intake tube to the throttle
body.
- Connect the negative battery cable. Fill and bleed
the cooling system.
- Start the engine and bring to normal operating temperature.
Check for leaks. Check the idle speed.
- Relieve the fuel system pressure, and disconnect
the negative battery cable. Drain the cooling system.
- Disconnect the mass air flow sensor electrical connector.
Remove the air ducts, air cleaner assembly, mass air flow sensor and resonance
chamber.
- Disconnect the throttle and accelerator cables. Disconnect
and plug the fuel lines.
-
Remove the throttle body as follows:
- Disconnect the coolant hoses.
- Label and disconnect the electrical connectors
for the idle air control valve and the throttle position sensor.
- Remove the mounting bolts/nuts from the throttle
body, and remove the throttle body from the vehicle.
- Label and disconnect the vacuum lines at the intake
manifold.
- Remove the dynamic chamber (upper intake manifold).
- Disconnect and plug the fuel hoses from the fuel
rail.
- Label and disconnect the electrical connectors for
the fuel injectors.
- On some models you may need to remove the fuel rail
with the injectors connected.
- On the 1.5L engine, remove the EGR pipe from the
intake manifold. Remove the EGR and pressure regulator control (PRC) solenoid
valve brackets.
- Remove the intake manifold support bracket.
-
Remove the bolts and nuts, and remove the intake manifold.
To install:
- Clean all gasket mating surfaces.
- Install the intake manifold, using a new gasket.
Tighten the nuts and bolts to 14-18 ft. lbs. (19-25 Nm).
- Attach the EGR pipe to the manifold and install the
intake manifold support bracket. Tighten the support bracket bolts to
38 ft. lbs. (51 Nm).
- If removed, install the EGR and pressure regulator
control (PRC) solenoid valve brackets.
- Install the fuel rail and injector assembly. Connect
the electrical connectors to the injectors,and the fuel lines to the rail.
- Install the upper intake manifold to the intake manifold
using new gaskets. Tighten the nuts to 14-18 ft. lbs. (19-25 Nm).
- Install the throttle body, using a new mounting gasket.
Tighten the mounting bolts to 14-18 ft. lbs. (19-25 Nm).
- Connect the electrical connectors for the idle air
control valve and the throttle position sensor.
- Connect the vacuum and coolant lines.
- Connect and adjust the throttle and accelerator cables.
- Connect the fuel lines.
- Install the resonance chamber. Install the air cleaner
assembly, mass air flow sensor and ducts. Connect the mass air flow sensor
connector.
- Connect the negative battery cable. Fill and bleed
the cooling system. Run the engine and check for leaks.
- Relieve the fuel system pressure and disconnect the
negative battery cable. Drain the cooling system.
- Disconnect the vacuum hoses and electrical connectors
from the air cleaner housing. Remove the air cleaner assembly.
- Disconnect the knock sensor connector and remove
the knock sensor bracket from the intake manifold. Remove the crankshaft
position sensor bracket from the right side of the intake manifold.
- Remove the right bank (rear) spark plug wires from
the spark plugs and the routing clips. Remove the Variable Resource Induction
System (VRIS) solenoid connector bracket from the rear of the intake manifold.
- Label and disconnect the necessary vacuum hoses from
the rear of the intake manifold and EGR valve. Disconnect the PCV valve
hose from the intake manifold, near the throttle body.
- Label and disconnect the throttle position sensor
and fuel rail electrical connectors. Disconnect the throttle cable from
the throttle body and the vacuum hose from the evaporative canister.
- Disconnect and plug the fuel supply line at the fuel
rails and discard the copper crush washers. Disconnect the fuel and vacuum
lines from the fuel pressure regulator.
-
Disconnect the EGR breather tube. Remove the intake manifold mounting
nuts and bolts in 2-3 steps, then remove the intake manifold.
To install:
- Clean all gasket mating surfaces.
- Position new gaskets and install the intake manifold.
Tighten the nuts and bolts in 2-3 steps to 18 ft. lbs. (25 Nm).
- Connect the EGR breather tube and connect the fuel
and vacuum lines to the fuel pressure regulator.
- Connect the fuel supply line to the fuel rail, using
new copper crush washers.
- Connect the vacuum hoses to the evaporative canister,
intake manifold, throttle body and EGR valve.
- Connect the throttle position sensor electrical connector.
Install the VRIS solenoid connector bracket.
- Connect the spark plug wires to the spark plugs and
routing clips. Install the crankshaft position sensor bracket.
- Install the knock sensor bracket and connect the
knock sensor electrical connector.
- Install the air cleaner assembly and connect the
vacuum hoses and electrical connectors to the air cleaner housing.
- Connect the negative battery cable. Fill and bleed
the cooling system. Run the engine and check for leaks.
- Relieve the fuel system pressure and disconnect the
negative battery cable. Drain the cooling system.
- Disconnect the mass air flow sensor electrical connector.
Remove the air ducts, air cleaner assembly and resonance chamber.
- Remove the fuel line mounting bracket and disconnect
the throttle cable. Disconnect and plug the fuel lines.
-
Remove the throttle body as follows:
- Disconnect the coolant hoses.
- Label and disconnect the electrical connectors
for the idle air control valve and the throttle position sensor.
- Remove the mounting bolts/nuts from the throttle
body, and remove the throttle body from the vehicle.
- Label and disconnect the vacuum lines at the intake
manifold.
- Remove the bypass air control (BAC) valve, variable
inertia charging system (VICS) solenoid valve, pressure regulator control
(PRC) solenoid valves, and the EGR solenoid vent and vacuum valves from
the intake manifold.
- Disconnect and plug the fuel hoses from the fuel
rail.
- Label and disconnect the electrical connectors for
the fuel injectors.
- Remove the fuel rail with the injectors connected.
- Remove the intake manifold support bracket and remove
the EGR pipe from the intake manifold.
-
Lower the vehicle. Remove the bolts and nuts, and remove the intake
manifold.
To install:
- Clean all gasket mating surfaces.
- Install the intake manifold, using a new gasket.
Tighten the nuts and bolts to 16-22 ft. lbs. (22-30 Nm).
- Raise and safely support the vehicle.
- Attach the EGR pipe to the manifold and install the
intake manifold support bracket. Tighten the support bracket bolts to
38 ft. lbs. (51 Nm).
- Install the fuel rail and injector assembly. Connect
the electrical connectors to the injectors,and the fuel lines to the rail.
- Install the bypass air control (BAC) valve, variable
inertia charging system (VICS) solenoid valve, pressure regulator control
(PRC) solenoid valves, and the EGR solenoid vent and vacuum valves to
the intake manifold.
- Install the throttle body, using a new mounting gasket.
Tighten the mounting bolts to 14-18 ft. lbs. (19-25 Nm).
- Connect the electrical connectors, vacuum lines and
coolant lines.
- Connect the throttle cable and the fuel lines. Install
the fuel line mounting bracket and tighten the bolt to 97 inch lbs. (11
Nm).
- Install the resonance chamber. Install the air cleaner
assembly and ducts. Connect the mass air flow sensor connector.
- Connect the negative battery cable. Fill and bleed
the cooling system. Run the engine and check for leaks.
- Relieve the fuel system pressure and disconnect the
negative battery cable. Drain the cooling system.
- Remove the top engine compartment strut bar from
the vehicle.
- Remove the fresh air duct. Label and disconnect the
vacuum hoses and electrical connectors from the air cleaner housing. Remove
the air cleaner assembly.
- Remove the resonance duct.
- Remove the volume air flow sensor and the air intake
hose from the throttle body.
- Disconnect the knock sensor connector and remove
the knock sensor bracket from the intake manifold. Remove the crankshaft
position sensor bracket from the right side of the intake manifold.
- Remove the Variable Resource Induction System (VRIS)
solenoid connector bracket from the rear of the intake manifold.
- Label and disconnect the necessary vacuum hoses from
the rear of the intake manifold and EGR valve. Disconnect the PCV valve
hose from the intake manifold, near the throttle body.
- Label and disconnect the throttle position sensor
and fuel rail electrical connectors. Disconnect the throttle cable from
the throttle body and the vacuum hose from the evaporative canister.
- Disconnect and plug the fuel supply line at the fuel
rails and discard the copper crush washers. Disconnect the fuel and vacuum
lines from the fuel pressure regulator.
- Disconnect the EGR breather tube. Remove the intake
manifold mounting nuts and bolts in 2-3 steps, then remove the intake
manifold.
-
If the intake manifold is being replaced, remove the throttle body,
air bypass (BAC) valve and the air intake pipe from the manifold. Remove
the fuel rail and injectors from the manifold.
To install:
- Clean all gasket mating surfaces.
-
If installing a new intake manifold:
- Position the fuel rail, with injectors, onto
the manifold. Tighten the mounting bolts to 14-18 ft. lbs. (19-25 Nm).
- Lubricate new O-rings with clean engine oil,
and install the air intake pipe.
- Install the BAC valve and the throttle body onto
the manifold.
- Position new gaskets and install the intake manifold.
Tighten the nuts and bolts in 2-3 steps, from the center to the ends,
to 14-18 ft. lbs. (19-25 Nm).
- Connect the EGR breather tube and connect the fuel
and vacuum lines to the fuel pressure regulator.
- Connect the fuel supply line to the fuel rail, using
new copper crush washers.
- Connect and adjust the throttle cable.
- Connect the vacuum hoses to the evaporative canister,
intake manifold, throttle body, PCV and EGR valve.
- Connect the throttle position sensor electrical connector.
Install the VRIS solenoid connector bracket.
- Install the crankshaft position sensor bracket.
- Install the knock sensor bracket and connect the
knock sensor electrical connector.
- Install the air intake hose onto the throttle body.
Install the volume air flow sensor.
- Install the air cleaner assembly and connect the
vacuum hoses and electrical connectors to the air cleaner housing. Install
the fresh air duct, and tighten the mounting nut to 70-95 inch lbs. (8-11
Nm).
- Install the strut bar, and tighten the bolts to 34-46
ft. lbs. (47-62 Nm).
- Connect the negative battery cable. Fill and bleed
the cooling system. Run the engine and check for leaks.
- Relieve the fuel system pressure and disconnect the
negative battery cable.
- Remove the fresh air duct. Label and disconnect the
vacuum hoses and electrical connectors from the air cleaner housing. Remove
the air cleaner assembly.
- Remove the volume air flow sensor and the air intake
hose from the throttle body.
- Disconnect the accelerator cable.
- Disconnect the fuel pipe from the fuel distributor.
- Remove the intake manifold.
-
Remove the following from the manifold if necessary: the throttle body,
air bypass (BAC) valve and the air intake pipe from the manifold. Remove
the fuel rail and injectors from the manifold.
To install:
- Clean all gasket mating surfaces.
-
If installing a new intake manifold:
- Position the fuel rail, with injectors, onto
the manifold. Tighten the mounting bolts to 12-16 ft. lbs. (16-22 Nm).
- Lubricate new O-rings with clean engine oil,
and install the air intake pipe.
- Install the BAC valve and the throttle body onto
the manifold.
- Position new gaskets and install the intake manifold.
Tighten the nuts and bolts in 2-3 steps, from the center to the ends,
to 14-18 ft. lbs. (19-25 Nm).
- Connect the fuel supply line to the fuel rail, using
new copper crush washers.
- Connect and adjust the accelerator cable.
- Install the air intake hose onto the throttle body.
Install the volume air flow sensor.
- Install the air cleaner assembly and connect the
vacuum hoses and electrical connectors to the air cleaner housing. Install
the fresh air duct, and tighten the mounting nut to 70-95 inch lbs. (8-11
Nm).
- Connect the negative battery cable.
- Relieve the fuel system pressure and disconnect the
negative battery cable.
- Remove the fresh air duct and the air cleaner assembly.
- Disconnect the Mass Air Flow Sensor and remove the
air hose.
- Remove the resonance chamber.
- Disconnect the accelerator cable.
- Remove the throttle body and the BAC valve.
- Remove the fuel distributor.
-
Remove the intake manifold bracket and remove the intake manifold.
To install:
- Clean all gasket mating surfaces.
-
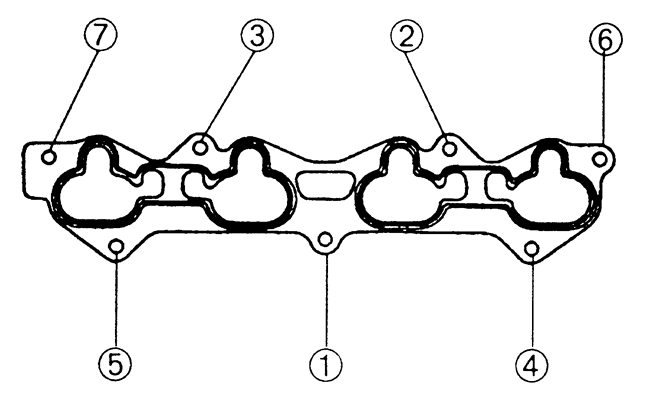
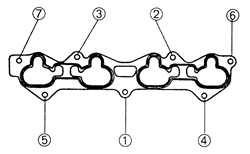
Install the intake manifold, using a new gasket. Tighten the nuts and
bolts, in sequence, to 14-18 ft. lbs. (19-25 Nm).
| Fig. 1: Intake manifold mounting bolt (torque sequence) --
1993-97 626 and MX6 2.0L (FS) engine
|
- Install the manifold bracket. Torque the bolt to
28-38 ft. lbs. (38-51 Nm).
- Install the fuel distributor and torque the bolts
to 14-18 ft. lbs. (19-25 Nm).
- Install the BAC valve, torque the mounting bolt to
22-31 in. lbs. (2.5-3.5 Nm).
- Install the throttle body, torque the mounting nuts
and bolts to 14-18 ft. lbs. (19-25 Nm).
- Install the accelerator cable.
- Install the resonance chamber, air hose and connect
the MAF sensor.
- Install the air cleaner assembly and the fresh air
duct.
- Connect the negative battery cable.
- Properly relieve the fuel system pressure.
- Disconnect the negative battery cable, and drain
the cooling system.
- Disconnect the air intake hose from the throttle
body. Disconnect the air flow meter electrical connector and remove the
air cleaner assembly and air ducts.
- Disconnect the accelerator cable. Disconnect and
plug the fuel lines.
- Label and disconnect the necessary hoses and electrical
connectors from the throttle body, and remove the throttle body.
- Disconnect the electrical connector, water hoses
and air hose from the air bypass valve. Remove the retaining bolts/nuts
and remove the air bypass valve. Remove the air intake pipe from the upper
intake manifold.
- Label and disconnect the necessary hoses and electrical
connectors from the upper intake manifold. Remove the upper intake manifold
retaining bolts and the upper intake manifold.
- Label and disconnect the electrical connectors from
the fuel injectors.
- Remove the retaining bolts and cap from the top of
the injector. Remove the injector by grasping the plastic part of the
injector and twisting out. Disconnect the vacuum hose from the fuel pressure
regulator and remove the fuel rail.
- Label and disconnect the remaining hoses and electrical
connectors from the lower intake manifold. Loosen the retaining nuts in
2-3 steps working gradually inward from the ends of the manifold. Remove
the lower intake manifold.
-
Clean all gasket mating surfaces. Inspect the manifolds for cracks
or other damage.
To install:
-
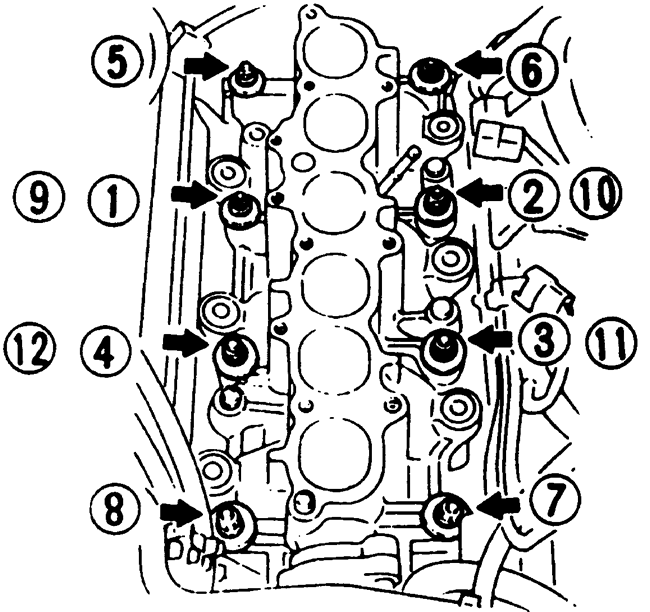
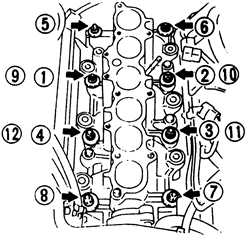
Position new gaskets and install the lower intake manifold. Install
the retaining nut washers with the white paint mark facing upward. Tighten
the retaining nuts in 2-3 steps to 19 ft. lbs. (25 Nm), in the proper
sequence.
| Fig. 2: Intake manifold nut torque sequence --
1993-95 929 3.0L (JE-ZE) engines
|
- Connect the hoses and electrical connectors to the
lower intake manifold.
- Install the fuel rail. Apply a small amount of clean
engine oil to new injector O-rings and install on the injectors. Install
the injectors in the fuel rail using a turning motion, to prevent damaging
the O-rings. Install the injector retainer caps and tighten the screws
to 30 inch lbs. (3.4 Nm).
- Connect the injector electrical connectors and connect
the vacuum hose to the fuel pressure regulator. Connect the fuel lines.
- Using a new gasket, install the upper intake manifold
on the lower intake manifold. Tighten the mounting bolts to 19 ft. lbs.
(25 Nm).
- Connect the electrical connectors and hoses to the
upper intake manifold.
- Install the air intake pipe on the upper intake manifold
using a new gasket, and tighten the mounting bolts to 17 ft. lbs. (23
Nm). Install the air bypass valve and tighten the nuts to 19 ft. lbs.
(25 Nm). Connect the coolant hoses, air hose and electrical connector
to the air bypass valve.
- Install the throttle body, using a new gasket. Tighten
the nuts to 19 ft. lbs. (25 Nm).
- If removed, install the air cleaner and air ducts.
Connect the air intake to the throttle body.
- Connect the negative battery cable. Fill and bleed
the cooling system.
- Start the engine and bring to normal operating temperature.
Check for leaks. Check the idle speed.
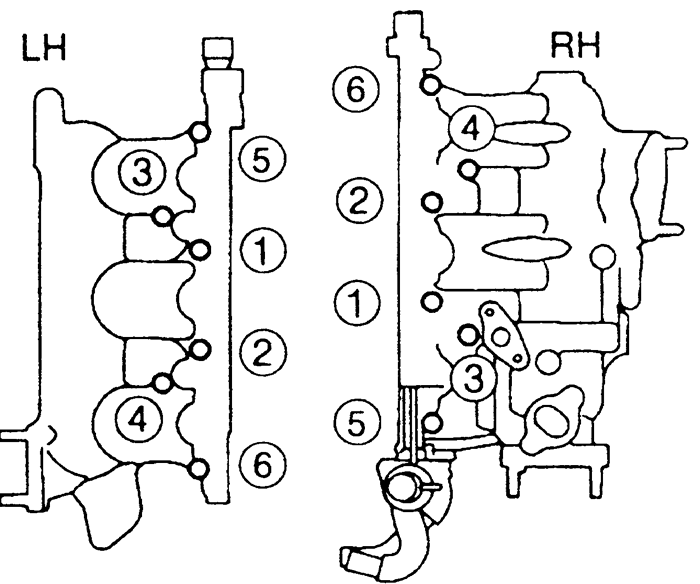
| Fig. 3: Intake manifold mounting bolt torque sequence --
1995-97 Millenia 2.3L (KJS) engine
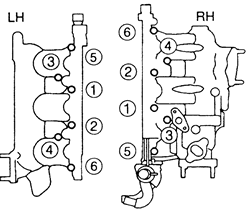
|
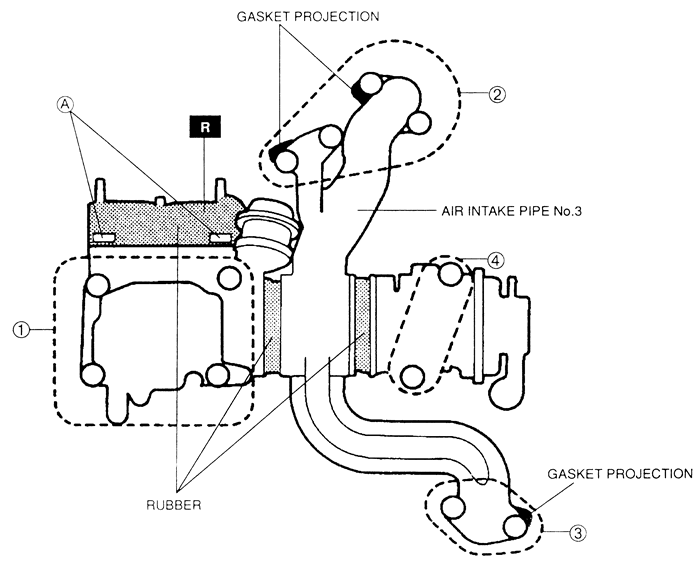
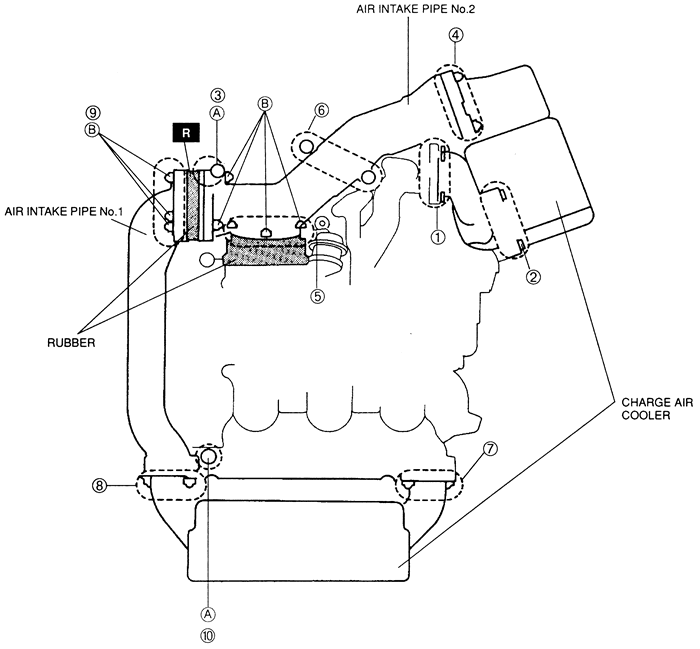
| Fig. 4: Air intake pipe mounting bolt locations --
1995-97 Millenia 2.3L (KJS) Engine
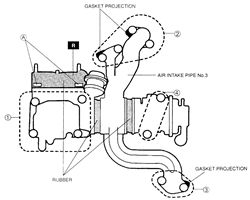
|
| Fig. 5: Charge air cooler mounting bolt locations --
1995-97 Millenia 2.3L (KJS) engine
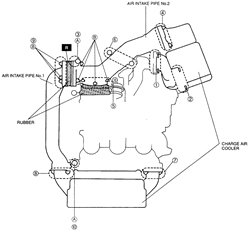
|
- Relieve the fuel system pressure, and disconnect
the negative battery cable.
- Drain the cooling system.
- Remove the dynamic chamber cover.
- Remove the charge air cooler air duct.
- Label and disconnect the vacuum hoses and electrical
connectors from the air cleaner housing. Remove the air cleaner assembly.
- Remove the air and fresh air ducts.
- Remove the mass air flow sensor and the air intake
hose from the throttle body.
- Remove the resonator.
- Remove the right-hand charge air cooler.
- Remove the left-hand charge air cooler.
- Disconnect the accelerator cable.
- Label and disconnect the necessary vacuum hoses from
the rear of the intake manifold and EGR valve.
- Remove the EGR valve.
- Remove the air intake pipe assembly.
- Remove the charge air cooler pipe.
- Disconnect and plug the fuel supply line at the fuel
rails and discard the copper crush washers. Disconnect the fuel and vacuum
lines from the fuel pressure regulator.
- Disconnect and plug the coolant hoses.
- Remove the harness from the intake manifold.
- Remove the intake manifold mounting nuts and bolts
in 2-3 steps, then remove the intake manifold.
-
Label and disconnect the fuel hoses and electrical connectors from
the throttle body. Remove the throttle body.
To install:
- Clean all gasket mating surfaces.
- Install the throttle body. Tighten the nuts and bolts
to 14-18 ft. lbs. (19-25 Nm), and connect the fuel hoses and electrical
connectors.
- Position new gaskets and install the intake manifold.
Tighten the nuts and bolts in 2-3 steps, from the center to the ends,
to 14-18 ft. lbs. (19-25 Nm).
- Install the harness onto the intake manifold.
- Unplug and and connect the coolant hoses.
- Connect the fuel and vacuum lines to the fuel pressure
regulator. Connect the fuel supply line to the fuel rail, using new copper
crush washers.
- Install the charge air cooler pipe.
- Position the air intake pipe assembly using new gaskets.
Hand tighten the nuts and bolts in the order shown in the graphic until
the air intake pipe contacts the intake manifold. Verify that the rubber
gaskets are not twisted or distorted. Tighten the bolts markedA to
70-95 inch lbs. (8-11 Nm), and all others, in sequence, to 14-18 ft. lbs.
(19-25 Nm).
- Install the EGR valve using a new gasket.
- Connect the vacuum hoses to the intake manifold and
EGR valve.
- Connect and adjust the accelerator cable.
- Using new gaskets, position the left and right-hand
charge air coolers. Hand tighten the nuts and bolts in the order shown
in the graphic until the air intake pipes and charge air coolers contact
the intake manifold. Verify that the rubber gaskets are not twisted or
distorted. Tighten the bolts marked A to 44-78 inch lbs. (5-9 Nm).
Tighten the bolts marked B to 70-95 inch lbs. (8-11 Nm), and all
others, in sequence, to 14-18 ft. lbs. (19-25 Nm).
- Install the resonator. Tighten the nuts and bolts
to 12-16 ft. lbs. (16-22 Nm)
- Install the air intake hose onto the throttle body.
Install the mass air flow sensor.
- Install the fresh air and air ducts.
- Install the air cleaner assembly and connect the
vacuum hoses and electrical connectors to the air cleaner housing.
- Install the charge air cooler air duct. Tighten the
mounting bolts to 70-95 inch lbs. (8-11 Nm).
- Install the dynamic chamber cover.
- Connect the negative battery cable.
- Fill and bleed the cooling system. Run the engine
and check for leaks.
- Relieve the fuel system pressure and disconnect the
negative battery cable.
- Drain the cooling system.
- Label and disconnect the vacuum hoses and electrical
connectors from the air cleaner housing. Remove the air cleaner assembly.
- Remove the mass air flow sensor and the air intake
hose from the throttle body.
- Label and disconnect the fuel hoses and electrical
connectors from the throttle body. Remove the throttle body.
- Disconnect the accelerator cable.
- Disconnect and plug the fuel supply line at the fuel
rails and discard the copper crush washers. Disconnect the fuel and vacuum
lines from the fuel pressure regulator.
- Label and disconnect the necessary vacuum hoses from
the rear of the intake manifold and EGR valve.
- Remove the harness from the intake manifold.
- Remove the EGR valve. Disconnect the EGR breather
tube.
-
Remove the intake manifold mounting nuts and bolts in 2-3 steps, then
remove the intake manifold.
To install:
- Clean all gasket mating surfaces.
- Position new gaskets and install the intake manifold.
Tighten the nuts and bolts in 2-3 steps, from the center to the ends,
to 14-18 ft. lbs. (19-25 Nm).
- Connect the EGR breather tube and install the EGR
valve.
- Install the harness onto the intake manifold.
- Connect the vacuum hoses to the intake manifold and
EGR valve.
- Connect the fuel and vacuum lines to the fuel pressure
regulator. Connect the fuel supply line to the fuel rail, using new copper
crush washers.
- Connect and adjust the accelerator cable.
- Install the throttle body. Tighten the nuts and bolts
to 14-18 ft. lbs.(19-25 Nm), and connect the fuel hoses and electrical
connectors.
- Install the air intake hose onto the throttle body.
Install the mass air flow sensor.
- Install the air cleaner assembly and connect the
vacuum hoses and electrical connectors to the air cleaner housing.
- Connect the negative battery cable.
- Fill and bleed the cooling system. Run the engine
and check for leaks.
- Relieve the fuel system pressure, and disconnect
the negative battery cable. Drain the cooling system.
- Remove the air pipe.
- Remove the throttle cable. Disconnect and plug the
fuel lines.
-
Remove the throttle body as follows:
- Disconnect the coolant hoses.
- Label and disconnect the electrical connectors
for the idle air control valve and the throttle position sensor.
- Remove the mounting bolts/nuts from the throttle
body, and remove the throttle body from the vehicle.
- Label and disconnect the vacuum lines at the intake
manifold.
- Disconnect and plug the fuel hoses from the fuel
rail.
- Label and disconnect the electrical connectors for
the fuel injectors.
- Remove the fuel rail with the injectors connected.
- Remove the fuel injector harness.
- Remove the intake manifold support bracket.
-
Lower the vehicle. Remove the nuts, and remove the intake manifold.
To install:
- Clean all gasket mating surfaces.
- Install the intake manifold, using a NEW gasket.
Tighten the nuts to 14-18 ft. lbs. (19-25 Nm).
- Raise and safely support the vehicle.
- Install the intake manifold support bracket. Tighten
the support bracket bolts to 38 ft. lbs. (51 Nm).
-
Install the fuel injector harness.
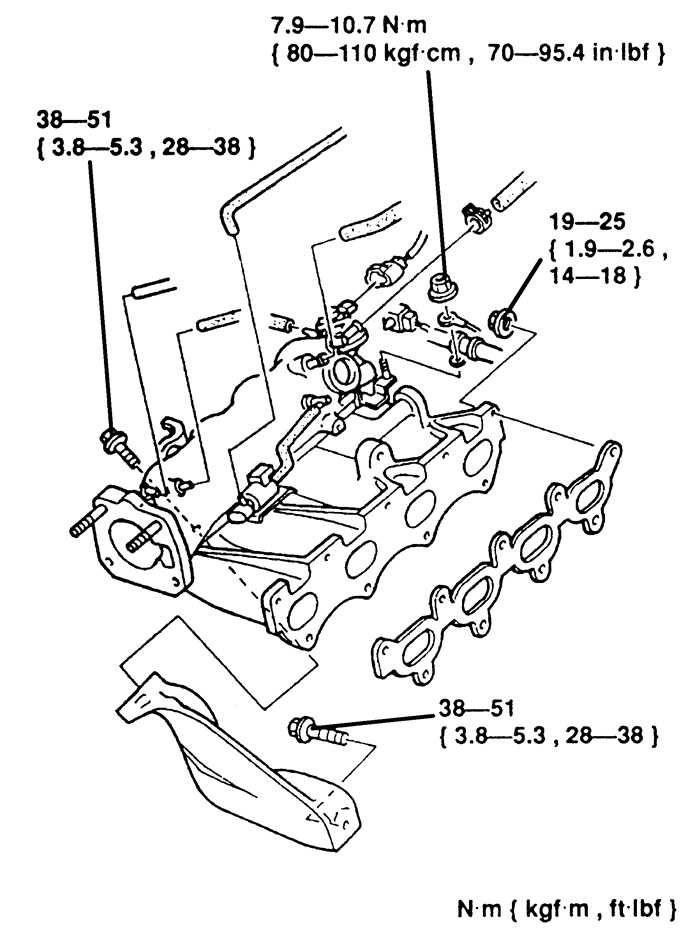
| Fig. 6: Intake manifold and related components (exploded
view) -- 1995-97 Miata 1.8L (BPD) engines
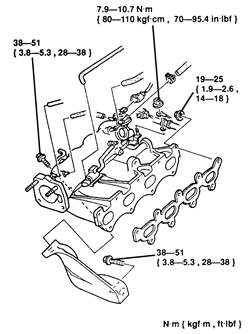
|
- Install the fuel rail and injector assembly. Connect
the electrical connectors to the injectors,and the fuel lines to the rail.
- Install the throttle body, using a new mounting gasket.
Tighten the mounting bolts to 14-18 ft. lbs. (19-25 Nm).
- Connect the electrical connectors, vacuum lines and
coolant lines.
- Connect the throttle cable and the fuel lines.
- Install the air pipe.
- Connect the negative battery cable. Fill and bleed
the cooling system. Run the engine and check for leaks.
- Relieve the fuel system pressure.
- Disconnect the negative battery cable.
- Drain the cooling system.
- Remove the resonance chamber.
- Disconnect the accelerator cable.
- Remove the air intake hose, air cleaner and air bypass
valve.
- Remove the pressure chamber and air intake pipe.
- Remove the water hose from the extension manifold
and the throttle body.
- Label and disconnect the electrical connectors, vacuum
and coolant hoses from the throttle body and extension manifold.
- Remove the mounting bolts and nuts, and the throttle
body/extension manifold assembly.
- Label and disconnect the electrical connectors and
hoses at the intake manifold. Disconnect and plug the fuel lines.
-
Remove the intake manifold retaining bolts and remove the intake manifold.
Cover the intake ports while the manifold is removed to keep dirt out
of the engine.
To install:
- Make sure all gasket mating surfaces are clean.
- Install a new manifold-to-engine gasket and install
the intake manifold assembly with the retaining bolts.
- Tighten the intake manifold mounting bolts to 14-18
ft. lbs. (19-25 Nm). Connect the fuel lines and all hoses and wiring to
the manifold.
- Install the throttle body/extension manifold assembly,
using a new gasket, and tighten the nuts and bolts to 14-18. lbs. (19-25
Nm).
- Connect the coolant and vacuum hoses and the electrical
connectors to the throttle body and extension manifold.
- Install the water hose to the extension manifold
and the throttle body.
- Install the air intake pipe.
- Install the pressure chamber and connect the vacuum
hoses.
- Install the air bypass valve, air cleaner assembly
and the air intake hose.
- Connect the accelerator cable.
- Install the resonance chamber.
- Connect the negative battery cable. Turn the ignition
key ON to pressurize the system and check for leaks. Correct as
necessary.
- Fill and bleed the cooling system.
- Start the engine and bring to normal operating temperature.
Check for leaks. Check the idle speed.