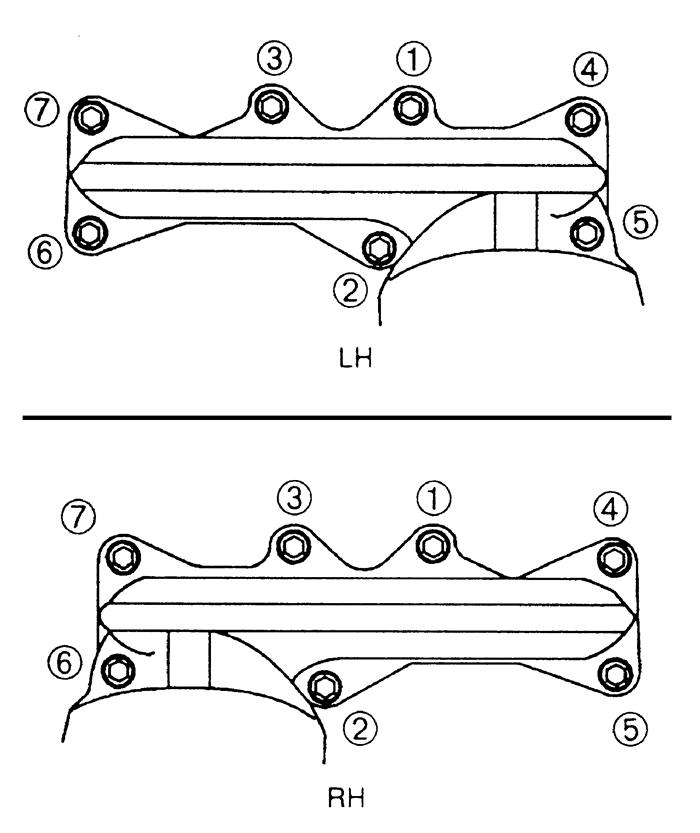
Remove the retaining bolts and remove the exhaust
manifold insulator.
Disconnect the oxygen sensor electrical connector.
Remove the oxygen sensor, if necessary, if it is installed in the manifold.
Disconnect the EGR pipe, if equipped.
Raise and safely support the vehicle. Remove the
nuts from the exhaust pipe flange and disconnect the exhaust pipe from
the manifold or turbocharger, if equipped.
Lower the vehicle.
Remove the mounting nuts/bolts and remove the exhaust
manifold.
Installation is the reverse of the removal procedure.
Make sure all gasket mating surfaces are clean prior to assembly.
Use new gaskets and tighten the exhaust manifold-to-cylinder
head nuts/bolts to specifications.
Use a new gasket and tighten the exhaust pipe flange-to-exhaust
manifold nuts to 34 ft. lbs. (46 Nm).
Remove the air cleaner, and disconnect the air hose.
Remove the water bypass pipe bolt.
Remove the exhaust manifold heat shield bolts and
the heat shield.
Disconnect the oxygen sensor electrical connector.
Raise and safely support the vehicle.
Remove and discard the exhaust pipe-to-exhaust manifold
nuts. Suspend the exhaust system with wire.
Disconnect the EGR pipe from the exhaust manifold
and lower the vehicle.
Remove the nuts and bolts and remove the exhaust manifold. Discard
the nuts.
To install:
Clean all gasket mating surfaces.
Position a new exhaust manifold gasket over the studs
and install the exhaust manifold. Tighten the mounting nuts and bolts
to 14-16 ft. lbs. (19-22 Nm) on the 1.5L, and for the 1.8L to 29-34 ft.
lbs. (39-47 Nm).
Raise and safely support the vehicle.
Connect the exhaust pipe to the manifold. Install
new nuts and tighten to 38 ft. lbs. (52 Nm). Connect the oxygen sensor
connector.
Connect the EGR pipe to the back of the exhaust manifold
and tighten to 34 ft. lbs. (47 Nm). Lower the vehicle.
Install the heat shield and tighten the bolts to
88 inch lbs. (10 Nm).
Install the water bypass pipe bolt, and tighten to
48-65 ft. lbs. (64-89 Nm).
Connect the air hose, and install the air cleaner.
Disconnect the negative battery cable. Raise and
safely support the vehicle.
Disconnect the oxygen sensor connectors.
Remove the nuts from the front and rear exhaust pipes
and lower the exhaust system. Both pipes must be disconnected, even if
only one manifold is to be removed.
If removing the rear (right side) manifold, disconnect
the EGR pipe.
Remove the 3 heatshield bolts and remove the heat
shield.
Remove the 2 nuts and 5 bolts and remove the exhaust manifold.
To install:
Clean all gasket mating surfaces.
Install the exhaust manifold, using a new gasket,
and tighten the nuts to 15-20 ft. lbs. (20-28 Nm), and the bolts to 12-16
ft. lbs. (16-22 Nm).
Install the heat shield and tighten the bolts to
88 inch lbs. (10 Nm).
If installing the rear (right side) manifold, connect
the EGR pipe.
Connect the exhaust pipes to the manifolds, using
new gaskets and nuts, and tighten the nuts to 38 ft. lbs. (51 Nm).
Connect the oxygen sensor connectors and lower the
vehicle.
Remove the 4 exhaust manifold heat shield bolts and
the heat shield.
Disconnect the oxygen sensor electrical connector.
Raise and safely support the vehicle. Remove the
nuts from the exhaust pipe flange and disconnect the exhaust pipe from
the manifold. Suspend the exhaust system with wire.
Disconnect the EGR pipe.
Lower the vehicle.
Remove the mounting nuts/bolts and remove the exhaust manifold.
To install:
Clean all gasket mating surfaces.
Position a new exhaust manifold gasket over the studs
and install the exhaust manifold. Tighten the 8 mounting bolts/nuts to
29-33 ft. lbs. (39-46 Nm).
Raise and safely support the vehicle.
Connect the exhaust pipe to the manifold. Install
new nuts and tighten to 38 ft. lbs. (52 Nm). Connect the oxygen sensor
connector.
Install the two inlet pipe bracket bolts.
Connect the EGR pipe to the back of the exhaust manifold.
Lower the vehicle.
Install the heat shield and tighten the bolts to
70-95 inch lbs. (8-11 Nm). Connect the negative battery cable.
Remove the retaining bolts, and remove the exhaust
manifold insulator.
Disconnect the oxygen sensor electrical connector.
Disconnect the EGR pipe.
Raise and safely support the vehicle. Remove and
discard the nuts from the exhaust pipe flange, and disconnect the exhaust
pipe from the manifold.
Lower the vehicle.
Remove and discard the mounting nuts, and remove the exhaust manifold.
To install:
Make sure all gasket mating surfaces are clean prior
to assembly.
Using a new gasket, install the exhaust manifold
to the cylinder head. Tighten the new mounting nuts to14-18 ft. lbs. (19-25
Nm).
Raise and safely support the vehicle.
Using a new gasket, install the exhaust pipe flange
to the exhaust manifold nuts. Tighten the new nuts to 28-38 ft. lbs. (38-51
Nm). Lower the vehicle.
Connect the EGR pipe and the oxygen sensor.
Install the exhaust manifold insulators, and tighten
the bolts to 14-18 ft. lbs. (19-25 Nm).
Remove the nuts from the front and rear exhaust pipes
and lower the exhaust system. Both pipes must be disconnected, even if
only one manifold is to be removed.
If removing the rear (right side) manifold, disconnect
the EGR pipe.
If removing the front (left side) manifold, remove
the charge air cooler and the coolant/condenser fans.
Disconnect the front and rear oxygen sensor connectors.
Remove the three heat shield bolts and remove the
heat shield.
Remove the 2 nuts and 5 bolts and remove the exhaust manifold.
To install:
Clean all gasket mating surfaces.
Install the exhaust manifold, using a new gasket, and tighten the nuts
and bolts to 12-16 ft. lbs. (16-22 Nm).
Install the heat shield and tighten the bolts to
70-95 inch lbs. (8-11 Nm).
Connect the oxygen sensor connectors.
If installing the front (left side) manifold, install
the the coolant/condenser fans and the charge air cooler. Tighten the
charge air cooler mounting bolts to 14-18 ft. lbs. (19-25 Nm)
If installing the rear (right side) manifold, connect
the EGR pipe.
Connect the exhaust pipes to the manifolds, using
new gaskets and nuts, and tighten the nuts to 28-38 ft. lbs. (38-51 Nm).