- Disconnect the negative battery cable. Raise and
safely support the vehicle.
- Remove the timing belt. Remove the retaining bolt
and remove the crankshaft sprocket. Drain the engine oil and remove the
oil pan.
- Remove the oil pump pickup tube-to-oil pump bolts,
the tube and gasket.
- Remove the oil pump-to-cylinder block bolts, the
pump and gasket.
- If necessary, pry the oil seal from the pump and
clean the seal bore.
- Clean the gasket mounting surfaces. Inspect the pump
and gears for wear.
- Disconnect the negative battery cable.
- Remove the crankshaft pulley, timing belt cover,
belt and the crankshaft sprocket.
- Remove the oil pan.
- Remove the oil pickup tube and discard the gasket.
- Remove the oil pump attaching bolts and remove the
oil pump.
-
Remove the front crankshaft seal from the oil pump if the pump is being
replaced.
To install:
- Clean the oil, dirt and old sealant from all contact
surfaces. Replace the O-rings on the oil pump.
- If the oil seal was removed from the oil pump, apply
clean engine oil to the lip of the seal. Push the seal in lightly be hand.
Press the seal, with a protrusion of 0.02-0.04 inch (0.5-1.0 mm), into
the oil pump with a suitable tool (49 B014 401 or equivalent).
- Apply a bead of silicone to the oil pump at the cylinder
block contact surface, going inside the bolt holes.
- Install the oil pump and tighten the bolts to 14-18
ft. lbs. (19-25 Nm).
- Install a new gasket and the oil pump pickup tube.
Tighten the mounting bolts to 70-95 inch lbs. (8-11 Nm).
- Install the oil pan.
- Install the crankshaft sprocket, timing belt and
cover.
- Install the crankshaft pulley
- Connect the negative battery cable.
- Fill the engine with the proper type and quantity
of oil. Run the engine and check for leaks.
- Disconnect the negative battery cable.
- Remove the oil pan.
- Properly discharge the refrigerant from the A/C system.
- Remove the A/C compressor and the compressor bracket.
- Remove the power steering pump and tensioner bolts
from the engine block. Remove the pump and tensioner and position aside.
- Remove the crankshaft pulley, timing belt cover,
timing belt and the crankshaft sprocket.
- Remove the oil pump mounting bolts (4 long 'A' and
5 short 'B'), and the 2 oil strainer-to-pump bolts. Remove the oil pump
body.
-
Press the oil seal from the housing. Remove the pump cover mounting
bolts with an impact screwdriver. Remove the cover and remove the oil
pump rotors.
To install:
- Clean the oil, dirt and old sealant from all contact
surfaces.
- Press a new oil seal into the pump housing with a
protrusion of 0-0.03 inch (0-0.7mm).
- Install the rotors into the oil pump body with the
marks aligned with each other. Install the pump cover and torque the mounting
bolts to 53-78 in. lbs. (5.9-8.8 Nm).
- Apply a continuous bead of silicone sealant to the
oil pump mating surface, and install the pump body.
- Install the oil pump body mounting bolts. Tighten
bolts to 14-18 ft. lbs. (19-25 Nm).
- Replace the oil strainer-to-pump gasket, and install
the mounting bolts. Tighten the bolts to 70-95 inch lbs. (8-11 Nm).
- Install the crankshaft sprocket and key, timing belt
and cover. Install the crankshaft pulley.
- Install the power steering pump and tensioner. Tighten
the 2 power steering belt tensioner upper bolts and the power steering
pump rear bracket bolt to 33 ft. lbs. (46 Nm). Tighten the tensioner lower
bolt to 18 ft. lbs. (25 Nm).
- Install the A/C compressor bracket and tighten the
bolts to 38 ft. lbs. (51 Nm). Install the A/C compressor and tighten the
bolts to 38 ft. lbs. (51 Nm).
- Install the oil pan. Fill the engine with the proper
type and quantity of oil.
- Connect the negative battery cable. Run the engine
and check for leaks.
- Evacuate and charge the A/C system.
- Disconnect the negative battery cable.
- Remove the crankshaft pulley, timing belt cover,
belt and the crankshaft sprocket.
- Remove the A/C compressor and secure it aside, leaving
the refrigerant lines attached. Remove the compressor mounting bracket.
- Remove the oil pan.
- Remove the oil pickup tube and discard the gasket.
- Remove the oil pump body attaching bolts and remove
the oil pump body.
- Remove the front crankshaft seal from the oil pump
if the pump is being replaced.
-
On 1993 -- 97 626 and MX6 2.0L (FS) engines, remove the pump cover
mounting bolts with an impact screwdriver, remove the cover and the rotors.
To install:
- Clean the oil, dirt and old sealant from all contact
surfaces. Replace the O-rings on the oil pump.
- If the oil seal was removed from the oil pump, apply
clean engine oil to the lip of the seal. Push the seal in lightly be hand.
Press the seal, with a protrusion of 0-0.02 inch (0-0.5 mm), into the
oil pump.
- Install the oil pump rotors into the pump body with
the rotor marks aligned with each other.
- On 1993 -- 97 626 and MX6 2.0L (FS) engines,
install the pump cover, torque the bolts to 53-78 in. lbs. (5.9-8.8 Nm).
- Apply a bead of silicone to the oil pump body-to-cylinder
block contact surface, going inside the bolt holes.
- Install the oil pump body and tighten the bolts to
14-18 ft. lbs. (19-25 Nm).
- Install a new gasket and the oil pump pickup tube.
Tighten the mounting bolts to 88 inch lbs. (10 Nm).
- Install the oil pan.
- Install the A/C compressor bracket and tighten the
bolts to 38 ft. lbs. (52 Nm). Install the A/C compressor and tighten the
bolts to 26 ft. lbs. (35 Nm).
- Install the crankshaft sprocket, timing belt assembly
and cover.
- Install the crankshaft pulley
- Connect the negative battery cable.
- Fill the engine with the proper type and quantity
of oil. Run the engine and check for leaks.
Due to space requirements, the engine assembly must be removed in order
to replace the oil pump.
- Disconnect the negative battery cable. Wait at least
90 seconds before performing any work. The backup power supply system
for the SRS must deplete its stored energy.
- Raise and safely support the vehicle.
- Drain the engine oil and the engine coolant.
- Remove and tag all electrical connections, hoses,
and cables necessary to remove the engine assembly. Remove the front exhaust
pipe.
- Remove the engine assembly and secure to a suitable
engine holding device.
- Remove the oil pan, the oil strainer, and the oil
pan baffle.
- Remove the timing belt.
- Using a suitable tool, remove the front timing belt
pulley and key.
- If equipped with a vacuum pump, remove the mounting
bolts and nuts and remove the vacuum pump, O-ring, and gasket.
-
Remove the front seal, the mounting bolts, the oil pump, and the oil
pump O-rings.
To install:
-
Make sure that the oil pump mating surfaces are clean. Install new
O-rings coated with fresh engine oil to the oil pump cavity. Coat a new
oil seal with fresh engine oil and install it to the oil pump. Apply silicone
sealant to the oil pump contact surface and install the oil pump with
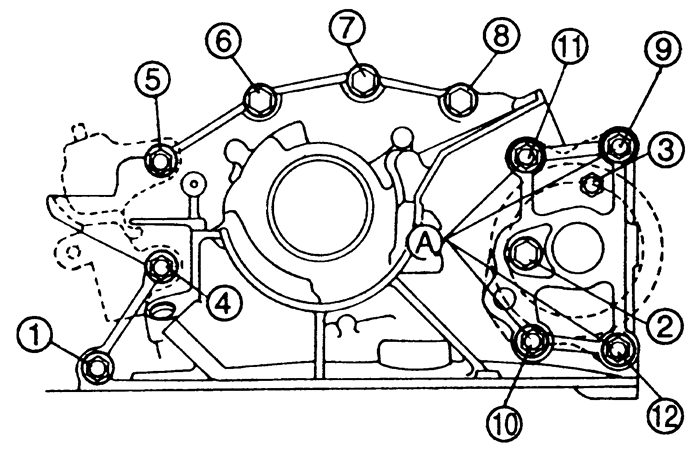
the mounting bolts. Torque the mounting bolts to A: 16-22 ft. lbs. (22-30
Nm). All others: 14-18 ft. lbs. (19-25 Nm). Torque the bolts in sequence.
| Fig. 1: Tightening the oil pump mounting bolts in
sequence -- 1995-97 Millenia 2.3L and 2.5L engines
|
- If equipped with a vacuum pump, reinstall the pump
using a new gasket and O-ring.
- Install the key and the timing belt pulley.
- Reinstall the timing belt.
- Install the oil pan baffle, the oil pump strainer,
and install the oil pan.
- Remove the engine from the holding device and install
the engine assembly into the vehicle.
- Reinstall the front exhaust pipe. Reconnect all electrical
connectors, cables, hoses, and install any components necessary to complete
the engine installation.
- Refill the engine with engine oil and coolant. Safely
lower the vehicle.
- Reconnect the negative battery cable. Start the engine,
bleed the cooling system, make any necessary adjustments, check for leaks,
and road test for proper operation.
- Disconnect the negative battery cable.
- Remove the crankshaft pulley, timing belt covers,
belt and the crankshaft sprocket.
- Remove the A/C compressor and secure it aside, leaving
the refrigerant lines attached. Remove the compressor mounting bracket.
- Remove the oil pan, oil strainer and baffle plate.
- Remove the oil pan block assembly.
- Remove the thermostat housing assembly.
-
Remove the oil pump mounting bolts and remove the oil pump. If necessary,
pry out the old oil seal being careful not to damage the seal housing
area.
To install:
- Clean the oil, dirt and old sealant from all contact
surfaces. Replace the O-rings on the oil pump.
- If the oil seal was removed from the oil pump, apply
clean engine oil to the lip of the seal. Push the seal in lightly be hand.
Press the seal flush into the oil pump with a suitable seal installer
tool.
- Apply a bead of silicone to the oil pump at the cylinder
block contact surface, going inside the bolt holes.
- Install the oil pump, using a new gasket, and tighten
the bolts to 14-19 ft. lbs. (19-25 Nm).
- Install the thermostat housing using a new gasket.
Tighten the bolts to 14-19 ft. lbs. (19-25 Nm).
- Cut away any portion of the oil pan gasket that projects
toward the oil pan.
- Install the baffle plate to the oil pan block assembly
and tighten the bolts to 26 inch lbs. (3 Nm).
- Apply a bead of silicone sealer to the perimeter
of the oil pan block assembly and install it on the cylinder block. Tighten
the bolts, in 2-3 steps, to 95 inch lbs. (11 Nm).
- Install the oil strainer and oil pan.
- Install the A/C compressor bracket and tighten the
bolts to 38 ft. lbs. (52 Nm). Install the A/C compressor and tighten the
bolts to 26 ft. lbs. (35 Nm).
- Install the crankshaft sprocket, timing belt and
cover.
- Install the crankshaft pulley
- Connect the negative battery cable.
- Fill the engine with the proper type and quantity
of oil. Run the engine and check for leaks.
NOTE: The engine must be removed from the vehicle and
disassembled to remove and install the main oil pump.
- Disconnect the negative battery cable.
- Remove the engine, and place on a suitable stand.
- Remove the shaft lockbolt from the front engine cover.
- Remove the pulley boss with the shaft bypass valve
and the spring.
- Remove the front cover.
- Remove the oil seal by gently prying out of the front
cover.
- Remove the control valve spring, the control valve,
the o-ring and the drive gear.
- Lift the lock washer tab and remove the sprocket
locknut.
- Remove the oil pump drive gear, the sprocket wheel,
and the drive chain as an assembly.
-
Remove the oil pump.
To install:
- Install the oil pump. Torque the bolts to 5-7 ft.
lbs. (7-10 Nm).
- Install the oil pump drive gear, the sprocket wheel,
and the drive chain as an assembly.
- Install a new washer and the oil pump locknut. Torque
the nut to 24-34 ft. lbs. (32-46 Nm).
- Install the drive gear so that the chamfered surface
faces the housing.
- Apply clean oil to the new front oil seal and install
into the front cover.
- Install the oil pressure control valve in the front
cover. Torque to 29-36 ft. lbs. (40-49 Nm).
- Apply petroleum jelly and install the new o-ring
and backup ring.
- Install the front cover with a new gasket. Torque
bolts to 12-17 ft. lbs. (16-22 Nm).
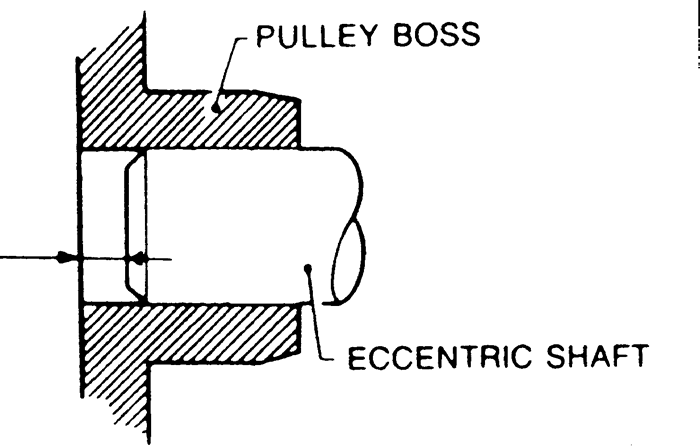
-
Install the shaft pulley boss.
| Fig. 2:Pulley shaft and boss -- 1993-95 RX7 1.3L
(13B) engines
|
- Temporarily install the lockbolt, and tighten it
by hand.
- Remove the lockbolt, and measure the pulley boss
protrusion. If it is over the limit, the needle bearing may be caught
by the spacer. Remove and reinstall the needle bearing, if necessary.
Protrusion: 2.44 mm Max.
- Install the bypass valve, spring and the o-ring into
the shaft.
- Apply sealant to the flange face of a new lockbolt.
- Install the lockbolt. Torque to 180-200 ft. lbs.
(240-270 Nm).
- Install the engine.
- Connect the negative battery cable.