Previous Next

ENGINE LUBRICATION

Oil Pan

REMOVAL AND INSTALLATION

1993-94 323 1.6L (B6E), 1994 Protege 1.8L (BPE, BPD), 1993-94 Miata 1.6L (B6-ZE) 1.8L (BPD) and 1994 MX3 1.8L (BPD) Engines
  1. Disconnect the negative battery cable. Raise and safely support the vehicle.
  2. Remove the engine undercover, if equipped. Position a suitable container under the oil pan. Remove the drain plug and drain the oil.
  3. Remove the exhaust pipe from the exhaust manifold and from the catalytic converter. If necessary, remove the exhaust pipe bracket from the engine block.
  4. On 1993-94 323 1.6L (B6E) and 1994 Protege 1.8L (BPD) engines, remove the integrated stiffener from the engine block and transaxle.
  5. 1993-94 Miata 1.6L (B6-ZE) 1.8L (BPD), Protege 1.8L (BPE) and 1994 MX3 1.8L (BPD) engines, remove the main bearing support/stiffener plate that is installed between the oil pan and engine block.
  6. Remove the bolts and remove the oil pan. It may be necessary to pry the pan away from the engine; be careful not to damage the gasket contact surfaces.
  7. If necessary remove the oil strainer.
  8. Remove the main bearing support/stiffener plate that is installed between the oil pan and engine block.

    To install:

  9. Clean all oil, dirt, old gasket material and sealer from the oil pan, support/stiffener plate, oil pan bolts and all gasket mating surfaces. If removed, clean the oil strainer.
  10. If equipped with the main bearing support/stiffener plate, run a bead of silicone sealer around the perimeter of the plate, going inside the bolt holes. Install the plate and tighten the bolts.

    NOTE: Make sure all old sealer is removed from the bolts prior to installation. Installing a bolt coated with old sealer could result in cracking of the bolt holes.

  11. If removed, install the oil strainer using a new gasket. Tighten the bolts.
  12. If used, apply silicone sealer to new rubber end gaskets and press them into place on the engine.
  13. Apply a bead of silicone to the perimeter of the oil pan, going around the inside of the bolt holes and install the pan to the engine. Install the oil pan bolts finger tight.
  14. Tighten the oil pan bolts.

    NOTE: Make sure all old sealer is removed from the bolts prior to installation. Installing a bolt coated with old sealer could result in cracking of the bolt holes.

  15. On 1993-94 323 1.6L (B6E) and 1994 Protege 1.8L (BPD) engines, install the integrated stiffener to the engine block and transaxle. Tighten the bolts to 38 ft. lbs. (52 Nm).
  16. 1993-94 Miata 1.6L (B6-ZE) 1.8L (BPD) and Protege 1.8L (BPE) and 1994 MX3 1.8L (BPD) engines, install the transverse member. Tighten the bolts to 93 ft. lbs. (126 Nm).
  17. Install the front exhaust pipe bracket, if equipped. Install the front exhaust pipe, using new gaskets. Tighten the exhaust manifold flange nuts to 34 ft. lbs. (46 Nm).
  18. Install the oil pan drain plug using a new gasket. Tighten the drain plug to 30 ft. lbs. (41 Nm).
  19. Install the engine undercover and lower the vehicle.
  20. Fill the engine with the proper type and quantity of oil.
  21. Connect the negative battery cable. Start the engine and bring to normal operating temperature. Check for leaks.
1995-97 Protege 1.5L (Z5D) and 1.8L (BPD) Engines
  1. Disconnect the negative battery cable. Raise and safely support the vehicle.
  2. Remove the right-hand splash shield. Drain the engine oil into a suitable container.
  3. Remove the transverse member.
  4. Disconnect the oxygen sensor connector. Remove and discard the exhaust pipe-to-manifold nuts. Move the exhaust pipe aside and support it with a jack.
  5. Remove the oil pan bolts and the oil pan.

    To install:

  6. Clean the oil pan. Clean all dirt, oil, gasket and old sealant from the oil pan and cylinder block contact surfaces.
  7. Apply a continuous bead of silicone sealant on the gaskets and around the oil pan, going on the inside of the bolt holes.
  8. Position the gaskets on the oil pan. Install the oil pan, and tighten the vertical bolts to 70-95 inch lbs. (8-11 Nm), and the horizontal bolts to 28-38 ft. lbs. (38-51 Nm).
  9. Connect the exhaust pipe to the manifold with new nuts. Tighten the nuts to 28-38 ft. lbs. (38-51 Nm). Connect the oxygen sensor connector.
  10. Install the transverse member, and tighten the mounting bolts to 69-97 ft. lbs. (94-131 Nm).
  11. Install the right-hand splash shield and tighten the mounting bolts to 70-95 inch lbs. (8-11 Nm). Lower the vehicle.
  12. Fill the engine with the proper type and quantity of engine oil. Connect the negative battery, run the engine and check for leaks.
1993-95 MX3 1.8L (K8) 1.6L (B6E) and 1993-97 626 and MX6 2.0L (FS) and 2.5L (KL) and 1995-97 2.3L (KJS and 2.5L (KLD) Engines
  1. Disconnect the negative battery cable. Raise and safely support the vehicle.
  2. Remove the passenger side splash shield. Drain the engine oil into a suitable container.
  3. Disconnect the oxygen sensor connector. Remove the front exhaust pipe.
  4. Remove the oil pan bolts and the oil pan.

    To install:

  5. Clean the oil pan. Clean all dirt, oil and old sealant from the oil pan and cylinder block contact surfaces.
  6. Apply a continuous bead of silicone sealant around the oil pan, going on the inside of the bolt holes.
  7. Install the oil pan and tighten the bolts to 14-18 ft. lbs. (19-25 Nm).
  8. Install the front pipe. Tighten the nuts to 28-38 ft. lbs. (38-51 Nm). Connect the oxygen sensor connector.
  9. Install the splash shield and tighten the mounting bolts to 70-95 inch lbs. (8-11 Nm). Lower the vehicle.
  10. Fill the engine with the proper type and quantity of engine oil. Connect the negative battery, run the engine and check for leaks.
1993-95 929 3.0L (JE-ZE) Engines
  1. Disconnect the negative battery cable, and raise and safely support the vehicle.
  2. Remove the engine undercover, and drain the oil.
  3. Safely support the engine, and remove the engine mount nuts.
  4. Remove the bolts and carefully pry the oil pan from the engine. Be careful not to damage the gasket surfaces.

    To install:

  5. Clean the old sealer from the engine and pan bolts. Thoroughly clean the oil, dirt and old sealer from the oil pan.
  6. Apply a bead of silicone sealer to the pan, making sure it is inside the bolt holes.
  7. Install the pan and torque the bolts to 87 inch lbs. (10 Nm). Install the drain plug, using a new gasket, and tighten to 30 ft. lbs. (41 Nm).
  8. Install the engine mount nuts, tightening to 57-77 ft. lbs. (77-104 Nm). Remove the engine support device.
  9. Install the engine undercover and lower the vehicle.
  10. Fill the engine with the proper type and quantity of engine oil. Connect the negative battery cable, start the engine and bring to normal operating temperature. Check for leaks.
1995-97 Miata 1.8L (BPD) Engine
  1. Disconnect the negative battery cable. Raise and safely support the vehicle.
  2. Remove the splash shield. Drain the engine oil into a suitable container.
  3. Remove the dipstick and pipe.
  4. Remove the intermediate steering shaft bolt.
  5. Loosen the oil pan mounting bolts.
  6. Safely support the engine with a suitable lifting device.
  7. Remove the left and right engine mounting nuts.
  8. Using a hoist lift the engine slightly.
  9. Support the crossmember with a suitable transmission jack.
  10. Remove the crossmember mounting bolts and nuts.
  11. Separate the intermediate steering shaft from the pinion shaft.
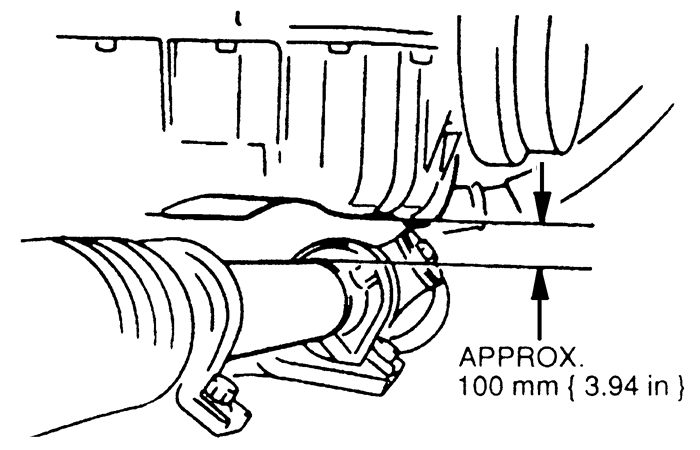
  12. Lower the crossmember until there is about four inches (100mm) of clearance between the oil pan and the steering gear housing.
    Fig. 1:Oil pan clearance -- 1995-97 Miata 1.8L (BPD) engines

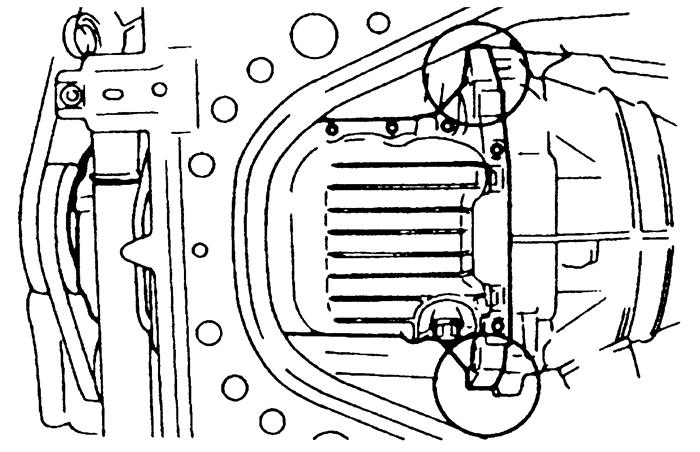
  13. Remove the oil pan bolts. Insert a suitable prying tool at the rear of the oil pan and remove the oil pan.
    Fig. 2:Oil pan removal prybar insertion points -- 1995-97 Miata 1.8L (BPD) engines

    To install:

  14. Clean the oil pan. Clean all dirt, oil and old sealant from the oil pan and cylinder block contact surfaces.
  15. Apply silicone sealant to the oil pan where the oil pump body and rear cover are located. Install new gaskets at the same two locations.
  16. Apply a continuous bead of silicone sealant around the oil pan, going on the inside of the bolt holes.
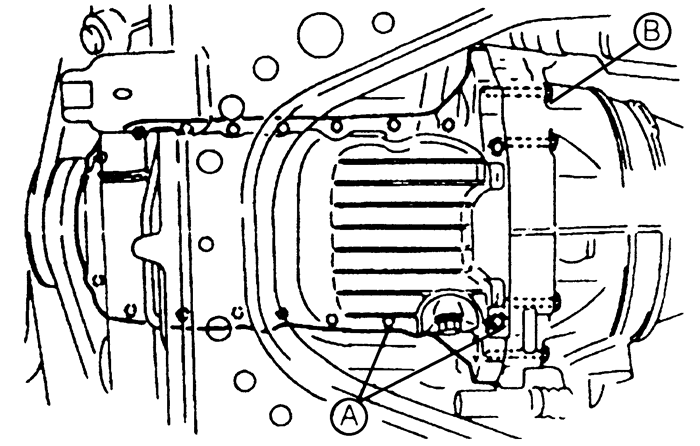
  17. Install the oil pan and the mounting bolts.
    Fig. 3:Oil pan bolt torque, A : 70-95.4 in. lbs. (7.9-10.7 Nm), B: 48-65 ft. lbs. (64-89 Nm) -- 1995-97 Miata 1.8L (BPD) engines

  18. Reposition the crossmember, and install the intermediate steering shaft to the pinion shaft.
  19. Install the crossmember mounting bolts and nuts, and remove the support jack.
  20. Reposition the engine, and install the engine mounting nuts. Remove the engine lifting device.
  21. Install the intermediate steering shaft bolt and tighten to 14-19 ft. lbs. (18-26 Nm).
  22. Install the dipstick and pipe.
  23. Install the splash shield and tighten the mounting bolts to 70-95 inch lbs. (8-11 Nm). Lower the vehicle.
  24. Fill the engine with the proper type and quantity of engine oil. Connect the negative battery, run the engine and check for leaks.
1993-95 RX7 1.3L (13B) Engines
  1. Disconnect the negative battery cable.
  2. Raise and safely support the vehicle.
  3. Remove the engine undercover.
  4. Remove the drain plug from the oil pan and drain the oil into a suitable container.
  5. Remove the stabilizer bar.
  6. Install engine support tool. Remove the engine mount nuts and take the weight from the mounts with the engine support tool.
  7. Disconnect the steering gear from the crossmember.
  8. Support the crossmember with a jack. Remove the power steering hose bracket and the mounting bolts and nuts from the crossmember. Lower the crossmember from the vehicle.
  9. Remove the engine mount brackets from the engine. Disconnect the oil level sensor connector and remove it from the harness bracket.
  10. Remove the oil pan bolts and the oil pan. If necessary, pry the oil pan from the engine, using the prying tool only at the rear of the engine and being careful not to damage the contact surfaces.

    To install:

  11. Thoroughly clean the oil, dirt and old sealer from the oil pan. Clean the old sealer and any foreign material from the contact surfaces on the engine and from the oil pan bolts.
  12. Apply silicone sealer to the contact surfaces of the oil pan and the engine side of the new gasket.
  13. Install the oil pan and tighten the bolts to 79-104 inch lbs. (9-12 Nm).
  14. Connect the oil level sensor connector.
  15. Install the engine mount brackets and tighten the bolts to 68 ft. lbs. (93 Nm).
  16. Raise the crossmember into position. Install the bolts/nuts and tighten to 86 ft. lbs. (117 Nm).
  17. Install the power steering hose bracket.
  18. Install the steering gear to the crossmember and tighten the bolts to 38 ft. lbs. (51 Nm).
  19. Remove the engine support tool. Install the mount nuts and tighten to 49 ft. lbs. (68 Nm).
  20. Install the stabilizer bar. Tighten the stabilizer bar bracket bolts to 19 ft. lbs. (25 Nm).
  21. Install the drain plug, using a new gasket, and tighten to 30 ft. lbs. (41 Nm). Install the engine undercover and lower the vehicle.
  22. Fill the engine with the proper type and quantity of engine oil. Connect the negative battery cable, start the engine and bring to normal operating temperature. Check for leaks.
 
Previous Next