Previous Next

Timing Belt, Sprockets, Tensioner and Front Cover

REMOVAL AND INSTALLATION

1993-94 323 1.6L (B6E) and Protege 1.8L (BPE) Engines
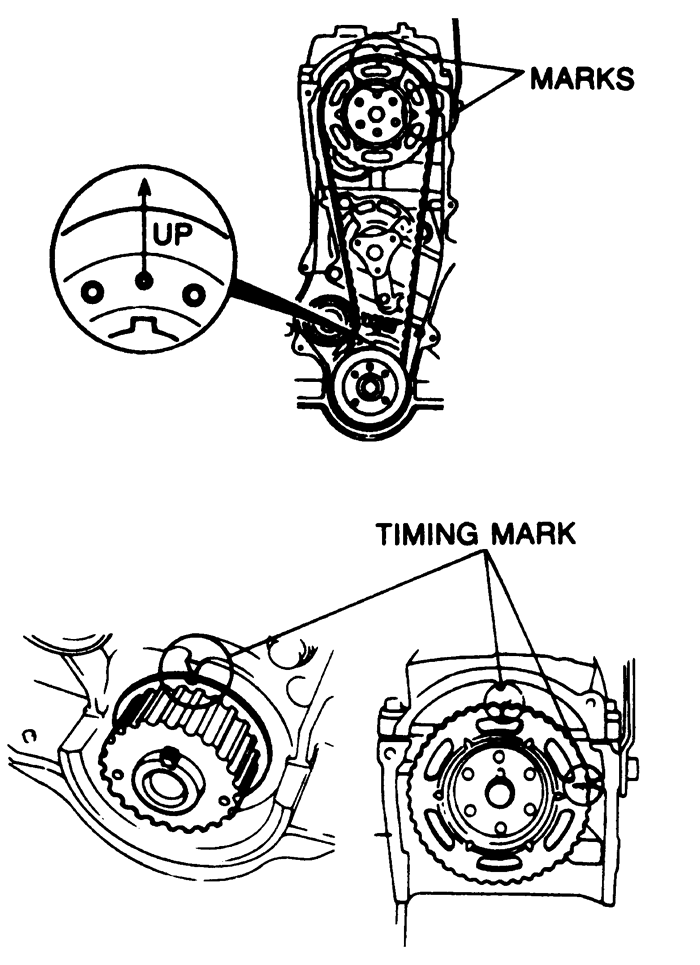
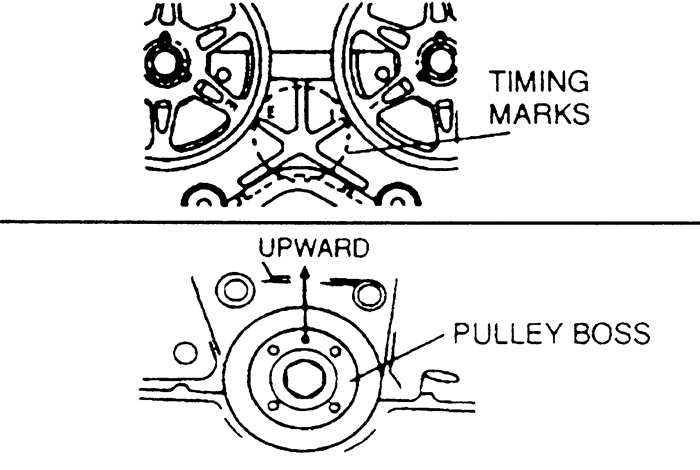
Fig. 1: Timing marks -- 1993-94 323 1.6L (B6E) and Protege 1.8L (BPE) engines

  1. Disconnect the negative battery cable. Remove the engine undercover.
  2. Remove the accessory drive belts.
  3. Remove the water pump pulley.
  4. Remove the crankshaft pulley bolts and remove the crankshaft pulley and baffle plate. Using a suitable tool to hold the crankshaft pulley and remove the pulley lockbolt. Remove the crankshaft pulley boss.
  5. Remove the upper and lower timing belt covers.
  6. Tag and disconnect the spark plug wires. Remove the spark plugs.

    NOTE: Spark plugs are removed to make it easier to rotate the engine.

  7. Temporarily reinstall the crankshaft pulley boss and lockbolt.
  8. Turn the crankshaft, using the bolt, until the camshaft sprocket and crankshaft sprocket timing marks are aligned. Mark the direction of rotation on the timing belt.
  9. Remove the belt tensioner lockbolt, the tensioner wheel and the spring. Remove the timing belt.

    NOTE: Do not rotate the engine after the timing belt has been removed.

  10. Inspect the belt for wear, peeling, cracking, hardening or signs of oil contamination. Inspect the tensioner for free and smooth rotation. Check the tensioner spring free length; it should not exceed 2.520 in. (64mm). Inspect the sprocket teeth for wear or damage. Replace parts, as necessary.
  11. If necessary to remove the sprockets:
    1. Insert a small prybar through one of the camshaft sprocket holes to keep it from turning.
    2. Remove the sprocket bolt and the sprocket from the camshaft.

      To install:

  12. Align the dowel on the camshaft with the dowel pin facing straight up. The dowel pin on the camshaft should also be facing upward.
  13. Install the camshaft sprocket bolt. Hold the sprocket with the prybar and tighten the bolt(s) to 36-45 ft. lbs. (49-61 Nm).
  14. Make sure the timing marks on the sprockets are properly aligned.
  15. Install the timing belt tensioner and spring. Temporarily tighten the bolt with the spring fully extended.
  16. Install the timing belt so there is no looseness on the tension side. If reusing the old timing belt, make sure it is reinstalled in the same direction of rotation.
  17. Turn the crankshaft 2 turns clockwise and check the timing mark alignment. If the marks are not aligned, repeat Steps 11-14.
  18. Loosen the tensioner lockbolt to set the tension, then torque the bolt to 19 ft. lbs. (25 Nm).
  19. Turn the crankshaft 2 turns clockwise and check the alignment of the timing marks. If they are not aligned, repeat Steps 11-16.
  20. Apply approximately 22 lbs. pressure to the timing belt on the side opposite the tensioner, at a point midway between the sprockets. The belt should deflect 0.43-0.51 in. (11-13mm). If the tension is not as specified, repeat Steps 14-17 or, if necessary, replace the tensioner spring.
  21. Install the spark plugs and connect the spark plug wires.
  22. Install the upper and lower timing belt covers. Tighten the bolts to 95 inch lbs. (11 Nm).
  23. Install the crankshaft pulley boss and tighten the lockbolt to 123 ft. lbs. (167 Nm), while holding the pulley boss with a suitable tool.
  24. Install the crankshaft pulley and baffle plate.
  25. Install the undercover or side cover. Connect the negative battery cable.
  26. Start the engine and check for proper operation. Check the ignition timing.
1993-94 MX3 1.6L and Protege 1.8L (BPD) Engines
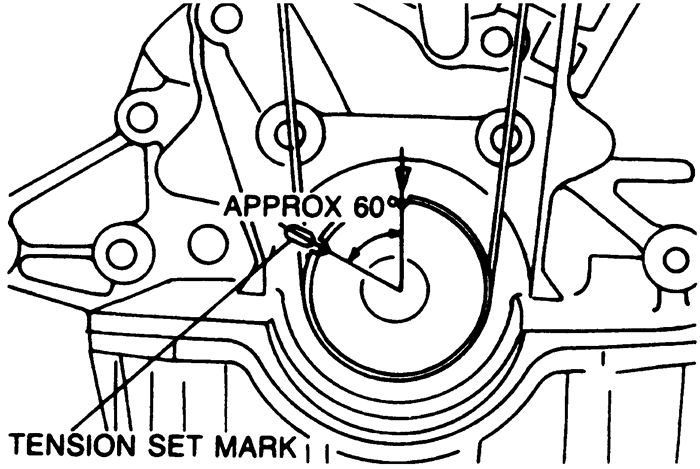
Fig. 2: Tensioner set mark -- 1993-94 MX3 1.6L and Protege 1.8L (BPD) engines

  1. Disconnect the negative battery cable. Remove the engine undercover.
  2. Remove the accessory drive belts.
  3. Remove the crankshaft pulley bolts and remove the crankshaft pulley.
  4. Remove the outer timing belt guide plate. Remove the inner timing belt guide plate if so equipped.
  5. Tag and disconnect the spark plug wires. Remove the spark plugs.

    NOTE: Spark plugs are removed to make it easier to rotate the engine.

  6. Remove the engine oil dipstick.
  7. Remove the upper, middle and lower timing belt covers.
  8. Turn the crankshaft until the timing marks on the crankshaft and camshaft sprockets are aligned. On 1993-94 vehicles, the pin on the pulley boss must face upward.
  9. On 1993-94 vehicles, hold the crankshaft pulley boss with a suitable tool and remove the pulley lockbolt, being careful not to rotate the crankshaft. Remove the crankshaft pulley boss.
  10. Mark the direction of rotation on the timing belt. Loosen the tensioner lockbolt and pry the tensioner outward. Tighten the lockbolt with the tensioner spring fully extended. Remove the timing belt.

    NOTE: Protect the tensioner with a shop towel before prying on it. Do not rotate the crankshaft after the timing belt has been removed.

  11. Remove the tensioner and spring. If necessary, remove the idler pulley.
  12. Inspect the belt for wear, peeling, cracking, hardening or signs of oil contamination. Inspect the tensioner for free and smooth rotation. Check the tensioner spring free length; it should not exceed 2.315 in. (58.8mm). Inspect the sprocket teeth for wear or damage. Replace parts, as necessary.

    To install:

  13. If removed, install the idler pulley and tighten the bolt to 38 ft. lbs. (52 Nm).
  14. Install the tensioner and tensioner spring. Pry the tensioner outward and temporarily tighten the tensioner lockbolt with the tensioner spring fully extended.
  15. Make sure the crankshaft sprocket timing mark is aligned with the mark on the oil pump housing and the camshaft sprocket timing marks are aligned with the marks on the seal plate.
  16. Install the timing belt so there is no looseness at the idler pulley side or between the camshaft sprockets. If reusing the old belt, make sure it is installed in the same direction of rotation.
  17. On 1993-94 vehicles, temporarily install the pulley boss and lockbolt.
  18. Turn the crankshaft 2 turns clockwise and align the crankshaft sprocket timing mark. On 1993-94 vehicles, face the pin on the pulley boss upright. Make sure the camshaft sprocket timing marks are aligned. If they are not, repeat Steps 15-19.
  19. Turn the crankshaft 1 56 turns clockwise and align the crankshaft sprocket timing mark with the tension set mark for proper belt tension adjustment. On 1992-94 vehicles, remove the lockbolt and pulley boss.
  20. Make sure the crankshaft sprocket timing mark is aligned with the tension set mark. Loosen the tensioner lockbolt and allow the spring to apply tension to the belt. Tighten the tensioner lockbolt to 38 ft. lbs. (52 Nm).
  21. On 1993-94 vehicles, install the pulley boss and lockbolt.
  22. Turn the crankshaft 2 16 turns clockwise and make sure the timing marks are correctly aligned.
  23. Apply approximately 22 lbs. pressure to the timing belt at a point midway between the camshaft sprockets. The belt should deflect 0.35-0.45 in. (9.0-11.5mm). If the deflection is not correct, repeat Steps 21-24.
  24. On 1993-94 vehicles, hold the pulley boss with a suitable tool and tighten the lockbolt to 123 ft. lbs. (167 Nm).
  25. Install the timing belt covers and tighten the bolts to 95 inch lbs. (11 Nm). Install the engine oil dipstick.
  26. Install the spark plugs and connect the spark plug wires.
  27. Install the timing belt inner guide plate, if equipped. Make sure the dished side of the plate faces away from the timing belt. Install the outer guide plate, if equipped.
  28. Install the crankshaft pulley and tighten the bolts to 13 ft. lbs. (17 Nm).
  29. Install the water pump pulley and the accessory drive belts. Adjust the belt tension.
  30. Install the engine side or undercover, as necessary. Connect the negative battery cable.
  31. Start the engine and check for proper operation. Check the ignition timing.
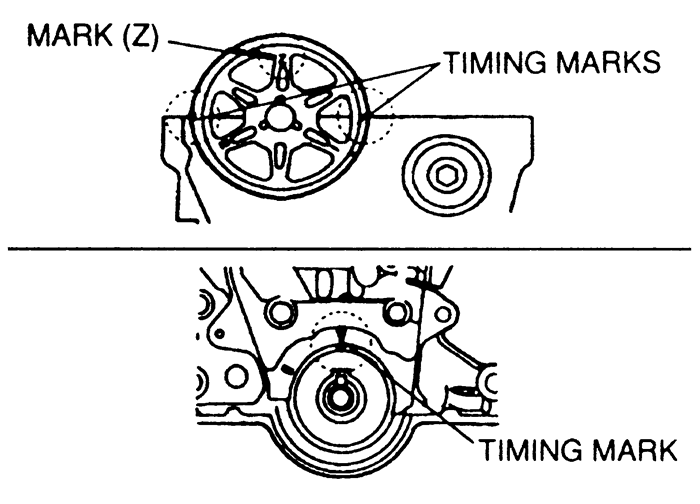
    Fig. 3: Timing mark locations -- 1995-97 Protege (Z5D) engines

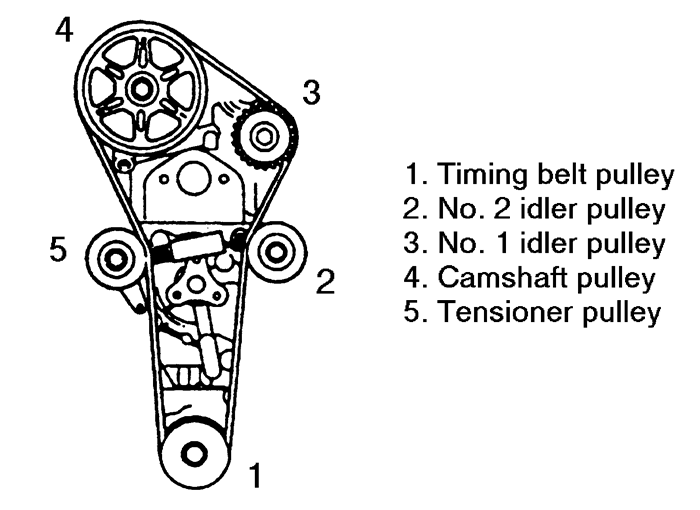
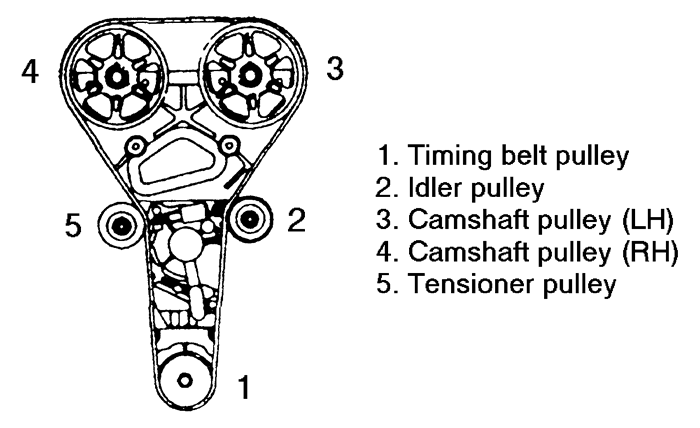
    Fig. 4: Timing belt installation pulley order -- 1995-97 Protege (Z5D) engines

1995-97 Protege 1.5L (Z5D) and 1.8L (BPD) Engines
  1. Disconnect the negative battery cable.
  2. Remove the timing belt covers.
  3. Turn the crankshaft until the timing mark on the crankshaft sprocket aligns with the timing mark on the oil pump and the camshaft sprocket timing marks line up on the camshaft sprockets.
    Fig. 5: Timing mark locations -- 1995-97 Protege 1.8L (BPD) engines

  4. Remove the crankshaft pulley lockbolt and pulley boss.
  5. Lower the vehicle. Insert a camshaft sprocket holding tool between the camshaft sprockets.
  6. Loosen the tensioner pulley lockbolt. Pull the tensioner pulley away from the center of the engine to reduce the tension on the timing belt.
  7. If the timing belt is to be reused, mark the direction of rotation on the timing belt. Remove the timing belt.
  8. To remove the tensioner, unhook the tensioner spring, and remove the pulley lockbolt and tensioner.
  9. If necessary to remove the sprockets:
    1. Hold the camshaft by using a wrench on the cast hexagon, and loosen the sprocket mounting bolt.
    2. Remove the sprocket bolt and the sprocket from the camshaft.
    3. If equipped with a manual transaxle, place the shift lever in 4th gear and apply the parking brake. If equipped with an automatic transaxle, remove the flywheel dust cover and install a flywheel locking tool to hold the flywheel.
    4. Remove the crankshaft sprocket bolt, sprocket and key.

      To install:

  10. On the 1.5L engine, install the camshaft sprocket, aligning the dowel with the letter Z mark.
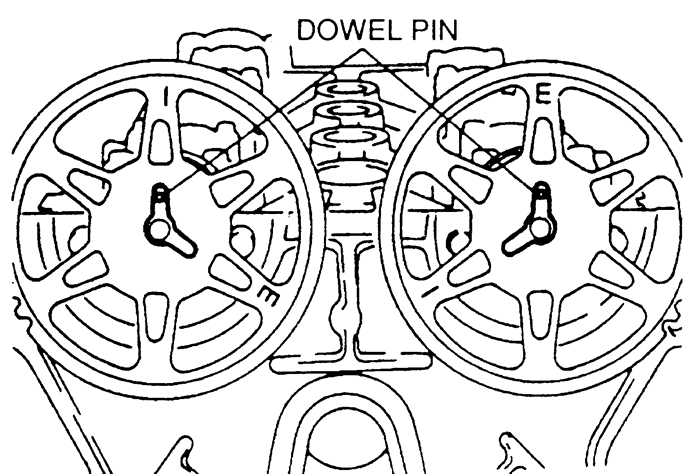
  11. On the 1.8L engine, install the camshaft sprocket, aligning the dowel with the letter I mark on the intake side, and the letter E mark on the exhaust side.
    Fig. 6: Camshaft sprocket dowel pins -- 1995-97 Protege 1.5L (Z5D) engines

    Fig. 7: Camshaft sprocket dowel pins -- 1995-97 Protege 1.8L (BPD) engines

  12. Install the camshaft sprocket bolt. Hold the camshaft, on the cast hexagon, with the wrench and tighten the bolt to 37-44 ft. lbs. (50-60 Nm).
  13. Install the crankshaft sprocket and key. Align the keyway with the timing mark on the oil pump housing.
  14. Install the crankshaft sprocket bolt. Install the flywheel locking tool, if equipped with automatic transaxle, or place the shift lever in 4th gear and apply the parking brake, if equipped with manual transaxle. Tighten the bolt to 116-122 ft. lbs. (157-166 Nm).
  15. Make sure the timing marks on the camshaft and crankshaft sprockets are still aligned.
  16. If removed, position the tensioner with the spring fully extended, and install the lockbolt tightening the mounting bolt to 28-38 ft. lbs. (38-51 Nm).
  17. Install the timing belt. If reusing the original timing belt, make sure it is installed in the same direction of rotation.
    Fig. 8: Timing belt installation pulley order -- 1995-97 Protege 1.8L (BPD) engines

  18. Rotate the crankshaft clockwise 1 56 turns and align the timing marks. Make sure all marks are still correctly aligned.
  19. Loosen the tensioner lockbolt to apply tension to the timing belt. Tighten the tensioner lockbolt to 28-38 ft. lbs. (38-51 Nm). Remove the holding tool from between the camshaft sprockets.
  20. Rotate the crankshaft clockwise 2 16 turns and make sure all marks are still correctly aligned.
  21. Raise and safely support the vehicle. Install the crankshaft pulley lockbolt and boss. Tighten the bolt to 116-122 ft. lbs. (157-166 Nm).
  22. Install the timing belt covers.
  23. Connect the negative battery cable.
1993-95 MX3 1.8L (K8) and 1993-97 626 and MX6 2.5L (KL) Engines
  1. Disconnect the negative battery cable.
  2. Support the engine, and remove the nuts and through-bolt from the right side engine mount Remove the mount.
  3. Remove the timing belt covers. Temporarily reinstall the crankshaft pulley bolt.
  4. Turn the crankshaft until the timing mark on the crankshaft sprocket aligns with the timing mark on the oil pump and the camshaft sprocket timing marks align with the marks on the cylinder head. The number one piston should be at TDC of the compression stroke.
  5. Remove the 2 bolts from the automatic tensioner, removing the lower one first. Keep the bolt holes aligned by holding the tensioner to reduce the chance of stripping the threads on the bolts.
  6. If the timing belt is to be reused, mark the direction of rotation on the timing belt.
  7. Remove the number one idler pulley. Remove the timing belt.
  8. If necessary to remove the sprockets:
    1. Insert a proper tool through one of the camshaft sprocket holes to keep it from turning.
    2. Remove the sprocket bolt and the sprocket from the camshaft.
    3. If equipped with a manual transaxle, place the shift lever in 4th gear and apply the parking brake. If equipped with an automatic transaxle, remove the flywheel dust cover and install a flywheel locking tool to hold the flywheel.
    4. Remove the crankshaft sprocket bolt, sprocket and key.
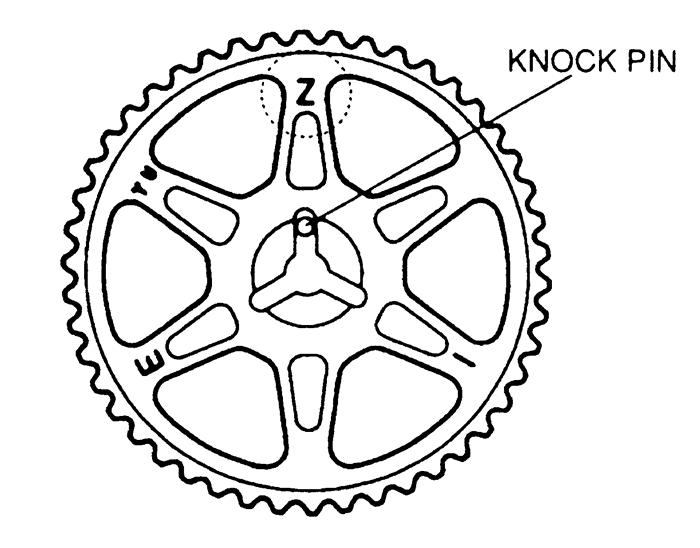
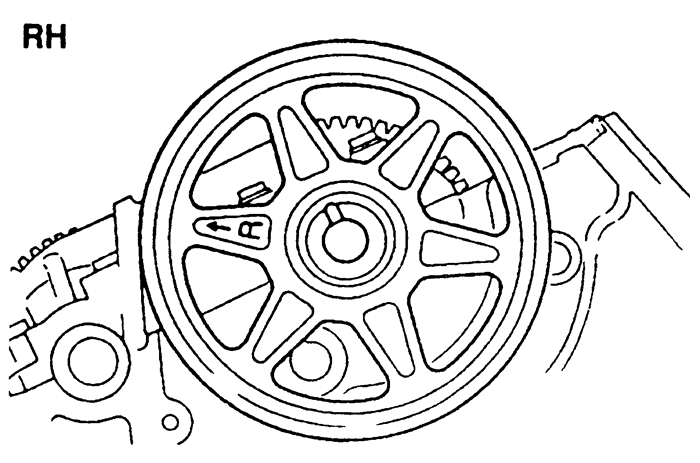
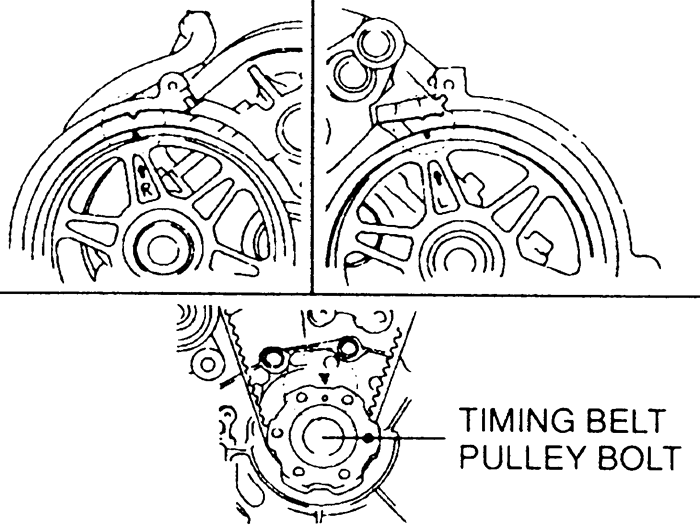
      Fig. 9: RH camshaft sprocket -- 1993-95 MX3 1.8L (K8) and 1993-97 626 and MX6 2.5L (KL) engines

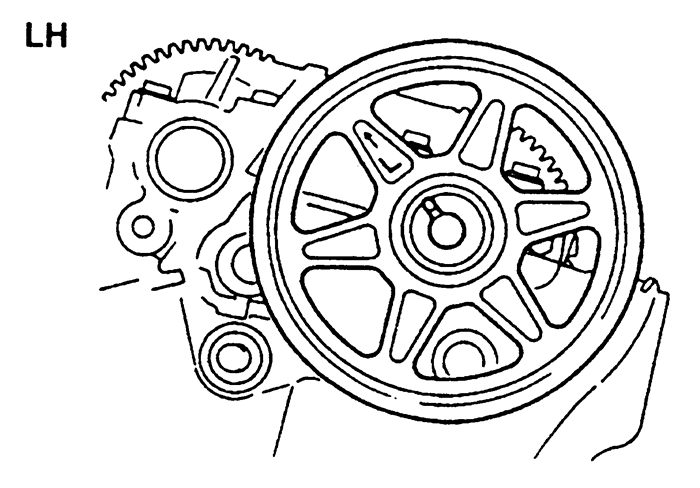
      Fig. 10: LH camshaft sprocket -- 1993-95 MX3 1.8L (K8) and 1993-97 626 and MX6 2.5L (KL) engines

      To install:

  9. Install the camshaft sprocket, aligning the dowel with the number 1 mark.
  10. Install the camshaft sprocket bolt. Hold the sprocket with a suitable tool and tighten the bolt to 35-48 ft. lbs. (47-65 Nm).
  11. Install the crankshaft sprocket and key. Align the keyway with the timing mark on the oil pump housing.
  12. Install the crankshaft sprocket bolt. Install the flywheel locking tool, if equipped with automatic transaxle, or place the shift lever in 4th gear and apply the parking brake, if equipped with manual transaxle. Tighten the bolt to 116-122 ft. lbs. (157-166 Nm).
  13. Position the automatic tensioner in a suitable press. Set a flat washer under the tensioner body to prevent damage to the body plug.
  14. Compress the tensioner until the hole in the piston is aligned with the 2nd hole in the tensioner case. Insert a 0.063 in. (1.6mm) diameter wire or pin through the 2nd hole to keep the piston compressed.
  15. Make sure the camshaft sprocket timing marks are still aligned. Turn the crankshaft counterclockwise until the timing sprocket is offset from TDC by 1 tooth.
  16. With the number one idler pulley removed, install the timing belt. If the original belt is being reused, make sure it is installed in the same direction of rotation. The order of installation is: timing belt (crankshaft) sprocket, number two idler pulley, LH camshaft sprocket, tensioner pulley and RH camshaft sprocket.
  17. Install the number one idler pulley while applying pressure on the timing belt. Tighten the bolt to 28-38 ft. lbs. (38-51 Nm).
  18. Install the automatic belt tensioner and tighten the bolts to 14-18 ft. lbs. (19-25 Nm). Remove the wire or pin from the tensioner.
  19. Rotate the crankshaft 2 turns in the normal direction of rotation and align the timing marks. Make sure all marks are still correctly aligned.
  20. Inspect the timing belt deflection, 0.24-0.31 ft. lbs. (6-8mm), between the crankshaft sprocket and the tensioner pulley. If it is out of specification, replace the auto tensioner.
  21. Remove the crankshaft damper bolt and install the timing belt covers.
  22. Install the right side engine mount. Tighten the nuts to 55-77 ft. lbs. (75-104 Nm) and the through-bolt to 63-86 ft. lbs. (86-116 Nm). Remove the engine support.
  23. Connect the negative battery cable.
1995 MX3 1.6L (B6-ZE) Engines
  1. Disconnect the negative battery cable.
  2. Remove the timing belt covers. Temporarily reinstall the crankshaft pulley bolt.
  3. Turn the crankshaft until the timing mark on the crankshaft sprocket aligns with the timing mark on the oil pump and the camshaft sprocket timing marks, E and I, line up on the camshaft sprockets.
  4. Lower the vehicle. Insert a camshaft sprocket holding tool between the camshaft sprockets.
  5. Loosen the tensioner pulley lockbolt. Pull the tensioner pulley away from the center of the engine to reduce the tension on the timing belt.
  6. If the timing belt is to be reused, mark the direction of rotation on the timing belt. Remove the timing belt.
  7. To remove the tensioner, unhook the tensioner spring, and remove the pulley lockbolt and tensioner.
  8. If necessary to remove the sprockets:
    1. Hold the camshaft by using a wrench on the cast hexagon, and loosen the sprocket mounting bolt.
    2. Remove the sprocket bolt and the sprocket from the camshaft.
    3. If equipped with a manual transaxle, place the shift lever in 4th gear and apply the parking brake. If equipped with an automatic transaxle, remove the flywheel dust cover and install a flywheel locking tool to hold the flywheel.
    4. Remove the crankshaft sprocket bolt, sprocket and key.

      To install:

  9. Install the camshaft sprocket, aligning the dowel with the number 1 mark.
  10. Install the camshaft sprocket bolt. Hold the camshaft, on the cast hexagon, with the wrench and tighten the bolt to 37-44 ft. lbs. (50-60 Nm).
  11. Install the crankshaft sprocket and key. Align the keyway with the timing mark on the oil pump housing.
  12. Install the crankshaft sprocket bolt. Install the flywheel locking tool, if equipped with automatic transaxle, or place the shift lever in 4th gear and apply the parking brake, if equipped with manual transaxle. Tighten the bolt to 108-116 ft. lbs. (147-157 Nm).
  13. Make sure the timing marks on the camshaft and crankshaft sprockets are still aligned.
  14. If removed, position the tensioner with the spring fully extended, and install the lockbolt tightening the mounting bolt to 28-38 ft. lbs. (38-51 Nm).
  15. Install the timing belt. If reusing the original timing belt, make sure it is installed in the same direction of rotation.
  16. Loosen the tensioner lockbolt to apply tension to the timing belt. Tighten the tensioner lockbolt. Remove the holding tool from between the camshaft sprockets.
  17. Rotate the crankshaft 2 turns in the normal direction of rotation and align the timing marks. Make sure all marks are still correctly aligned.
  18. Raise and safely support the vehicle. Remove the crankshaft pulley bolt and install the timing belt covers.
  19. Connect the negative battery cable.
1993-97 626 and MX6 2.0L (FS) Engines
  1. Disconnect the negative battery cable.
  2. Remove the timing belt covers. Temporarily reinstall the crankshaft pulley bolt.
  3. Turn the crankshaft until the timing mark on the crankshaft sprocket aligns with the timing mark on the oil pump and the camshaft sprocket timing marks, E and I, line up on the camshaft sprockets.
  4. Insert a camshaft sprocket holding tool between the camshaft sprockets.
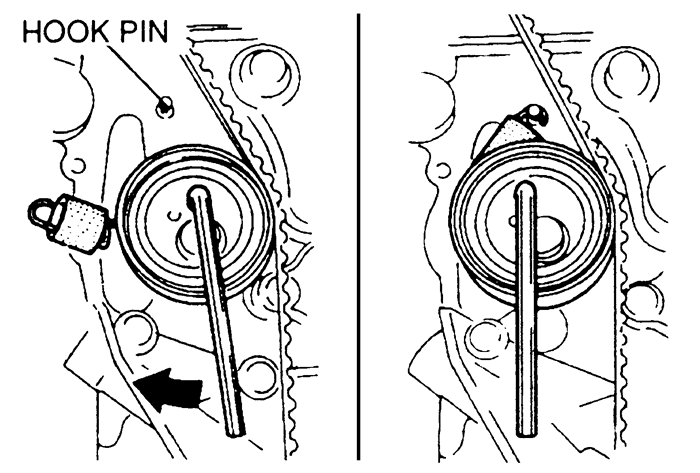
  5. Turn the timing belt tensioner with an Allen wrench and remove the tensioner spring from the hook pin.
    Fig. 11: Turning the tensioner spring -- 1993-97 626 and MX6 2.0L (FS) engines

  6. If the timing belt is to be reused, mark the direction of rotation on the timing belt. Remove the timing belt.
  7. If necessary to remove the sprockets:
    1. Hold the camshaft by using a wrench on the cast hexagon, and loosen the sprocket mounting bolt.
    2. Remove the sprocket bolt and the sprocket from the camshaft.
    3. If equipped with a manual transaxle, place the shift lever in 4th gear and apply the parking brake. If equipped with an automatic transaxle, remove the flywheel dust cover and install a flywheel locking tool to hold the flywheel.
    4. Remove the crankshaft sprocket bolt, sprocket and key.

      To install:

  8. Install the camshaft sprocket, aligning the dowel with the number 1 mark.
  9. Install the camshaft sprocket bolt. Hold the camshaft, on the cast hexagon, with the wrench and tighten the bolt to 35-48 ft. lbs. (47-65 Nm).
  10. Install the crankshaft sprocket and key. Align the keyway with the timing mark on the oil pump housing.
  11. Install the crankshaft sprocket bolt. Install the flywheel locking tool, if equipped with automatic transaxle, or place the shift lever in 4th gear and apply the parking brake, if equipped with manual transaxle. Tighten the bolt to 108-116 ft. lbs. (147-157 Nm).
  12. Make sure the timing marks on the camshaft and crankshaft sprockets are still aligned.
  13. Install the timing belt. If reusing the original timing belt, make sure it is installed in the same direction of rotation.
  14. Turn the tensioner clockwise with an Allen wrench and install the tensioner spring. Remove the holding tool from between the camshaft sprockets.
  15. Rotate the crankshaft 2 turns in the normal direction of rotation and align the timing marks. Make sure all marks are still correctly aligned.
  16. Remove the crankshaft pulley bolt and install the timing belt covers.
  17. Connect the negative battery cable.
1993-94 929 3.0L (JE-ZE) Engines
  1. Disconnect the negative battery cable and drain the cooling system.
  2. Remove the fresh air duct.
  3. Remove the cooling fan and fan shroud.
  4. Remove the air intake pipe from the throttle body and air cleaner.
  5. Disconnect the spark plug wires and remove the spark plugs.
  6. Remove the idler pulleys and the accessory drive belts.
  7. Remove the coolant bypass hose and the upper radiator hose.
  8. Disconnect the electrical connector and remove the distributor.
  9. Hold the crankshaft pulley with a suitable tool and remove the bolt. Remove the crankshaft pulley. Be careful not to damage the sensor rotor, if equipped.
  10. Remove the timing belt covers. Rotate the crankshaft until the camshaft and crankshaft sprocket timing marks are aligned.
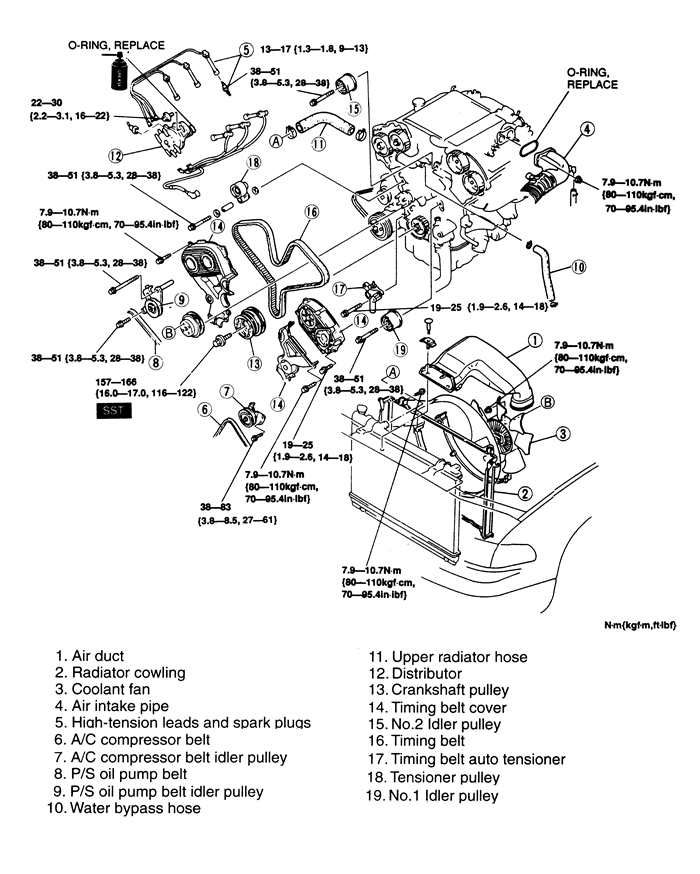
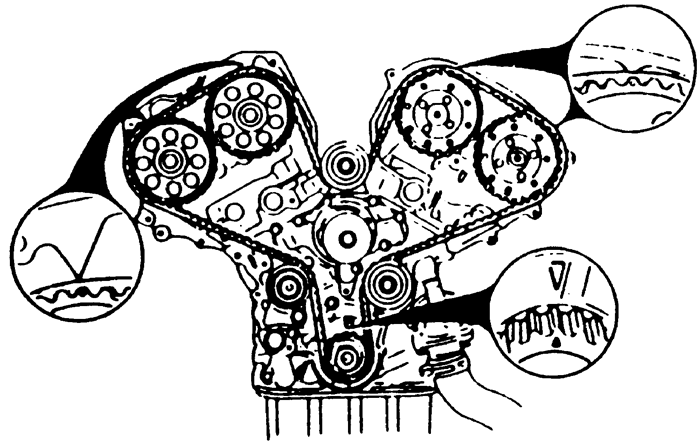
    Fig. 12: Timing belt assembly (exploded view) -- 929 3.0L (JE-ZE) engines

    Fig. 13: Timing marks -- 1993-94 929 3.0L (JE-ZE) engines

  11. Remove the upper idler pulley and the automatic tensioner and pulley. Mark the direction of rotation on the timing belt and remove the timing belt.

    NOTE: Do not rotate the engine after the timing belt has been removed.

  12. Inspect the belt for wear, peeling, cracking, hardening or signs of oil contamination. Inspect the tensioner pulley for free and smooth rotation. Check the automatic tensioner for oil leakage. Check the tensioner rod projection (free length); it should be 0.47-0.55 in. (12-14mm). Inspect the sprocket teeth for wear or damage. Replace parts, as necessary.
  13. If necessary to remove the sprockets:
    1. Insert a proper tool through one of the camshaft sprocket holes to keep it from turning.

      NOTE: The right and left camshaft sprockets are different and need to be installed on the same camshaft from which they were removed.

    2. Remove the sprocket bolt and the sprocket from the camshaft.
    3. Remove the flywheel dust cover and install a flywheel locking tool to hold the flywheel.
    4. Remove the crankshaft sprocket bolt, sprocket and key.

      To install:

  14. Install the camshaft sprocket, aligning the dowel with the number 1 mark.
  15. Install the camshaft sprocket bolt. Hold the sprocket with a suitable tool and tighten the right-hand bolt to 53-59 ft. lbs. (71-80 Nm), and the left-hand bolt to 14-18 ft. lbs. (19-254 Nm).
  16. Install the crankshaft sprocket and key. Align the keyway with the timing mark on the oil pump housing.
  17. Install the crankshaft sprocket bolt. Install the flywheel locking tool. Tighten the bolt to 116-122 ft. lbs. (157-166 Nm). Remove the locking tool.
  18. Install the timing belt and cover. Connect the negative battery cable.
  19. Position the automatic tensioner in a suitable press. Place a flat washer under the tensioner body to prevent damage to the body plug.
  20. Slowly press in the tensioner rod, but do not exceed 2200 lbs. force. Insert a pin into the tensioner body to hold the rod in place.
  21. Install the tensioner and tighten the bolts to 19 ft. lbs. (25 Nm).
  22. Make sure the crankshaft and camshaft sprocket timing marks are aligned.
  23. Install the timing belt over the crankshaft sprocket, lower idler pulley, left exhaust camshaft sprocket, left intake camshaft sprocket, tensioner pulley, right exhaust camshaft sprocket and right intake camshaft sprocket, in that order.
  24. Push the belt down and install the upper idler pulley. Tighten the bolt to 38 ft. lbs. (52 Nm). Make sure the timing marks are still aligned after installing the upper idler pulley.
  25. Turn the crankshaft 2 revolutions in the direction of normal rotation and realign the timing marks. If the timing marks do not align, repeat Steps 16-20.
  26. Remove the pin from the automatic tensioner. Again rotate the crankshaft 2 turns and make sure the timing marks are aligned.
  27. Apply approximately 22 lbs. (98 N) pressure to the timing belt at a point midway between the right exhaust camshaft sprocket and the tensioner pulley. The belt should deflect 0.20-0.28 in. (5-7mm). If the deflection is not as specified, replace the automatic tensioner.
  28. Install the timing belt covers, and tighten the bolts to 95 inch lbs. (11 Nm).
  29. Install the crankshaft pulley. Hold the pulley with a suitable tool and tighten the lockbolt to 123 ft. lbs. (167 Nm). Be careful not to damage the sensor rotor, if equipped.
  30. Install the distributor and connect the electrical connector.
  31. Install the upper radiator hose and coolant bypass hose.
  32. Install the idler pulleys and the accessory drive belts. Adjust the belt tension.
  33. Install the spark plugs and connect the spark plug wires.
  34. Install the air intake pipe to the throttle body and air cleaner.
  35. Install the cooling fan and radiator shroud. Install the fresh air duct.
  36. Connect the negative battery cable. Fill and bleed the cooling system.
  37. Start the engine and bring to normal operating temperature. Check for leaks and for proper operation. Check the ignition timing.
1995-97 Millenia 2.3L (KJS) Engines
  1. Disconnect the negative battery cable.
  2. Remove the timing belt covers. Temporarily reinstall the crankshaft pulley bolt.
  3. Remove the power steering auto tensioner and pulley.
  4. Turn the crankshaft until the timing mark on the crankshaft sprocket aligns with the timing mark on the oil pump and the camshaft sprocket timing marks align with the marks on the cylinder head. The number one piston should be at TDC of the compression stroke.
    Fig. 14: Timing mark locations -- 1995-97 Millenia 2.3L (KJS) engines

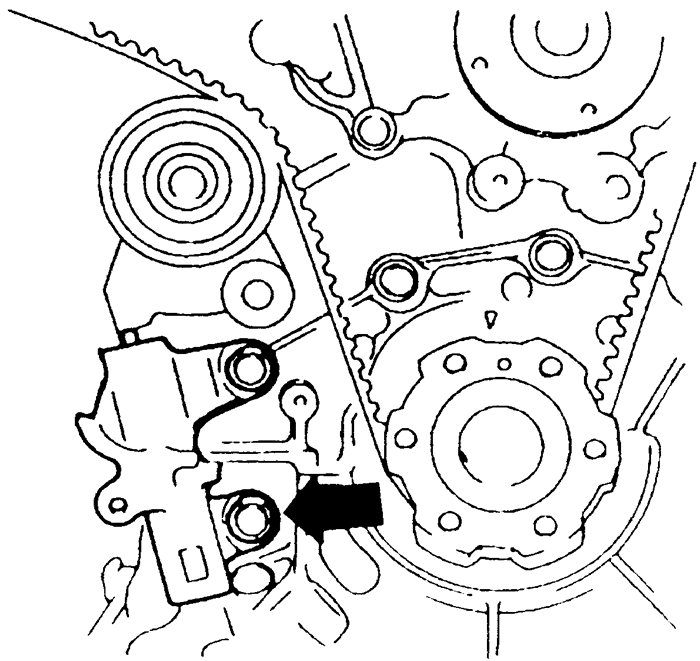
  5. Remove the two bolts from the automatic tensioner, removing the lower one first. Keep the bolt holes aligned by holding the tensioner to reduce the chance of stripping the threads on the bolts.
    Fig. 15: Lower auto tensioner bolt location -- 1995-97 Millenia 2.3L (KJS) engines

  6. If the timing belt is to be reused, mark the direction of rotation on the timing belt.
  7. Remove the timing belt.
  8. If necessary to remove the sprockets:
    1. Insert a proper tool through one of the camshaft sprocket holes to keep it from turning.

      NOTE: The right and left camshaft sprockets are different and need to be installed on the same camshaft from which they were removed.

    2. Remove the sprocket bolt and the sprocket from the camshaft.
    3. Remove the flywheel dust cover and install a flywheel locking tool to hold the flywheel.
    4. Remove the crankshaft sprocket bolt, sprocket and key.

      To install:

  9. Install the camshaft sprocket so that the R (on right-hand) and L (on left-hand) face out, and align the timing marks with the knock/dowel pin.
  10. Apply clean engine oil to the bolt threads, and install the camshaft sprocket bolt. Hold the sprocket with a suitable tool and tighten the bolt to 91-103 ft. lbs. (123-140 Nm).
  11. Install the crankshaft sprocket and key. Align the keyway with the timing mark on the oil pump housing.
  12. Install the crankshaft sprocket bolt. Install the flywheel locking tool. Tighten the bolt to 116-122 ft. lbs. (157-166 Nm). remove the flywheel locking tool.
  13. Position the automatic tensioner in a press. Set a flat washer under the tensioner body to prevent damage to the body plug.
  14. Compress the tensioner until the hole in the piston is aligned with the 2nd hole in the tensioner case. Insert a 0.063 inch (1.6 mm) diameter wire or pin through the 2nd hole to keep the piston compressed.
  15. Make sure the camshaft sprocket timing marks are still aligned. Turn the crankshaft clockwise until the timing sprocket is aligned.
  16. Install the timing belt. If the original belt is being reused, make sure it is installed in the same direction of rotation. The order of installation is: timing belt (crankshaft) sprocket, number two idler pulley, LH camshaft sprocket, both number one idler pulleys, RH camshaft sprocket and the tensioner pulley.
  17. Install the automatic belt tensioner and tighten the bolts to 14-18 ft. lbs. (19-25 Nm). Remove the wire or pin from the tensioner.
  18. Turn the crankshaft clockwise, until the crankshaft sprocket timing mark is again at TDC. This should place all of the belt slack in the automatic tensioner portion of the belt.
  19. Rotate the crankshaft two turns in the normal direction of rotation and align the timing marks. Make sure all marks are still correctly aligned.
  20. Inspect the timing belt deflection, 0.24-0.31 inches (6-8 mm), between the crankshaft sprocket and the tensioner pulley. If it is out of specification, replace the auto tensioner.
  21. Install the power steering auto tensioner and tighten the bolts to 14-18 ft. lbs. (19-25 Nm). Install the pulley, and tighten the bolt to 29-34 ft. lbs. (40-47 Nm).
  22. Remove the crankshaft damper bolt and install the timing belt covers.
  23. Connect the negative battery cable. Start the engine, and check the ignition timing.
1995-97 Millenia 2.5L (KLD) Engine
  1. Disconnect the negative battery cable.
  2. Remove the timing belt covers. Temporarily reinstall the crankshaft pulley bolt.
  3. Support the engine, and remove the nuts and through-bolt from the right side (number three) engine mount sub bracket. Remove the sub bracket.
  4. Turn the crankshaft until the timing mark on the crankshaft sprocket aligns with the timing mark on the oil pump and the camshaft sprocket timing marks align with the marks on the cylinder head. The number one piston should be at TDC of the compression stroke.
  5. Remove the two bolts from the automatic tensioner, removing the lower one first. Keep the bolt holes aligned by holding the tensioner to reduce the chance of stripping the threads on the bolts.
  6. If the timing belt is to be reused, mark the direction of rotation on the timing belt.
  7. Remove the number one idler pulley. Remove the timing belt.
  8. If necessary to remove the sprockets:
    1. Insert a proper tool through one of the camshaft sprocket holes to keep it from turning.

      NOTE: The right and left camshaft sprockets are different and need to be installed on the same camshaft from which they were removed.

    2. Remove the sprocket bolt and the sprocket from the camshaft.
    3. Remove the flywheel dust cover and install a flywheel locking tool to hold the flywheel.
    4. Remove the crankshaft sprocket bolt, sprocket and key.

      To install:

  9. Install the camshaft sprocket so that the R (on right-hand) and L (on left-hand) face out, and align the timing marks with the knock/dowel pin.
  10. Apply clean engine oil to the bolt threads, and install the camshaft sprocket bolt. Hold the sprocket with a suitable tool and tighten the bolt to 91-103 ft. lbs. (123-140 Nm).
  11. Install the crankshaft sprocket and key. Align the keyway with the timing mark on the oil pump housing.
  12. Install the crankshaft sprocket bolt. Install the flywheel locking tool. Tighten the bolt to 116-122 ft. lbs. (157-166 Nm). remove the flywheel locking tool.
  13. Position the automatic tensioner in a suitable press. Set a flat washer under the tensioner body to prevent damage to the body plug.
  14. Compress the tensioner until the hole in the piston is aligned with the 2nd hole in the tensioner case. Insert a 0.060 in. (1.6 mm) diameter wire or pin through the 2nd hole to keep the piston compressed.
  15. Make sure the camshaft sprocket timing marks are still aligned. Turn the crankshaft counterclockwise until the timing sprocket is aligned.
  16. With the number one idler pulley removed, install the timing belt. If the original belt is being reused, make sure it is installed in the same direction of rotation. The order of installation is: timing belt (crankshaft) sprocket, number two idler pulley, LH camshaft sprocket, tensioner pulley and RH camshaft sprocket.
  17. Install the number one idler pulley while applying pressure on the timing belt. Tighten the bolt to 28-38 ft. lbs. (38-51 Nm).
  18. Install the automatic belt tensioner and tighten the bolts to 14-18 ft. lbs. (19-25 Nm). Remove the wire or pin from the tensioner.
  19. Turn the crankshaft clockwise, until the crankshaft sprocket timing mark is again at TDC. This should place all of the belt slack in the automatic tensioner portion of the belt.
  20. Rotate the crankshaft 2 turns in the normal direction of rotation and align the timing marks. Make sure all marks are still correctly aligned.
  21. Inspect the timing belt deflection, 0.24-0.31 in. (6-8 mm), between the crankshaft sprocket and the tensioner pulley. If it is out of specification, replace the auto tensioner.
  22. Install the right side (number three) engine mount sub bracket. Tighten the nuts to 55-77 ft. lbs. (75-104 Nm) and the through-bolt to 63-86 ft. lbs. (86-116 Nm). Remove the engine support.
  23. Remove the crankshaft damper bolt and install the timing belt covers.
  24. Connect the negative battery cable. Start the engine, and check the ignition timing.
1993-94 Miata 1.6L (B6-ZE) and 1993-97 1.8L (BPD) Engines
  1. Disconnect the negative battery cable. Remove the engine undercover.
  2. Drain the engine coolant.
  3. Remove the air intake pipe.
  4. Remove the upper radiator hose, then remove the water hoses connected to the thermostat housing.
  5. Remove the accessory drive belts.
  6. Remove the water pump pulley.
  7. Remove the crankshaft pulley front plate. Remove the bolts and remove the crankshaft pulley.
  8. Remove the outer timing belt guide plate.
  9. Tag and disconnect the spark plug wires. Remove the coil.
  10. Remove the spark plugs.

    NOTE: Spark plugs are removed to make it easier to rotate the engine.

  11. Remove the valve cover (cylinder head cover).
  12. Remove the upper, middle and lower timing belt covers.
  13. Turn the crankshaft until the timing marks on the crankshaft and camshaft sprockets are aligned. The pin on the pulley boss must face upward. Hold the crankshaft pulley boss with a suitable tool and remove the pulley lockbolt, being careful not to rotate the crankshaft. Remove the crankshaft pulley boss.
  14. Mark the direction of rotation on the timing belt. Loosen the tensioner lockbolt and pry the tensioner outward. Tighten the lockbolt with the tensioner spring fully extended. Remove the timing belt.

    NOTE: Protect the tensioner with a shop towel before prying on it. Do not rotate the crankshaft after the timing belt has been removed.

  15. Remove the tensioner and spring. If necessary, remove the idler pulley.
  16. Inspect the belt for wear, peeling, cracking, hardening or signs of oil contamination. Inspect the tensioner for free and smooth rotation. Check the tensioner spring free length; it should not exceed 2.331 in. (59.2mm) on the 1995-97 1.8L engine and 2.315 in. (58.8mm) on all others. Inspect the sprocket teeth for wear or damage. Replace parts, as necessary.
  17. If necessary to remove the sprockets:
    1. Hold the camshaft by using a wrench on the cast hexagon, and loosen the sprocket mounting bolt.
    2. Remove the sprocket bolt, and the sprocket from the camshaft.
    3. If equipped with a manual transaxle, place the shift lever in 4th gear and apply the parking brake. If equipped with an automatic transaxle, remove the flywheel dust cover and install a flywheel locking tool to hold the flywheel.
    4. Remove the crankshaft sprocket bolt, sprocket and key.

      To install:

  18. Install the camshaft sprocket, aligning the dowel with the number 1 mark.
  19. Install the camshaft sprocket bolt. Hold the camshaft, on the cast hexagon, with the wrench and tighten the bolt to 37-44 ft. lbs. (50-60 Nm).
  20. Install the crankshaft sprocket and key. Align the keyway with the timing mark on the oil pump housing.
  21. Install the crankshaft sprocket bolt. Install the flywheel locking tool, if equipped with automatic transaxle, or place the shift lever in 4th gear and apply the parking brake, if equipped with manual transaxle. Tighten the bolt to 108-116 ft. lbs. (147-157 Nm).
  22. If removed, install the idler pulley and tighten the bolt to 38 ft. lbs. (52 Nm).
  23. Install the tensioner and tensioner spring. Pry the tensioner outward and temporarily tighten the tensioner lockbolt with the tensioner spring fully extended.
  24. Make sure the crankshaft sprocket timing mark is aligned with the mark on the oil pump housing. Make sure the camshaft sprocket timing marks are aligned with the marks on the seal plate.
  25. Install the timing belt so there is no looseness at the idler pulley side or between the camshaft sprockets. If reusing the old belt, make sure it is installed in the same direction of rotation.
  26. Temporarily install the pulley boss and lockbolt.
  27. Turn the crankshaft 2 turns clockwise and align the crankshaft sprocket timing mark. Face the pin on the pulley boss upright. Make sure the camshaft sprocket timing marks are aligned. If they are not, repeat the alignment steps.
  28. Turn the crankshaft 1 56 turns clockwise and align the crankshaft sprocket timing mark with the tension set mark for proper belt tension adjustment. Remove the lockbolt and pulley boss.
  29. Make sure the crankshaft sprocket timing mark is aligned with the tension set mark. Loosen the tensioner lockbolt, and allow the spring to apply tension to the belt. Tighten the tensioner lockbolt to 28-38 ft. lbs. (38-52 Nm).
  30. Install the pulley boss and lockbolt.
  31. Turn the crankshaft 2 16 turns clockwise and make sure the timing marks are correctly aligned.
  32. Apply approximately 22 lbs. pressure to the timing belt at a point midway between the camshaft sprockets. The belt should deflect 0.35-0.45 in. (9.0-11.5mm). If the deflection is not correct, repeat the alignment and tensioning procedure.
  33. Hold the pulley boss with a suitable tool, and tighten the lockbolt to 123 ft. lbs. (167 Nm).
  34. Install the timing belt covers and tighten the bolts to 95 inch lbs. (11 Nm).
  35. Install the valve cover.
  36. Install the PCV valve.
  37. Install the coil
  38. Install the spark plugs and connect the spark plug wires.
  39. Install the crankshaft pulley and tighten the bolts to 13 ft. lbs. (17 Nm).
  40. Install the water pump pulley and the accessory drive belts. Adjust the belt tension.
  41. Connect the radiator and coolant hoses.
  42. Install the air intake pipe.
  43. Refill the coolant.
  44. Connect the negative battery cable.
  45. Start the engine and check for proper operation. Check the ignition timing and idle speed. Check carefully for any fluid leaks.
  46. Install the engine side or undercover, as necessary.
 
Previous Next