CAUTION
Fuel injection systems remain under pressure after the engine has been
turned OFF. Properly relieve fuel pressure before disconnecting any fuel
lines. Failure to do so may result in fire or personal injury. Do not
allow fuel spray or fuel vapors to come in contact with a spark or open
flame. Keep a dry chemical fire extinguisher nearby. Never store fuel
in an open container due to risk of fire or explosion.
- On fuel injected engines, relieve the fuel system
pressure.
- Disconnect the negative battery cable.
- If equipped, remove the fuel line clamps.
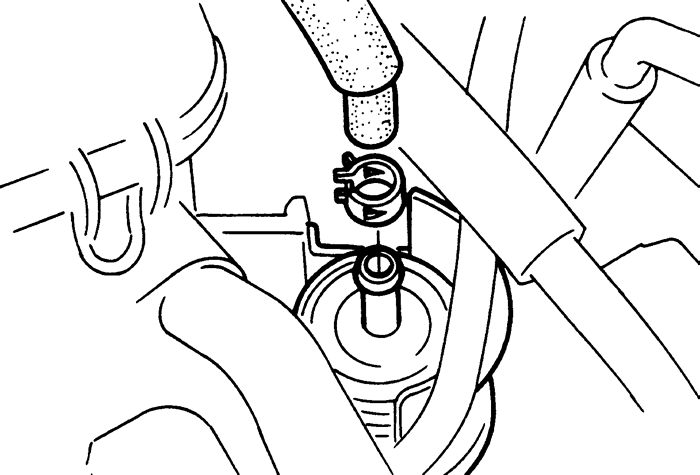
- Disconnect the fuel lines from the filter and plug
the ends to prevent leakage.
-
Loosen the bolt and nut and remove the fuel filter from its mounting
bracket. Note the direction of the flow arrow on the filter so the replacement
filter can be installed in the correct position.
To install:
- Install the fuel filter in its mounting bracket,
making sure the flow arrow is pointing in the proper direction. Tighten
the bracket bolt and nut.
- Unplug the fuel lines and connect them to the fuel
filter.
- If equipped, install the fuel line clamps.
- Connect the negative battery cable.
- Relieve the fuel system pressure.
- Disconnect the negative battery cable.
- Remove the air intake hose.
- Remove the two nuts an the fuel filter bracket, and
remove the fuel tube clamps.
- Disconnect the fuel lines from both ends of the fuel
filter. Plug the lines to prevent leakage.
-
Remove the filter from the mounting bracket.
| Fig. 1:Fuel filter assembly -- 1993-97 626 and
MX6 2.0L (FS) and 1995 MX3 1.6L (B6-ZE) engines
|
To install:
- Position the filter in the mounting bracket.
- Unplug the fuel lines and connect them to the filter.
- Install the fuel tube clamps, and install and tighten
the bracket nuts to 70-95 inch lbs. (8-11 Nm).
- Install the air intake hose.
- Connect the negative battery cable.
- Run the engine and check for any fuel leaks.
CAUTION
Do not allow fuel spray or fuel vapors to come in contact with a spark
or open flame. Keep a dry chemical fire extinguisher nearby. Never store
fuel in an open container due to risk of fire or explosion.
- Insure the ignition is OFF. Relieve the fuel
system pressure.
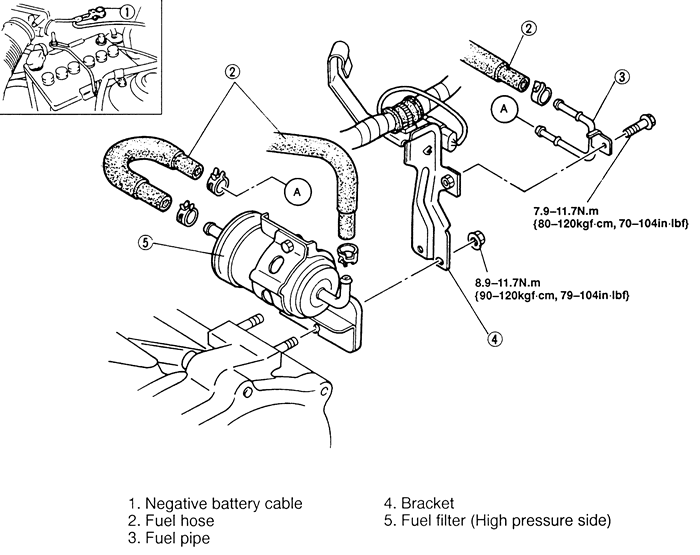
- Remove the nuts on the fuel filter bracket, and remove
the fuel tube clamps.
-
Disconnect the fuel lines from both ends of the fuel filter. Plug the
lines to prevent leakage.
| Fig. 2:Fuel filter assembly (exploded view) --
1994-95 MX3 1.8L (K8) engine
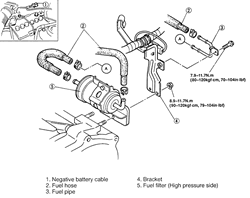
|
-
Remove the filter from the mounting bracket.
To install:
- Position the filter in the mounting bracket.
- Unplug the fuel lines and connect them to the filter.
- Install the fuel tube clamps, and install and tighten
the bracket nuts to 79-104 inch lbs. (9-12 Nm) on MX3 1.8L engines and
70-95.4 inch. lbs. (7.9-10.7 Nm) on 626/MX6 2.5L engines.
- Run the engine and check for any fuel leaks.
CAUTION
Do not allow fuel spray or fuel vapors to come in contact with a spark
or open flame. Keep a dry chemical fire extinguisher nearby. Never store
fuel in an open container due to risk of fire or explosion.
- Relieve the fuel system pressure, and disconnect
the negative battery cable.
- Raise and safely support the vehicle. The fuel filter
is located at the rear of the vehicle, next to the fuel tank.
- Disconnect the fuel lines from the fuel filter.
- Remove the filter mounting bolts or nuts, and remove
the fuel filter.
- Installation is the reverse of the removal procedure.
Make sure the fuel filter is installed in the proper flow direction.
CAUTION
Do not allow fuel spray or fuel vapors to come in contact with a spark
or open flame. Keep a dry chemical fire extinguisher nearby. Never store
fuel in an open container due to risk of fire or explosion.
- Insure the ignition is OFF. Relieve the fuel
system pressure.
- Disconnect the negative battery cable.
- Open the trunk, and remove the trunk mat.
- Remove the service hole cover.
- Disconnect the fuel lines from both ends of the fuel
filter. Plug the lines to prevent leakage.
- Remove the nut from the fuel filter bracket, and
remove the filter and bracket from the vehicle.
-
Remove the filter from the mounting bracket.
To install:
- Position the filter in the mounting bracket.
- Install and tighten the bracket nut to 70-95 inch
lbs. (8-11 Nm).
- Unplug the fuel lines and connect them to the filter.
- Install the service hole cover.
- Replace the trunk mat, and close the trunk.
- Connect the negative battery cable.
- Run the engine and check for any fuel leaks.
CAUTION
Do not allow fuel spray or fuel vapors to come in contact with a spark
or open flame. Keep a dry chemical fire extinguisher nearby. Never store
fuel in an open container due to risk of fire or explosion.
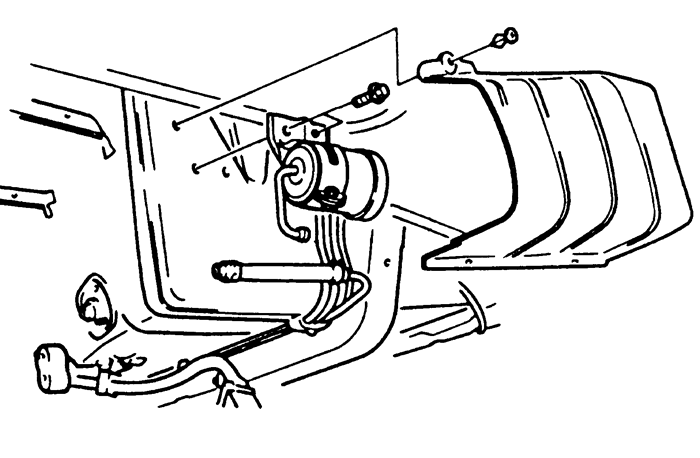
| Fig. 3:Fuel filter cover plate identification --
Miata with 1.6L and 1.8L engines
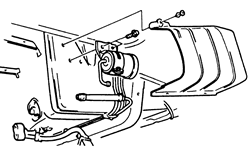
|
- Relieve the fuel system pressure and disconnect the
negative battery cable.
- Raise and safely support the vehicle. The fuel filter
is located at the rear of the vehicle, next to the fuel tank.
- Remove the fuel filter cover.
- Disconnect and plug the fuel lines from the fuel
filter.
- Remove the filter mounting bolts or nuts and remove
the fuel filter.
- Installation is the reverse of the removal procedure.
Make sure the fuel filter is installed in the proper flow direction. Torque
the fuel filter bracket mounting bolts to 70-95.4 in lbs. (7.9-10.7 Nm).
CAUTION
Do not allow fuel spray or fuel vapors to come in contact with a spark
or open flame. Keep a dry chemical fire extinguisher nearby. Never store
fuel in an open container due to risk of fire or explosion.
NOTE: The fuel filter is located at the rear of the vehicle,
next to the fuel tank.
- Relieve the fuel system pressure.
- Disconnect the negative battery cable.
- Raise and safely support the vehicle. Remove the
splash shield.
- Disconnect the fuel lines from the fuel filter.
- Remove the filter mounting bolts and the fuel filter.
- Installation is the reverse of the removal procedure.
Make sure the fuel filter is installed in the proper flow direction.