CAUTION
Fuel injection systems remain under pressure after the engine has been
turned OFF. Properly relieve fuel pressure before disconnecting any fuel
lines. Failure to do so may result in fire or personal injury. Do not
allow fuel spray or fuel vapors to come in contact with a spark or open
flame. Keep a dry chemical fire extinguisher nearby. Never store fuel
in an open container due to risk of fire or explosion.
- Relieve the fuel pressure and disconnect the negative
battery cable.
- Depress the clips on each end of the rear seat cushion
and remove the cushion.
- Disconnect the electrical connector from the fuel
pump/sending unit.
- Remove the attaching screws from the fuel pump/sending
unit access cover and remove the cover.
- Disconnect the fuel supply and return hoses from
the fuel pump/sending unit.
- Remove the attaching screws and the fuel pump/sending
unit from the fuel tank.
-
Disconnect the sending unit electrical connector, remove the sending
unit attaching nuts and remove the sending unit from the fuel pump assembly.
To install:
- Attach the sending unit to the fuel pump assembly
and install the nuts. Connect the sending unit electrical connector.
- Install the fuel pump/sending unit into the fuel
tank with a new gasket and install the mounting screws.
- Connect the fuel supply and return lines.
- Install the access cover and the mounting screws.
- Connect the sending unit electrical connector.
- Position the rear seat cushion over the floor, making
sure to align the retaining pins with the clips. Push down firmly until
the 2 retaining pins are locked into the rear seat retaining clips.
- Connect the negative battery cable, start the engine
and check for proper system operation and for fuel leaks.
CAUTION
Do not allow fuel spray or fuel vapors to come in contact with a spark
or open flame. Keep a dry chemical fire extinguisher nearby. Never store
fuel in an open container due to risk of fire or explosion.
- Relieve the fuel system pressure.
- Disconnect the negative battery cable.
- Remove the rear seat cushion from the vehicle.
- Remove any dirt that has accumulated around the fuel
pump cover so it will not enter the tank during pump removal and installation.
- Remove the fuel pump cover.
- Disconnect the fuel gauge connector, hoses, and the
gauge.
- Disconnect the fuel pump electrical connector.
-
Remove the fuel pump from the bracket assembly. Remove and discard
the seal ring.
To install:
- Clean the fuel pump mounting flange, fuel tank mounting
surface and seal ring groove.
- Apply a light coating of grease on a new seal ring
to hold it in place during assembly and install in the seal ring groove.
- Install the fuel pump to the bracket assembly carefully
to ensure the filter is not damaged. Make sure the seal ring remains in
the groove.
- Hold the pump assembly in place, and pull the fuel
pump down so that it is tight against the bracket.
- Connect the fuel pump electrical connector.
- Install the fuel gauge, hoses, and gauge connector.
- Install the fuel pump cover.
- Install the rear seat cushion.
- Connect the negative battery cable, start the engine
and check for proper system operation and for fuel leaks.
CAUTION
Do not allow fuel spray or fuel vapors to come in contact with a spark
or open flame. Keep a dry chemical fire extinguisher nearby. Never store
fuel in an open container due to risk of fire or explosion.
- Relieve the fuel system pressure, and disconnect
the negative battery cable.
- Remove the amplifier and CD changer, if equipped.
- Open the trunk and lift the carpet or mat.
- Remove the fuel pump access cover.
- Disconnect the fuel pump connector and the fuel lines.
- Remove the screws and remove the fuel pump/sending
unit assembly from the fuel tank.
-
If necessary, remove the fuel pump from the tank gauge sending unit.
To install:
- Using a new rubber seal, install the fuel pump into
the fuel tank.
- Connect the fuel pump connector and the fuel lines.
- Install the access cover, and replace the mat or
carpet.
- Install the amplifier and CD changer, if removed.
-
Connect the negative battery cable.
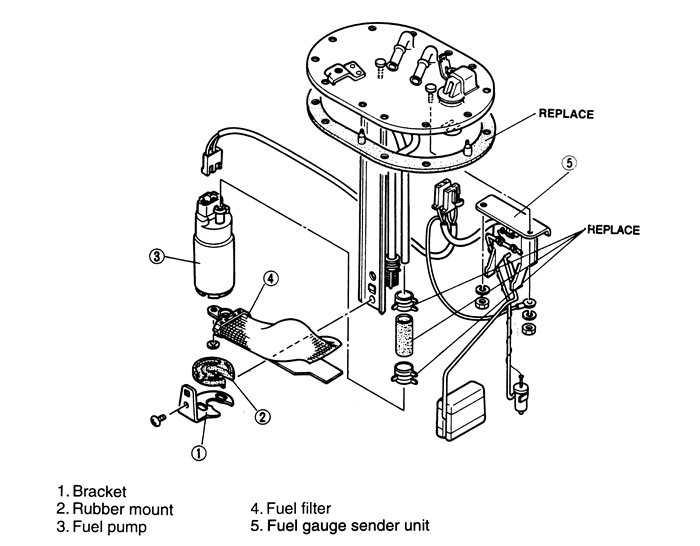
| Fig. 1:Fuel pump assembly -- 1993-94 929 3.0L
(JE-ZE) engines
|
CAUTION
Do not allow fuel spray or fuel vapors to come in contact with a spark
or open flame. Keep a dry chemical fire extinguisher nearby. Never store
fuel in an open container due to risk of fire or explosion.
- Relieve the fuel system pressure.
- Disconnect the negative battery cable.
- Remove the fuel tank and place it on a bench.
- Remove any dirt that has accumulated around the fuel
pump retaining flange so it will not enter the tank during pump removal
and installation.
- Turn the fuel pump locking ring counterclockwise
and remove the locking ring.
-
Remove the fuel pump and bracket assembly. Remove and discard the seal
ring.
To install:
- Clean the fuel pump mounting flange, fuel tank mounting
surface and seal ring groove.
- Apply a light coating of grease on a new seal ring
to hold it in place during assembly and install in the seal ring groove.
- Install the fuel pump and bracket assembly carefully
to ensure the filter is not damaged. Make sure the locating keys are in
the keyways and the seal ring remains in the groove.
- Hold the pump assembly in place and install the locking
ring finger-tight. Make sure all the locking tabs are under the tank lock
ring tabs.
- Rotate the locking ring clockwise until the ring
is against the stops.
- Install the fuel tank in the vehicle. Add a minimum
of 10 gallons of fuel to the tank and check for leaks.
- Connect the negative battery cable. Start the engine
and check for proper system operation and for fuel leaks.
CAUTION
Do not allow fuel spray or fuel vapors to come in contact with a spark
or open flame. Keep a dry chemical fire extinguisher nearby. Never store
fuel in an open container due to risk of fire or explosion.
- Properly relieve the fuel pressure, and disconnect
the negative battery cable.
- Remove the rear package trim and remove the service
hole cover.
- Remove the fuel pump cover and disconnect the fuel
pump connector. Disconnect the fuel hoses.
- Remove the fuel pump and the fuel gauge sender unit
as an assembly. Remove the fuel pump.
- Installation is the reverse of removal. Use a NEW
O-ring set when installing. After install the fuel pump to the bracket,
pull the fuel pump down so that it is tight against the bracket.
CAUTION
Do not allow fuel spray or fuel vapors to come in contact with a spark
or open flame. Keep a dry chemical fire extinguisher nearby. Never store
fuel in an open container due to risk of fire or explosion.
- Relieve the fuel system pressure and disconnect the
negative battery cable.
- Open the trunk or hatch and lift the carpet or mat.
- Remove the fuel pump access cover.
- Disconnect the fuel pump connector and the fuel lines.
- Remove the screws and remove the fuel pump/sending
unit assembly from the fuel tank. If necessary, remove the fuel pump from
the tank gauge sending unit.
- Installation is the reverse of the removal procedure.
Use a new rubber seal and tighten the mounting bolts to 70-95 inch lbs.
(8-11 Nm).