CAUTION
Fuel injection systems remain under pressure after the engine has been
turned OFF. Properly relieve fuel pressure before disconnecting any fuel
lines. Failure to do so may result in fire or personal injury. Do not
allow fuel spray or fuel vapors to come in contact with a spark or open
flame. Keep a dry chemical fire extinguisher nearby. Never store fuel
in an open container due to risk of fire or explosion.
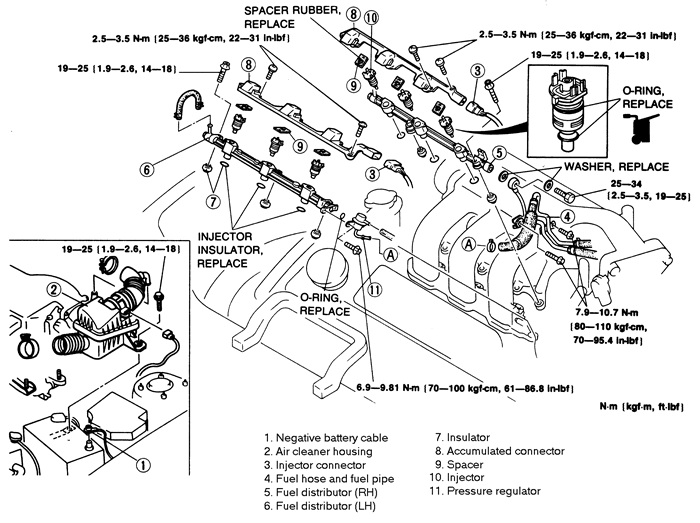
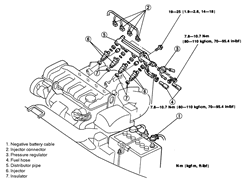
| Fig. 1:Exploded view of the fuel rail assembly --
626 and MX6 with 2.5L (KL) and 1993-95 MX3 1.8Lengines
|
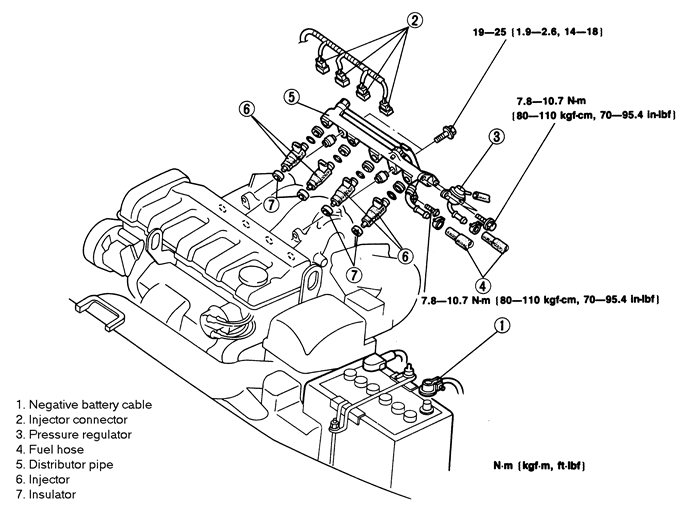
| Fig. 2:Fuel injectors and related components -- 626
and MX6 2.0L (FS) engines
|
- Relieve the fuel system pressure.
- Disconnect the negative battery cable.
- Disconnect the electrical connectors at the injectors.
- Remove the fuel injector harness from the fuel delivery
pipe.
- Remove the delivery pipe bolt(s) and remove the delivery
pipe with the injectors and the pressure regulator.
-
Separate the injectors, grommets and the insulators from the delivery
pipe assembly.
To install:
- Replace the fuel injector O-rings and apply a small
amount of clean engine oil to the O-rings before installation.
- Replace the fuel injector insulator seals.
- Install the injectors to the delivery pipe and install
the assembly to the engine. Tighten the delivery pipe bolt to 14-18 ft.
lbs. (19-25 Nm).
- Install the injector harness to the fuel delivery
pipe and connect the injector wiring.
- Connect the negative battery cable.
- Relieve the fuel system pressure, and disconnect
the negative battery cable.
- Disconnect the throttle and accelerator cables. Remove
the cable bracket.
- Label and disconnect the fuel injector wiring harness.
- Disconnect and plug the fuel lines at the fuel rail.
- Disconnect the vacuum hose from the fuel pressure
regulator.
- Remove the fuel line mounting bracket bolt.
- Remove the fuel rail mounting bolts, spacers, insulators
and the fuel rail, with the injectors attached.
-
Remove the fuel injectors, grommets and O-rings from the fuel rail.
Remove the O-rings from the fuel injectors.
To install:
- Apply a small amount of clean engine oil to new O-rings
and install them and the grommets on the fuel injectors.
- Install the insulators and injectors on the intake
manifold.
- Install the grommets and the fuel rail onto the injectors.
- Install the fuel rail attaching bolts and tighten
to 14-18 ft. lbs. (19-25 Nm).
- Connect the vacuum hose to the fuel pressure regulator
and the fuel lines to the fuel rail.
- Install the fuel line mounting bracket, and tighten
the bolt to 70-95 inch lbs. (8-11 Nm).
- Connect the fuel injector wiring harness.
- Install the cable bracket, and tighten the bolt to
70-95 inch lbs. (8-11 Nm). Connect and adjust the throttle and accelerator
cables.
- Connect the negative battery cable and turn the ignition
switch ON to pressurize the fuel system. Check for leaks and correct
as necessary, before starting the engine.
- Relieve the fuel system pressure, and disconnect
the negative battery cable.
- Remove the air cleaner housing and air ducts.
- Label and disconnect the fuel injector electrical
connectors.
- Disconnect and plug the fuel supply and return lines.
Discard the copper crush washers.
- Remove the fuel pressure regulator mounting bolts
and the fuel pressure regulator.
- Remove the fuel rail mounting bolts and the fuel
rails.
- Remove the 6 insulators.
- Remove the distribution harness (accumulated connector)
attaching screws, and remove the distribution harness from the fuel rails.
-
Remove and discard the spacer from the top of each fuel injector. Remove
the fuel injectors from the fuel rails by rotating back and forth.
To install:
- Apply clean engine oil to new O-rings and install
them on the injectors. Install the injectors into the fuel rails.
- Install new spacers on the injectors, then install
the distribution harness with the screws. Tighten the screws to 22-31
in. lbs. (2.5-3.5 Nm).
- Install the 6 insulators and the fuel rails. Install
the fuel rail mounting bolts and tighten to 14-18 ft. lbs. (19-25 Nm).
- Install the fuel pressure regulator and tighten the
bolts to 61-86 in. lbs. (7-10 Nm).
- Using new copper crush washers, connect the fuel
supply and return lines.
- Connect the fuel injector electrical connectors.
- Install the air ducts and air cleaner housing.
- Connect the negative battery cable. Turn the ignition
switch ON to pressurize the fuel system. Check for fuel leaks and
correct as necessary before starting the engine.
- Relieve the fuel system pressure and disconnect the
negative battery cable.
- Label and disconnect the fuel injector wiring harness.
- Disconnect and plug the fuel lines at the fuel rail.
- Disconnect the vacuum hose from the fuel pressure
regulator.
- Remove the fuel line mounting bracket bolt.
- Remove the fuel rail mounting bolts, spacers, insulators
and the fuel rail, with the injectors attached.
-
Remove the fuel injectors, grommets and O-rings from the fuel rail.
Remove the O-rings from the fuel injectors.
To install:
- Apply a small amount of clean engine oil to new O-rings
and install them and the grommets on the fuel injectors.
- Install the insulators and injectors on the intake
manifold.
- Install the grommets and the fuel rail onto the injectors.
- Install the fuel rail attaching bolts and tighten
to 14-18 ft. lbs. (19-25 Nm).
- Connect the vacuum hose to the fuel pressure regulator
and the fuel lines to the fuel rail.
- Install the fuel line mounting bracket and tighten
the bolt to 70-95 inch lbs. (8-11 Nm).
- Connect the fuel injector wiring harness.
- Connect the negative battery cable and turn the ignition
switch ON to pressurize the fuel system. Check for leaks and correct
as necessary, before starting the engine.
- Properly relieve the fuel system pressure.
- Disconnect the negative battery cable, and drain
the cooling system.
- Disconnect the air intake hose from the throttle
body. If necessary, disconnect the air flow meter electrical connector
and remove the air cleaner assembly and air ducts.
- Disconnect the accelerator cable. Disconnect and
plug the fuel lines.
- Label and disconnect the necessary hoses and electrical
connectors from the throttle body. Remove the throttle body.
- Disconnect the electrical connector, water hoses
and air hose from the air bypass valve. Remove the retaining bolts/nuts
and remove the air bypass valve. Remove the air intake pipe from the upper
intake manifold.
- Label and disconnect the necessary hoses and electrical
connectors from the upper intake manifold. Remove the upper intake manifold
retaining bolts and the upper intake manifold.
- Label and disconnect the electrical connectors from
the fuel injectors.
-
Remove the retaining bolts and cap from the top of the injector. Remove
the injector by grasping the plastic part of the injector and twisting
out. Disconnect the vacuum hose from the fuel pressure regulator and remove
the fuel rail.
To install:
- Install the fuel rail. Apply a small amount of clean
engine oil to new injector O-rings and install on the injectors. Install
the injectors in the fuel rail using a turning motion, to prevent damaging
the O-rings. Install the injector retainer caps and tighten the screws
to 30 inch lbs. (3.4 Nm).
- Connect the injector electrical connectors and connect
the vacuum hose to the fuel pressure regulator. Connect the fuel lines.
- Using a new gasket, install the upper intake manifold
on the lower intake manifold. Tighten the mounting bolts to 19 ft. lbs.
(25 Nm).
- Connect the electrical connectors and hoses to the
upper intake manifold.
- Install the air intake pipe on the upper intake manifold
using a new gasket, and tighten the mounting bolts to 17 ft. lbs. (23
Nm). Install the air bypass valve and tighten the nuts to 19 ft. lbs.
(25 Nm). Connect the coolant hoses, air hose and electrical connector
to the air bypass valve.
- Install the throttle body, using a new gasket. Tighten
the nuts to 19 ft. lbs. (25 Nm). Connect the hoses and electrical connectors
to the throttle body.
- If removed, install the air cleaner and air ducts.
Connect the air intake to the throttle body.
- Connect the negative battery cable and turn the ignition
ON to pressurize the fuel system. Check for leaks.
- Fill and bleed the cooling system.
- Start the engine and bring to normal operating temperature.
Check for leaks. Check the idle speed.
- Relieve the fuel system pressure, and disconnect
the negative battery cable.
- Remove the charge air cooler air duct.
- Remove the air cleaner assembly.
- Remove the resonator.
- Remove the left and right-hand charge air coolers.
- Disconnect the accelerator cable.
- Remove the air intake pipe assembly.
- Remove the vacuum hose assembly.
- Label and disconnect the fuel injector electrical
connectors.
- Disconnect and plug the fuel supply and return lines.
Discard the copper crush washers.
- Remove the fuel rail mounting bolts and the fuel
rails.
- Remove the six insulators.
- Remove the distribution harness (accumulated connector)
attaching screws, and remove the distribution harness from the fuel rails.
- Remove and discard the spacer from the top of each
fuel injector. Remove the fuel injectors from the fuel rails by rotating
back and forth.
-
Remove the fuel pressure regulator mounting bolts and the fuel pressure
regulator.
To install:
- Install the fuel pressure regulator and tighten the
bolts to 61-86 inch lbs. (7-10 Nm).
- Apply clean engine oil to new O-rings and install
them on the injectors. Install the injectors into the fuel rails.
- Install new spacers on the injectors, then install
the distribution harness with the screws. Tighten the screws to 22-31
inch lbs. (2.5-3.5 Nm).
- Install the 6 insulators and the fuel rails. Install
the fuel rail mounting bolts and tighten to 14-18 ft. lbs. (19-25 Nm).
- Using new copper crush washers, connect the fuel
supply and return lines.
- Connect the fuel injector electrical connectors.
- Install the vacuum hose assembly. Tighten the mounting
nuts to 70-95 inch lbs. (8-11 Nm).
- Install the air intake pipe assembly. Tighten the
mounting nuts to 70-95 inch lbs. (8-11 Nm), and the mounting bolts to
44-78 inch lbs. (5-9 Nm).
- Connect and adjust the accelerator cable. Tighten
the mounting bolt to 70-95 inch lbs. (8-11 Nm).
- Install the left and right-hand charge air coolers.
Install new O-rings, and tighten the bolts to 14-18 ft. lbs. (19-25 Nm).
- Install the resonator. Tighten the mounting nuts
to 70-95 inch lbs. (8-11 Nm).
- Install the air cleaner assembly. Tighten the mounting
nuts to 70-95 inch lbs. (8-11 Nm).
- Install the charge air cooler air duct. Tighten the
mounting nuts to 70-95 inch lbs. (8-11 Nm).
- Connect the negative battery cable. Turn the ignition
switch ON to pressurize the fuel system. Check for fuel leaks and
correct as necessary before starting the engine.
- Properly relieve the fuel system pressure, and disconnect
the negative battery cable.
- Remove the PCV hose.
- Disconnect the vacuum hose from the fuel pressure
regulator.
- Label and disconnect the fuel injector connectors.
- Remove the fuel rail mounting bolts, spacers, insulators
and the fuel rail, with the injectors attached.
-
Remove the fuel injectors, grommets and O-rings from the fuel rail.
Remove the O-rings from the fuel injectors.
To install:
- Apply a small amount of clean engine oil to NEW O-rings
and install them and the grommets on the fuel injectors.
- Install the insulators and injectors on the intake
manifold.
- Install the grommets and the fuel rail onto the injectors.
- Install the fuel rail attaching bolts and tighten
to 14-18 ft. lbs. (19-25 Nm).
- Connect the vacuum hose to the fuel pressure regulator
and the fuel lines to the fuel rail.
- Connect the fuel injector connectors.
- Install the PCV hose.
-
Connect the negative battery cable and turn the ignition switch
ON to pressurize the fuel system. Check for leaks and correct as necessary,
before starting the engine.
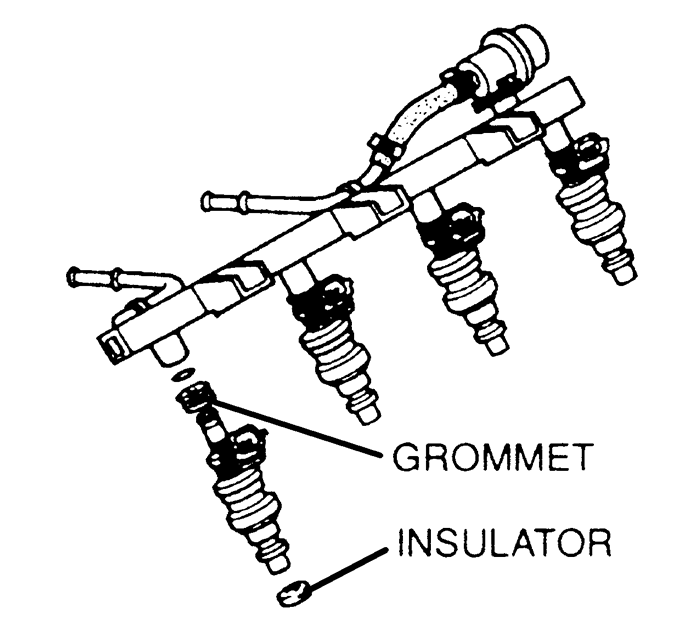
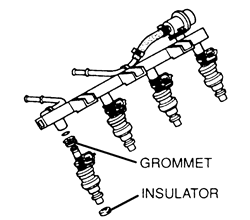
| Fig. 3:Fuel injector assembly -- 1995-97 Miata
1.8L (BPD) engines
|
- Relieve the fuel system pressure.
- Disconnect the negative battery cable.
- Drain the cooling system.
- Remove the fresh air duct, and disconnect the accelerator
cable.
- Disconnect the hoses and remove the air cleaner assembly.
Remove the air cleaner-to-turbocharger hoses.
- Disconnect the vacuum hoses and remove the pressure
chamber.
- Remove the intercooler hoses and the turbocharger-to-intercooler
pipe and intercooler-to-throttle body pipe.
- Label and disconnect the electrical connectors, vacuum
and coolant hoses from the throttle body and extension manifold.
- Remove the mounting bolts and nuts, and the throttle
body/extension manifold assembly.
- Label and disconnect the fuel injector electrical
connectors. Disconnect and plug the fuel lines.
- Remove the primary and secondary fuel distributor
assemblies.
-
Remove the screws and remove the injector covers. Remove the injectors,
insulators and air bleed sockets from the fuel distributors.
To install:
- Apply clean engine oil to new O-rings and install
on the injectors. Install the injectors into the fuel distributors with
a twisting motion. Install the injector caps and tighten the screws to
30 inch lbs. (3.5 Nm).
- Align the tabs of the air bleed socket with the notches
in the intermediate housing. Install the air bleed socket, insulators
and fuel distributor assemblies. Tighten the fuel distributor mounting
bolts to 19 ft. lbs. (25 Nm).
- Connect the fuel lines and the injector connectors.
- Install the throttle body/extension manifold assembly,
using a new gasket, and tighten the nuts and bolts to 19 ft. lbs. (25
Nm).
- Connect the coolant and vacuum hoses and the electrical
connectors to the throttle body and extension manifold.
- Install the intercooler-to-throttle body, turbocharger-to-intercooler
pipes and the intercooler connecting hoses.
- Install the pressure chamber and connect the vacuum
hoses.
- Connect the accelerator cable.
- Install the air cleaner assembly and the air hoses.
- Connect the negative battery cable. Turn the ignition
key ON to pressurize the system and check for leaks. Correct as
necessary.
- Fill and bleed the cooling system. Start the engine
and check for leaks.