Previous Next

Windshield Wiper Motor

REMOVAL AND INSTALLATION

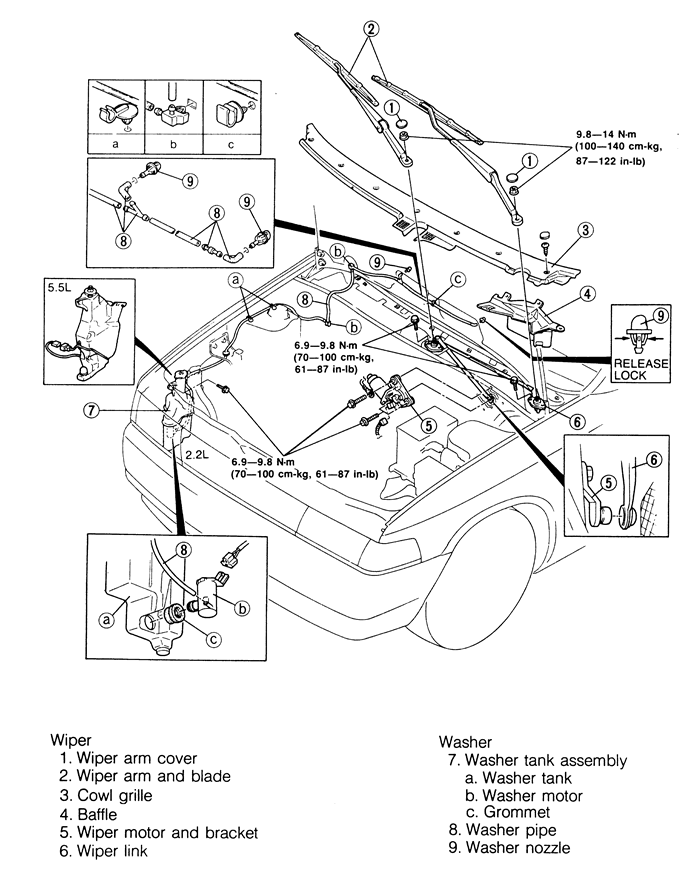
Fig. 1: Exploded view of typical wiper system -- 1993-95 323 and Protege shown, others similar

1993-94 323 and Protege
Front Wiper Motor
  1. Disconnect the negative battery cable.
  2. Remove the wiper arm nut covers, the wiper arm nuts and the wiper arms.
  3. Remove the cowl grille nut caps, the nuts, and the cowl grille assembly.
  4. Remove the baffle.
  5. Disconnect the electrical connector and remove the three wiper motor mounting bolts. Remove the wiper link from the wiper motor arm and remove the wiper motor from the vehicle.
  6. Make an alignment mark on the wiper motor bracket before removing the arm from the motor. Remove the motor arm.

    To install:

  7. Install the wiper arm to the wiper motor with the nut and aligning the mark made earlier. Torque the nut to 95-156 in. lbs. (11-18 Nm).
  8. Reinstall the wiper link to the wiper motor and mount the wiper motor with the three bolts. Torque the mounting bolts to 61-87 in. lbs. (6.9-9.8 Nm). Reconnect the electrical connector.
  9. Install the baffle.
  10. Reinstall the cowl grille assembly with the mounting screws and install the screw caps.
  11. Reconnect the negative battery cable.
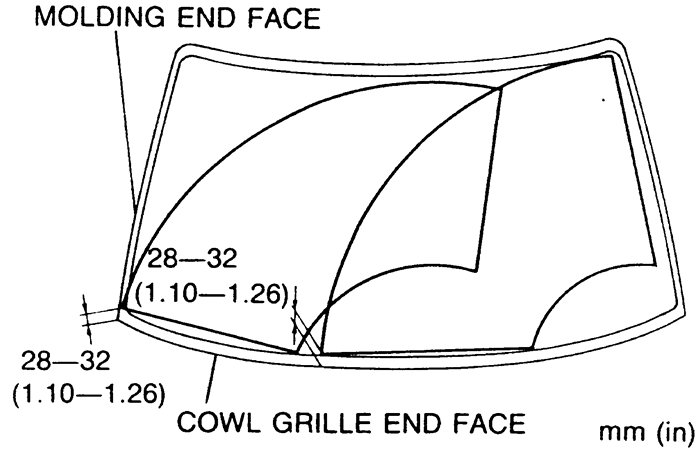
  12. Turn the wiper motor on to operate the motor. Turn the wiper switch off to set the automatic park position. Install the wiper arms and set to the correct height. Install and torque the wiper arm nuts to 87-122 in. lbs. (9.8-14 Nm). Reinstall the wiper arm nut caps.
    Fig. 2: Adjusting the front wiper arms -- 1993-95 323 and Protege

Rear Wiper Motor
  1. Disconnect the negative battery cable.
  2. Remove the wiper arm cover, remove the nut, and remove the wiper arm.
  3. Remove the seal cap and bushing.
  4. Remove the rear hatch lower trim.
  5. Disconnect the wiper motor electrical connector and remove the wiper motor mounting bolts and the motor.

    To install:

  6. Install the wiper motor with its mounting bolts. Torque the mounting bolts to 61-87 in. lbs. (6.9-9.8 Nm). Reconnect the electrical connector.
  7. Install the outer bushing and the seal cap.
  8. Reconnect the negative battery cable. Set the wiper motor shaft to the park position by turning the rear wiper switch from on to off. Install the rear wiper arm and adjust to the correct height.
  9. Install the rear wiper arm nut and torque the nut to 52-87 in. lbs. (5.9-9.8 Nm). Replace the wiper arm cover.
  10. Reinstall the rear hatch lower trim panel.
1993-95 MX3
Front Wiper Motor
  1. Disconnect the negative battery cable.
  2. Remove the wiper arm covers, the nuts, and remove the wiper blade and arm assemblies.
  3. Remove the screw covers, remove the attaching screws and remove the cowl cover. Once the cowl cover is removed, remove the lower baffle from the left side of the vehicle.
  4. Disconnect the wiper link from the wiper motor shaft. DO NOT disconnect the motor arm unless it absolutely necessary. The relationship of the motor arm to the motor shaft determines the position of the automatic stop angle. If this relationship is disturbed, wiper arm positioning will be affected.
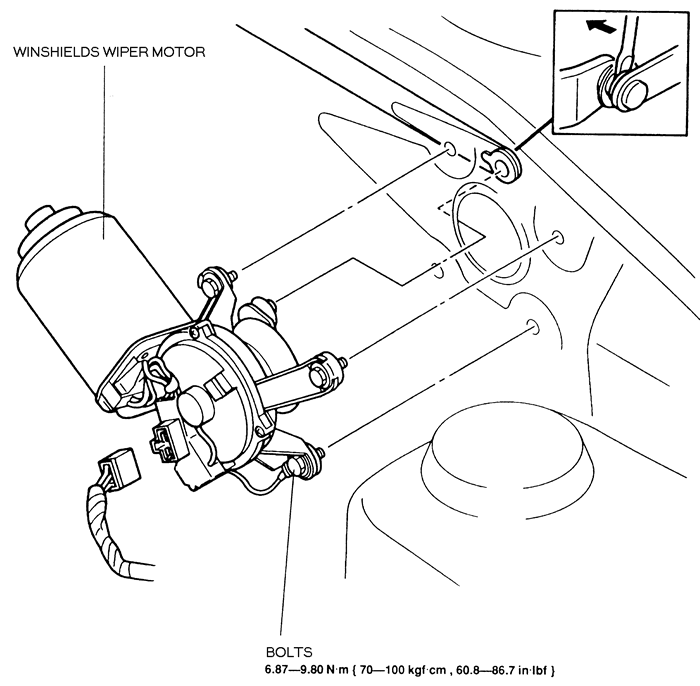
  5. Disconnect the wiper motor connector. Remove the attaching bolts and remove the wiper motor.

    To install:

  6. Position the motor onto its mounting and install the attaching bolts. Torque the mounting bolts to 61-86.7 in. lbs. (6.9-9.80 Nm). Connect the wiring to the motor.
  7. Connect the wiper link to the motor shaft and tighten the nut to 7.9-13 ft. lbs. (10-17 Nm).
  8. Install the left lower baffle, install the cowl panel with the screws, and replace the screw caps.
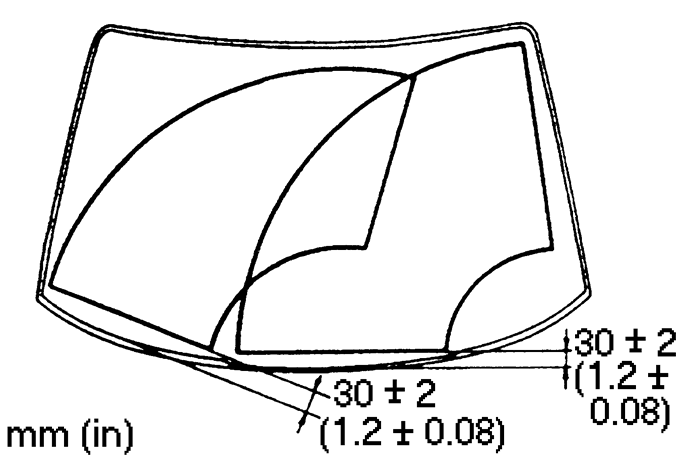
  9. Install the wiper arm/blade assemblies, adjust to the correct position, and install the wiper arm nuts and torque them to 86.8-121 in. lbs. (9.81-13.7 Nm). Replace the wiper arm nut caps.
    Fig. 3: Adjusting the front wipers -- 1993-95 MX3

  10. Connect the negative battery cable. Check the wiper system for proper operation.
Rear Wiper Motor
  1. Disconnect the negative battery cable.
  2. Remove the nut and remove the rear wiper arm.
  3. Remove the seal cap, the nut, and the outer bushing.
  4. Raise the rear hatch and remove the rear wiper motor cover.
  5. Disconnect the wiper motor wiring and remove the mounting bolts and the wiper motor.

    To install:

  6. Position the motor onto its mounting and install the attaching bolts. Torque the mounting bolts to 61-86.7 in. lbs. (6.9-9.80 Nm). Reconnect the motor wiring.
  7. Install the wiper motor cover.
  8. Lower the hatch and install the outer bushing. Install the nut and torque it to 27-52 in. lbs. (3.0-5.8 Nm). Replace the seal cap.
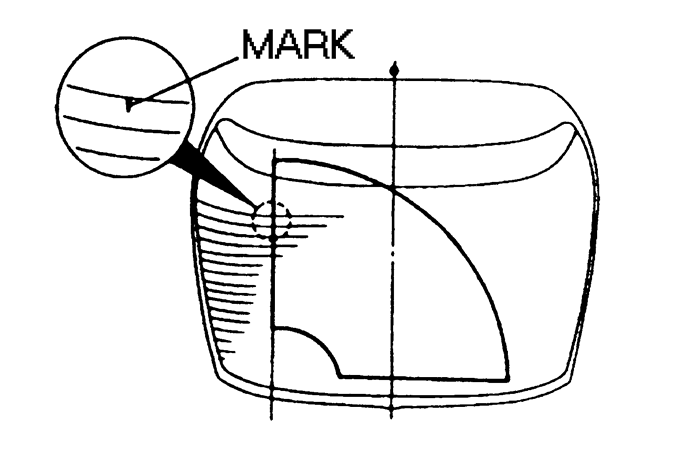
  9. Connect the negative battery cable. Set the wiper motor shaft to park by turning the rear wiper switch to on and off. Set the wiper height to the correct position. Torque the wiper arm nut to 53-86.7 in. lbs. (5.9-9.80 Nm). Test the wiper system for proper operation.
    Fig. 4: Adjusting the rear wiper arm -- 1993-94 MX3

1993-97 626, MX6 and Protege
  1. Disconnect the negative battery cable.
  2. If necessary remove the cowl grille.
    Fig. 5: Front wiper assembly (exploded view) -- 1995-97 Protege

  3. Disconnect the electrical harness.
  4. Remove the mounting bolts and remove the motor assembly.
  5. Installation is the reverse of removal. Torque the mounting bolts to 61-87 ft. lbs. (7-10 Nm).
1993-95 929
  1. Disconnect the negative battery cable.
  2. Remove the wiper arm cover. Remove the wiper arm and blade.
  3. Remove the cowl plate weatherstrip.
  4. Remove the cowl plate screws, and remove the cowl plate.
  5. Disconnect the wiring and linkage from the wiper motor.
  6. Unbolt and remove the motor.

    To install:

  7. Position the wiper motor, and install the mounting bolts.
  8. Connect the wiring and linkage to the wiper motor.
  9. Position the cowl plate and install the mounting screws. Install the weatherstrip.
  10. Install the wiper arm and blade, and replace the cover.
  11. Connect the negative battery cable.
  12. Check the system for proper operation.
Millenia
  1. Disconnect the negative battery cable.
  2. Remove the cowl grille and remove the wiper arm mounting nuts and the wiper arm assemblies.
  3. Disconnect the wiper motor electrical connector.
  4. Remove the wiper frame mounting bolts and wiper frame and link.
  5. Remove the nut and the wiper arm bell crank.
  6. Remove the mounting bolts and remove the motor.

    To install:

  7. Install the wiper motor to the wiper frame and link assembly. Torque the mounting bolts to 61-88 inch lbs. (7-10 Nm).
  8. Install the wiper motor bell crank with the lock washer and the nut.
  9. Install the wiper frame and link assembly to the cowl with the mounting bolts and torque the bolts to 61-88 inch lbs. (7-10 Nm).
  10. Reconnect the wiper motor connector.
  11. Reinstall the wiper arms to the wiper pivots with the nuts. Torque the nuts to 12-14 ft. lbs. (16-20 Nm).
  12. Replace the cowl grille.
  13. Reconnect the negative battery cable and check for proper operation.
Miata
Without ABS
  1. Disconnect the negative battery cable.
  2. On non-ABS equipped vehicles only:
    1. Remove the wiper arms.
    2. Remove the cowl plate screws and remove the cowl plate.
    3. Remove the baffle cover.
  3. Remove the main fuse block.
  4. Disconnect the wiring and linkage from the wiper motor. Unbolt and remove the motor.
  5. Installation is the reverse of removal. Check the system for proper operation.
 With ABS
  1. Disconnect the negative battery cable.
  2. Remove the main fuse block.
  3. Disconnect the wiring and linkage from the wiper motor. Unbolt and remove the motor.
  4. Installation is the reverse of removal. Check the system for proper operation.
RX7
Front
  1. Disconnect the negative battery cable. Remove the wiper arms.
  2. Remove the cowl grille screws and remove the cowl grille.
  3. Disconnect the wiring and linkage from the wiper motor.
  4. Unbolt and remove the motor.
  5. Installation is the reverse of removal. Check the system for proper operation.
Rear
  1. Disconnect the negative battery cable.
  2. Remove the wiper arm and outer bushing.
  3. Remove the liftgate lower trim panel.
  4. Disconnect the electrical connector and remove the wiper motor.
  5. Installation is the reverse of the removal procedure.
 
Previous Next