Previous Next

Automatic Transmission Assembly

REMOVAL AND INSTALLATION

1993-97 Miata with N4A-HL and NC4A-EL Transmissions
  1. Shift the selector lever to the N position.
  2. Disconnect the negative battery cable. Raise and safely support the vehicle. Drain the transmission fluid.
  3. Remove the engine undercover, and disconnect the shift rod.
  4. Remove the performance rod.
  5. Remove the complete exhaust system from the exhaust manifold.
  6. Mark the position of the driveshaft on the rear axle flange, and remove the driveshaft.
  7. Disconnect the speedometer cable, and disconnect the vacuum hose from the vacuum diaphragm.
  8. Label and disconnect the electrical connectors from the: inhibitor switch, kickdown solenoid, overdrive cancel solenoid, oil pressure switch and lockup solenoid.
  9. Remove the dipstick and dipstick tube. Disconnect the oil cooler lines.
  10. Support the transmission and differential with jacks. Remove the transmission-to-differential frame as follows:
    1. Disconnect the wiring harness from the frame.
    2. Remove the bolts from the underside of the frame at the differential end, noting their location. Pry out the spacer from the frame.
    3. Remove the differential mounting spacer from the underside of the differential.
    4. Insert a 14 x 1.5mm bolt through the frame hole, and turn it into the sleeve. Twist and pull the bolt downward.
    5. Install a 6 x 1mm bolt in the side hole to hold the sleeve, and remove the long bolt. Remove the short bolt.
    6. Remove the transmission side bolts, and remove the frame member.
  11. Remove the torque converter bolts, and the starter.
  12. Remove the transmission mounting bolts and remove the transmission, being careful not to drop the torque converter.

    To install:

  13. Make sure the torque converter is fully installed in the transmission. The distance between 1 of the bolt hole lugs and a straightedge laid across the bellhousing should be 0.89 in. (22.5mm).
  14. Raise the transmission into position, and install the mounting bolts. Tighten to 48-66 ft. lbs. (64-89 Nm).
  15. Install the starter. Install the torque converter bolts. Align the holes by turning the torque converter. Hold the flexplate with a small prybar, and tighten the bolts to 27-40 ft. lbs. (36-54 Nm).
  16. Install the transmission-to-frame member as follows:
    1. Install the differential mounting spacer on the underside of the differential. Tighten the mounting bolts to 38 ft. lbs. (52 Nm).
    2. Position the jack under the transmission so the transmission is level.
    3. Position the frame and install the transmission side bolts. Snug the bolts.
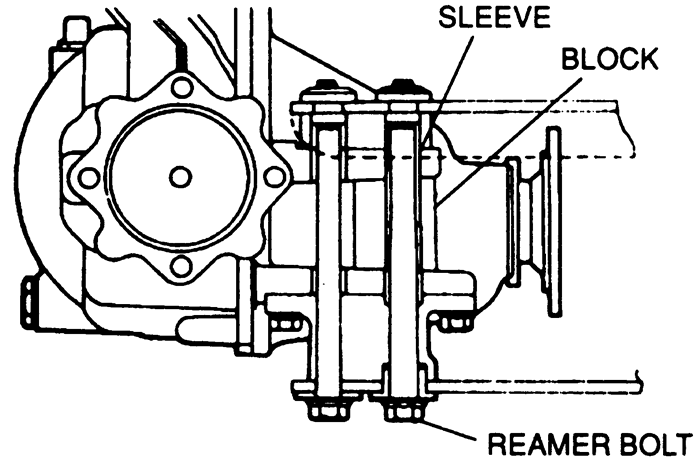
    4. Make sure the sleeve is installed in the block. Install the spacer and bolts with the reamer bolt in the front hole. Snug the bolts.
    5. Tighten the transmission side bolts to 77-91 ft. lbs. (104-123 Nm), then tighten the differential bolts to the same specification.
    6. Connect the wiring harness to the frame member and remove the jacks.

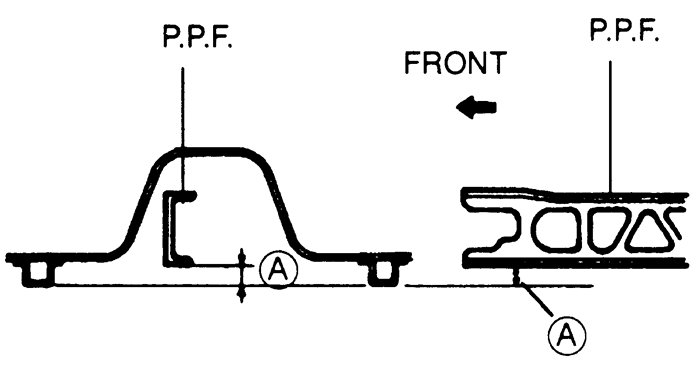
      NOTE: After the frame installation, position a straightedge between the body frame members on each side of the vehicle. Measure the distance between the bottom of the frame to the straightedge; it should be 2.023-2.417 in. (51.5-61.5mm). If the distance is not as specified, reposition the frame member at the transmission.

      Fig. 1:Sleeve and reamer bolt positioning -- 1993-95 Miata with N4A-HL and NC4A-EL transmissions

      Fig. 2:Measure distance A after installing the transmission-to-differential frame member -- 1993-95 Miata with N4A-HL and NC4A-EL transmissions

  17. Connect the oil cooler lines, using new gaskets. Install the dipstick tube and dipstick.
  18. Connect the electrical connectors and the vacuum hose. Connect the speedometer cable.
  19. Install the driveshaft, aligning the marks made during removal. Tighten the bolts to 22 ft. lbs. (30 Nm).
  20. Install the exhaust system. Connect the front pipe to the exhaust manifold, using a new gasket, and tighten the nuts to 34 ft. lbs. (46 Nm).
  21. Install the performance rod.
  22. Install the engine undercover and connect the shift rod.
  23. Lower the vehicle and connect the negative battery cable. Fill the transmission with the proper type and quantity of fluid. Start the engine and check for leaks and proper operation.
1993-95 RX7 with RB4A-EL Transmission
  1. Disconnect the negative battery cable. Raise and safely support the vehicle. Drain the transmission fluid.
  2. Remove the transmission dipstick.
  3. Remove the right and left undercovers. Remove the starter.
  4. Remove the center tunnel reinforcement. Disconnect the air injection pipe and remove the catalytic converter.
  5. Remove the front and rear tunnel reinforcements. Remove the cover at the front of the transmission-to-differential frame member.
  6. Mark the position of the driveshaft on the axle flange and remove the driveshaft. Plug the transmission tailshaft to prevent fluid leakage.
  7. Support the engine with engine support tool 49 G017 5A0 or equivalent. Support the differential with a jack. Remove the transmission-to-differential frame member.
  8. Disconnect the oxygen sensor and remove the front exhaust pipe.
  9. Label and disconnect the electrical connectors to the inhibitor switch, speed sensors, pulse generator and solenoid valve.
  10. Disconnect the transmission selector rod and remove the torque converter cover.
  11. Lock the flexplate with a small prybar and remove the torque converter bolts.
  12. Remove the upper and lower oil filler tubes. Disconnect the oil cooler lines.
  13. Support the transmission with a jack. Remove the transmission-to-engine bolts and carefully lower the transmission from the vehicle. Be careful not to drop the torque converter.

    To install:

  14. Make sure the torque converter is completely installed in the transmission. Lay a straightedge across the bellhousing and measure the distance to 1 of the converter bolt hole lugs; it should be 1.1 in. (29mm). If the distance is less than specification, push the converter into the pump while rotating it, to properly engage the pump drive.
  15. Raise the transmission into position and install the transmission-to-engine bolts. Tighten to 38 ft. lbs. (51 Nm).
  16. Position the jack under the differential so the differential is perfectly level. Install the transmission-to-differential frame member and hold in place with a new bolt and 8 new nuts.
  17. Tighten the frame-to-differential nuts to 130 ft. lbs. (176 Nm) and the frame-to-differential bolt to 68 ft. lbs. (93 Nm).
  18. Tighten the frame to transmission nuts to 130 ft. lbs. (176 Nm), tightening the upper nuts first.
  19. Remove the jack from under the differential. Lower the vehicle and remove the engine support tool.
  20. Raise and safely support the vehicle. Position a straightedge between the right and left floor pans and measure the distance between the bottom of the frame member and the straightedge. The distance should be 2.91 in. (74mm) minimum. If the distance is not correct, readjust the frame member.
  21. Turn the torque converter to align the holes. Hold the flexplate with a small prybar and tighten the bolts, evenly and gradually, to 26-36 ft. lbs. (35-49 Nm).
  22. Connect the oil cooler lines, using new washers, and tighten the banjo bolts to 26 ft. lbs. (35 Nm). Install the upper and lower oil filler tubes, using a new O-ring.
  23. Install the service hole cover. Connect the selector rod, using the washer and a new spring clip.
  24. Connect the electrical connectors.
  25. Install the front exhaust pipe, using a new gasket, and tighten the nuts to 65 ft. lbs. (89 Nm). Connect the oxygen sensor connector.
  26. Install the driveshaft, aligning the marks made during removal. Tighten the bolts to 43 ft. lbs. (58 Nm).
  27. Install the cover at the front of the transmission-to-differential frame member. Install the front and rear tunnel reinforcements and tighten the bolts to 19 ft. lbs. (26 Nm).
  28. Install the catalytic converter, using new gaskets. Tighten the nuts to 65 ft. lbs. (89 Nm) and connect the air injection pipe.
  29. Install the center tunnel reinforcement and tighten the bolts to 19 ft. lbs. (26 Nm). Install the starter and the right and left undercovers.
  30. Lower the vehicle and connect the negative battery cable. Fill the transmission with the proper type and quantity of fluid.
  31. Start the engine and bring to normal operating temperature. Check for leaks and proper operation.
1993-95 929 with RA4A-EL Transmission
  1. Disconnect the negative battery cable. Raise and safely support the vehicle. Drain the transmission fluid.
  2. Remove the transmission dipstick.
  3. Disconnect the oxygen sensors. Remove the exhaust system, except for the rear muffler.
  4. Remove the exhaust pipe bracket from the transmission, and remove the heat shield.
  5. Mark the position of the driveshaft on the axle flange and remove the driveshaft. Plug the tailshaft to prevent fluid leakage. Be sure to keep all the center bearing support bushings, washers and spacers in order so they can be reinstalled in their original locations.
  6. Remove the pinch bolts, and remove the shaft connecting the rear steering gear.
  7. Remove the spring pin, washer and nut, and disconnect the selector rod.
  8. Label and disconnect the electrical connectors for the inhibitor switch, speed sensors, solenoid valve, pulse generator and knock sensor.
  9. Disconnect the oil cooler lines, and remove the oil filler tube.
  10. Remove the starter and the transmission service hole cover. Lock the flexplate using a small prybar and remove the torque converter bolts.
  11. Support the engine and transmission with jacks. Remove the transmission-to-engine bolts and the transmission mount bolts. Remove the transmission mount.
  12. Carefully lower the transmission from the vehicle, being careful not to drop the torque converter.

    To install:

  13. Make sure the torque converter is completely installed in the transmission. Lay a straightedge across the bellhousing and measure the distance to one of the converter bolt hole lugs; it should be 1.161 in. (29.5mm). If the distance is less than specification, push the converter into the pump while rotating it, to properly engage the pump drive.
  14. Raise the transmission into position, and install the transmission-to-engine bolts. Tighten to 38 ft. lbs. (52 Nm).
  15. Install the transmission mount and tighten the mount-to-body bolts to 45 ft. lbs. (61 Nm). Remove the engine and transmission jacks, then tighten the mount-to-transmission bolts/nuts to 56 ft. lbs. (77 Nm).
  16. Turn the torque converter to align the bolt holes. Lock the flexplate using a small prybar and install the torque converter bolts. Tighten the bolts gradually and evenly to 25-36 ft. lbs. (34-49 Nm).
  17. Install the service hole cover and the starter.
  18. Install the oil filler tube using a new O-ring. Connect the oil cooler lines using new washers.
  19. Connect the electrical connectors. Connect the selector rod with the washer and a new spring clip.
  20. Install the rear steering gear shaft, and tighten the pinch bolt to 36 ft. lbs. (49 Nm).
  21. Install the driveshaft, aligning the marks made during removal. Tighten the driveshaft-to-axle flange bolts to 43 ft. lbs. (59 Nm). Install the center bearing support, making sure all bushings, washers and spacers are installed in their original locations. Tighten the bolts to 39 ft. lbs. (53 Nm).
  22. Install the heat shield and the exhaust pipe bracket. Install the exhaust system, using new gaskets, and tighten the flange nuts to 41 ft. lbs. (55 Nm). Connect the oxygen sensors.
  23. Lower the vehicle and connect the negative battery cable. Fill the transmission with the proper type and quantity of fluid.
  24. Start the engine and bring to normal operating temperature. Check for leaks and proper operation.
 
Previous Next