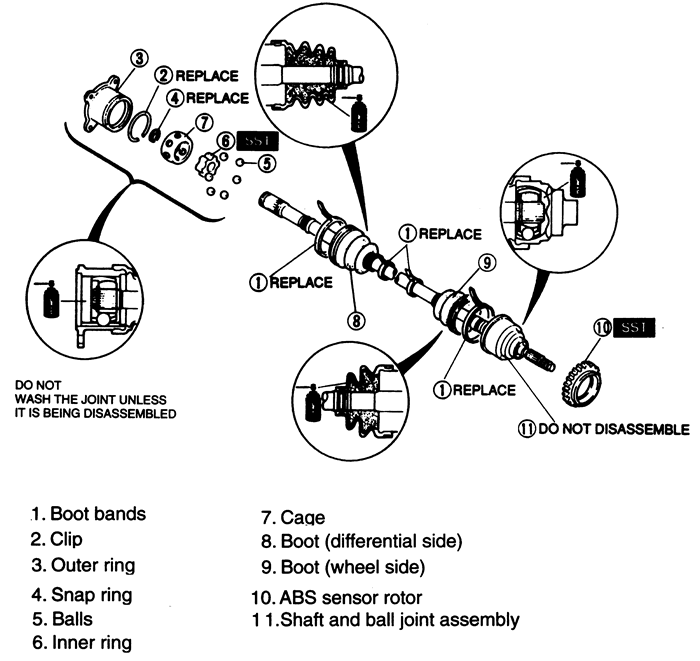
Three types of CV-joints are used. The inboard CV-joints are either
double offset type or the tripot type; disassembly procedures differ accordingly.
All outboard CV-joints are the Birfield type. The Birfield type CV-joint
cannot be disassembled; if an outboard CV-joint boot needs replacement,
the inboard CV-joint must be removed.
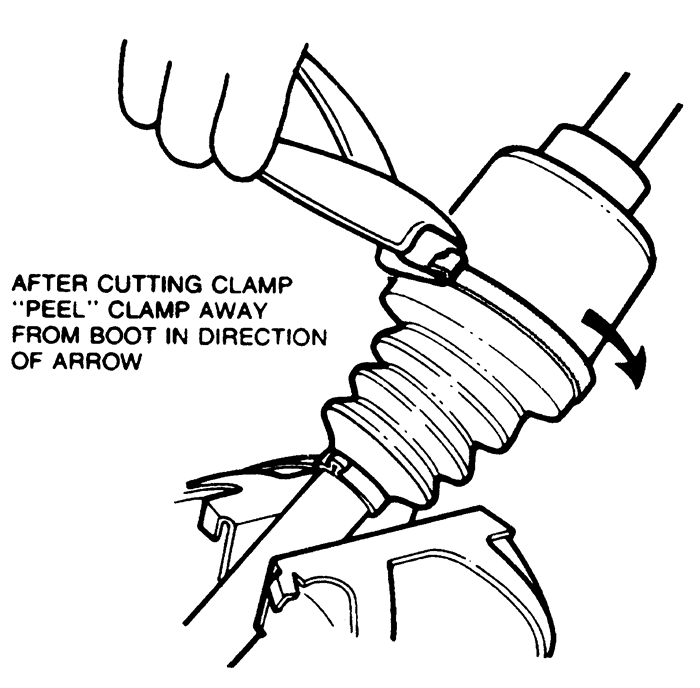
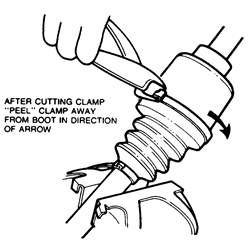
| Fig. 1:CV-joint boot removal, double offset -- 1993-94
323, 626, 929, MX3, MX6, Miata and Protege
|
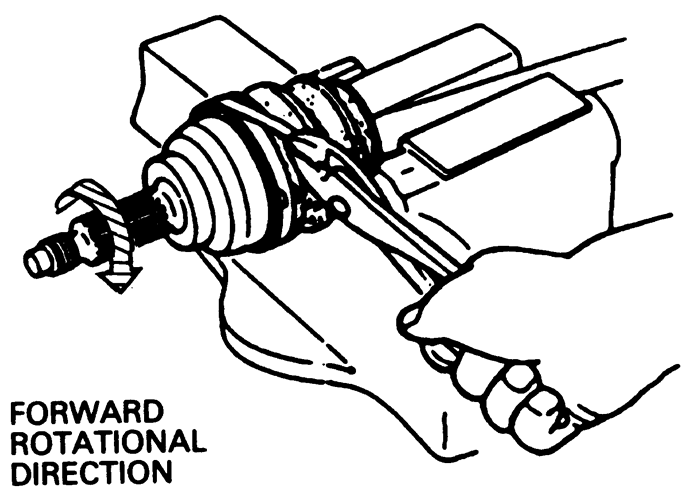
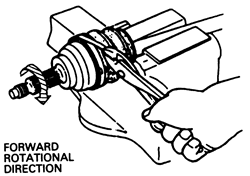
| Fig. 2:CV-joint boot installation, double offset --
1993-94 323, 626, 929, MX3, MX6, Miata and Protege
|
- Remove the halfshaft from the vehicle and clamp it
in a vise equipped with jaw caps, to prevent damage to the machined surfaces.
Do not allow the vise to contact the boot or its clamps.
-
Remove the large boot clamp from the inboard CV-joint, using side cutters.
After removing the clamp, roll the boot back over the shaft.
NOTE: Check the grease for contamination by rubbing
it between 2 fingers. Any gritty feeling indicates a contaminated CV-joint,
in which case the entire CV-joint must be disassembled, cleaned and inspected.
If the grease is not contaminated and the CV-joint has been operating
satisfactorily, continue with the boot replacement procedure and add the
required lubricant.
- Paint alignment marks on the outer race and shaft
for assembly reference. Remove the wire ring bearing retainer and remove
the outer race.
-
Paint alignment marks on the inner race and shaft for assembly reference.
Remove the inner race snapring from the end of the halfshaft and remove
the inner race, cage and ball bearings from the shaft as an assembly.
NOTE: Use care to prevent damage to the bearing surfaces
and cage.
-
If only the boot is being replaced, go to the next step. If it is necessary
to disassemble the CV-joint further, proceed as follows:
- Pry the ball bearing out of the bearing cage
using a small prybar with blunted edges. Mark the inner race and the bearing
cage for proper assembly.
- Rotate the inner race to align the bearing lands
with the windows in the bearing cage. Remove the inner race through the
larger end of the cage.
- Remove the small clamp and remove the inner boot
from the halfshaft. If the boot is to be reused, wrap the shaft splines
with tape before removing.
-
If the outer CV-joint boot is to be replaced, remove the clamps and
slide the boot off the shaft from the inboard side.
To install:
- If the outboard boot was removed, slide the boot
onto the shaft from the inboard side. Wrap tape on the splines before
installing to protect the boot.
- Install the inboard boot and remove the tape from
the shaft.
- Lubricate the inner race, bearing cage and ball bearings
with high temperature CV-joint grease.
-
Position the inner race in the bearing cage and align the matchmarks.
NOTE: Install the race with the chamfered splines
facing the large end of the cage.
- Install the ball bearings in the bearing cage. The
balls can be pressed into the cage windows with the heel of the hand.
- Install the inner race, cage and balls on the halfshaft
as an assembly. Make sure the chamfer on the bearing cage faces the snapring
and the paint marks made during removal line up. Install the inner race
snapring.
- Lubricate the outer race with high temperature CV-joint
grease. Install the outer race and add more grease to the outer race.
Install the wire ring bearing retainer.
- Position the CV-joint boot(s). Make sure the boot
is fully seated in the grooves in the shaft and outer race.
- Insert a small prybar with rounded edges between
the boot and the outer bearing race to allow trapped air to escape from
the boot. Install new boot clamps.
- Wrap the clamps around the boots in a clockwise direction,
pull tight with pliers and bend the locking tabs to secure in position.
- Work the CV-joint through its full range of travel
at various angles. The joint should flex, extend and compress smoothly.
- Install the halfshaft into the vehicle.
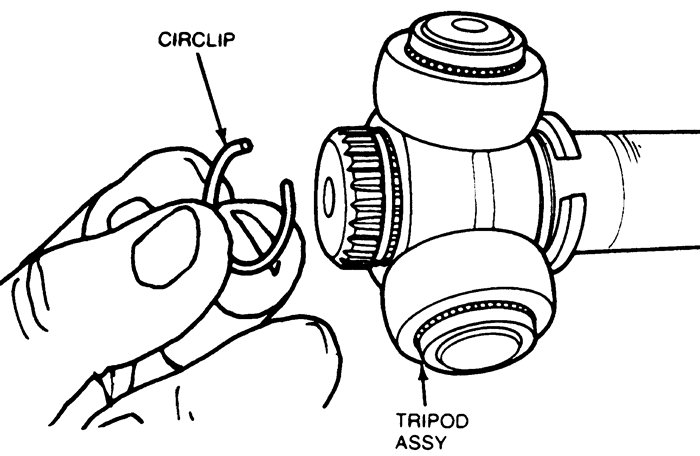
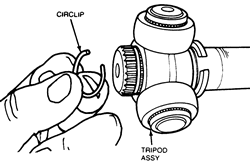
| Fig. 3:CV-joint, tripod -- 1993-94 323, 626, 929,
MX3, MX6, Miata and Protege
|
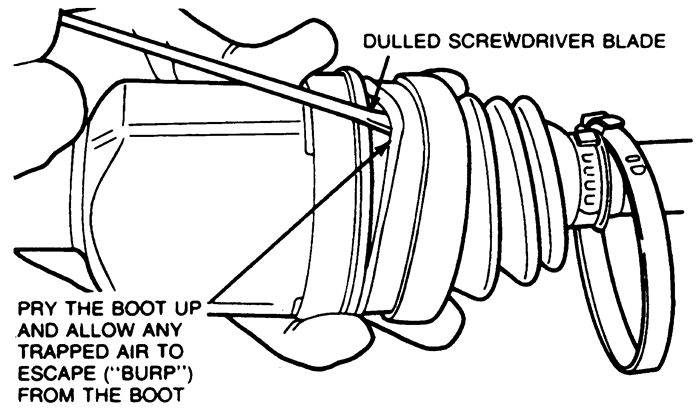
| Fig. 4:CV-joint boot installation, tripod -- 1993-94
323, 626, 929, MX3, MX6, Miata and Protege
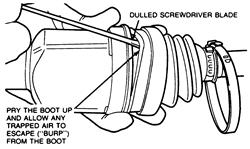
|
- Remove the halfshaft from the vehicle and clamp it
in a vise equipped with jaw caps, to prevent damage to the machined surfaces.
Do not allow the vise to contact the boot or its clamps.
-
Remove the large boot clamp from the inboard CV-joint, using side cutters.
After removing the clamp, roll the boot back over the shaft.
NOTE: Check the grease for contamination by rubbing
it between 2 fingers. Any gritty feeling indicates a contaminated CV-joint,
in which case the entire CV-joint must be disassembled, cleaned and inspected.
If the grease is not contaminated and the CV-joint has been operating
satisfactorily, continue with the boot replacement procedure and add the
required lubricant.
- Paint alignment marks on the outer race and shaft
for assembly reference. Remove the wire ring bearing retainer and remove
the outer race.
- Paint alignment marks on the tripot bearing and shaft
for assembly reference. Remove the tripot bearing snapring and, using
a brass drift and hammer, remove the tripot bearing from the shaft.
- Remove the small clamp and remove the inner boot
from the halfshaft. If the boot is to be reused, wrap the shaft splines
with tape before removing.
-
If the outer CV-joint boot is to be replaced, remove the clamps and
slide the boot off the shaft from the inboard side.
To install:
- If the outboard boot was removed, slide the boot
onto the shaft from the inboard side. Wrap tape on the splines before
installing to protect the boot.
- Install the inboard boot and remove the tape from
the shaft.
- Install the tripot assembly on the halfshaft. Tap
the assembly onto the shaft using a hammer and brass drift. Install the
tripot assembly retaining ring.
- Fill the CV-joint outer race with high temperature
CV-joint grease. Install the outer race over the tripot joint and install
the wire ring bearing retainer.
- Position the CV-joint boot(s). Make sure the boot
is fully seated in the grooves in the shaft and outer race.
- Insert a small prybar with rounded edges between
the boot and the outer bearing race to allow trapped air to escape from
the boot. Install new boot clamps.
- Wrap the clamps around the boots in a clockwise direction,
pull tight with pliers and bend the locking tabs to secure in position.
- Work the CV-joint through its full range of travel
at various angles. The joint should flex, extend and compress smoothly.
- Install the halfshaft into the vehicle.
Two types of CV-joints are used. The inboard CV-joints are the tripot
type. All outboard CV-joints are Birfield type. The Birfield CV-joint
cannot be disassembled; if an outboard CV-joint boot needs replacement,
the inboard CV-joint must be removed.
- Remove the halfshaft from the vehicle and clamp it
in a vise equipped with jaw caps, to prevent damage to the machined surfaces.
Do not allow the vise to contact the boot or its clamps.
-
Remove the large boot clamp from the inboard CV-joint, using side cutters.
After removing the clamp, roll the boot back over the shaft.
NOTE: Check the grease for contamination by rubbing
it between 2 fingers. Any gritty feeling indicates a contaminated CV-joint,
in which case the entire CV-joint must be disassembled, cleaned and inspected.
If the grease is not contaminated and the CV-joint has been operating
satisfactorily, continue with the boot replacement procedure and add the
required lubricant.
- Paint alignment marks on the outer race and shaft
for assembly reference. Remove the wire ring bearing retainer and remove
the outer race.
- Paint alignment marks on the tripot bearing and shaft
for assembly reference. Remove the tripot bearing snapring and, using
a brass drift and hammer, remove the tripot bearing from the shaft.
- Remove the small clamp and remove the inner boot
from the halfshaft. If the boot is to be reused, wrap the shaft splines
with tape before removing.
-
If the outer CV-joint boot is to be replaced, remove the clamps and
slide the boot off the shaft from the inboard side.
To install:
- If the outboard boot was removed, slide the boot
onto the shaft from the inboard side. Wrap tape on the splines before
installing to protect the boot.
- Install the inboard boot and remove the tape from
the shaft.
- Install the tripot assembly on the halfshaft. Tap
the assembly onto the shaft using a hammer and brass drift. Install the
tripot assembly retaining ring.
- Fill the CV-joint outer race with high temperature
CV-joint grease. Install the outer race over the tripot joint and install
the wire ring bearing retainer.
- Position the CV-joint boot(s). Make sure the boot
is fully seated in the grooves in the shaft and outer race.
- Insert a small prybar with rounded edges between
the boot and the outer bearing race to allow trapped air to escape from
the boot. Install new boot clamps.
- Wrap the clamps around the boots in a clockwise direction,
pull tight with pliers and bend the locking tabs to secure in position.
- Work the CV-joint through its full range of travel
at various angles. The joint should flex, extend and compress smoothly.
- Install the halfshaft into the vehicle.
| Fig. 5:Halfshaft with double offset CV-joint -- 1995
929 and Miata
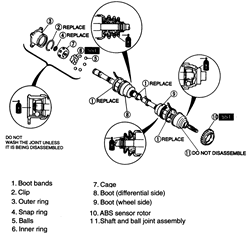
|
- Remove the halfshaft from the vehicle and clamp it
in a vise equipped with jaw caps to prevent damage to the machined surfaces.
Do not allow the vise to contact the boot or its clamps.
-
Remove the large boot clamp from the inboard CV-joint, using side cutters.
After removing the clamp, roll the boot back over the shaft.
NOTE: Check the grease for contamination by rubbing
it between two fingers. Any gritty feeling indicates a contaminated CV-joint,
in which case the entire CV-joint must be disassembled, cleaned and inspected.
If the grease is not contaminated and the CV-joint has been operating
satisfactorily, continue with the boot replacement procedure and add the
required lubricant.
- Paint alignment marks on the outer race and shaft
for assembly reference. Remove the wire ring bearing retainer and remove
the outer race.
-
Paint alignment marks on the inner race and shaft for assembly reference.
Remove the inner race snapring from the end of the halfshaft and remove
the inner race, cage and ball bearings from the shaft as an assembly.
NOTE: Use care to prevent damage to the bearing surfaces
and cage.
-
If only the boot is being replaced, go to the next step. If it is necessary
to disassemble the CV-joint further, proceed as follows:
- Pry the ball bearing out of the bearing cage
using a small prybar with blunted edges. Mark the inner race and the bearing
cage for proper assembly.
- Rotate the inner race to align the bearing lands
with the windows in the bearing cage. Remove the inner race through the
larger end of the cage.
- Remove the small clamp and remove the inner boot
from the halfshaft. If the boot is to be reused, wrap the shaft splines
with tape before removing.
-
If the outer CV-joint boot is to be replaced, remove the clamps and
slide the boot off the shaft from the inboard side.
To install:
- If the outboard boot was removed, slide the boot
onto the shaft from the inboard side. Wrap tape on the splines before
installing to protect the boot.
- Install the inboard boot and remove the tape from
the shaft.
- Lubricate the inner race, bearing cage and ball bearings
with high temperature CV-joint grease.
-
Position the inner race in the bearing cage and align the matchmarks.
NOTE: Install the race with the chamfered splines
facing the large end of the cage.
- Install the ball bearings in the bearing cage. The
balls can be pressed into the cage windows with the heel of the hand.
- Install the inner race, cage and balls on the halfshaft
as an assembly. Make sure the chamfer on the bearing cage faces the snapring
and the paint marks made during removal line up. Install the inner race
snapring.
- Lubricate the outer race with high temperature CV-joint
grease. Install the outer race and add more grease to the outer race.
Install the wire ring bearing retainer.
- Position the CV-joint boot(s). Make sure the boot
is fully seated in the grooves in the shaft and outer race.
- Insert a small prybar with rounded edges between
the boot and the outer bearing race to allow trapped air to escape from
the boot. Install new boot clamps.
- Wrap the clamps around the boots in a clockwise direction,
pull tight with pliers and bend the locking tabs to secure in position.
- Work the CV-joint through its full range of travel
at various angles. The joint should flex, extend and compress smoothly.
- Install the halfshaft into the vehicle.
- Raise and safely support the vehicle.
- Remove the halfshaft from the vehicle and clamp it
in a vise equipped with jaw caps, to prevent damage to the machined surfaces.
Do not allow the vise to contact the boot or its clamps.
-
Remove the large boot clamp from the inboard CV-joint, using side cutters.
After removing the clamp, roll the boot back over the shaft.
NOTE: Check the grease for contamination by rubbing
it between 2 fingers. Any gritty feeling indicates a contaminated CV-joint,
in which case the entire CV-joint must be disassembled, cleaned and inspected.
If the grease is not contaminated and the CV-joint has been operating
satisfactorily, continue with the boot replacement procedure and add the
required lubricant.
- Paint alignment marks on the outer race and shaft
for assembly reference. Remove the wire ring bearing retainer and remove
the outer race.
- Paint alignment marks on the tripod bearing and shaft
for assembly reference. Remove the tripod bearing snapring and, using
a brass drift and hammer, remove the tripod bearing from the shaft.
- Remove the small clamp and remove the inner boot
from the halfshaft. If the boot is to be reused, wrap the shaft splines
with tape before removing.
-
If the outer CV-joint boot is to be replaced, remove the clamps and
slide the boot off the shaft from the inboard side.
To install:
- If the outboard boot was removed, slide the boot
onto the shaft from the inboard side. Wrap tape on the splines before
installing to protect the boot.
- Install the inboard boot and remove the tape from
the shaft.
- Install the tripod assembly on the halfshaft. Tap
the assembly onto the shaft using a hammer and brass drift. Install the
tripod assembly retaining ring.
- Fill the CV-joint outer race with high temperature
CV-joint grease. Install the outer race over the tripod joint and install
the wire ring bearing retainer.
- Position the CV-joint boot(s). Make sure the boot
is fully seated in the grooves in the shaft and outer race.
- Insert a small prybar with rounded edges between
the boot and the outer bearing race to allow trapped air to escape from
the boot. Install new boot clamps.
- Wrap the clamps around the boots in a clockwise direction,
pull tight with pliers and bend the locking tabs to secure in position.
- Work the CV-joint through its full range of travel
at various angles. The joint should flex, extend and compress smoothly.
- Install the halfshaft into the vehicle.
- Remove the halfshaft from the vehicle and clamp it
in a vise equipped with jaw caps to prevent damage to the machined surfaces.
Do not allow the vise to contact the boot or its clamps.
-
Remove the large boot clamp from the inboard CV-joint, using side cutters.
After removing the clamp, roll the boot back over the shaft.
NOTE: Check the grease for contamination by rubbing
it between two fingers. Any gritty feeling indicates a contaminated CV-joint,
in which case the entire CV-joint must be disassembled, cleaned and inspected.
If the grease is not contaminated and the CV-joint has been operating
satisfactorily, continue with the boot replacement procedure and add the
required lubricant.
- Paint alignment marks on the outer race and shaft
for assembly reference. Remove the wire ring bearing retainer and remove
the outer race.
-
Paint alignment marks on the inner race and shaft for assembly reference.
Remove the inner race snapring from the end of the halfshaft and remove
the inner race, cage and ball bearings from the shaft as an assembly.
NOTE: Use care to prevent damage to the bearing surfaces
and cage.
-
If only the boot is being replaced, go to the next step. If it is necessary
to disassemble the CV-joint further, proceed as follows:
- Pry the ball bearing out of the bearing cage
using a small prybar with blunted edges. Mark the inner race and the bearing
cage for proper assembly.
- Rotate the inner race to align the bearing lands
with the windows in the bearing cage. Remove the inner race through the
larger end of the cage.
- Remove the small clamp and remove the inner boot
from the halfshaft. If the boot is to be reused, wrap the shaft splines
with tape before removing.
-
If the outer CV-joint boot is to be replaced, remove the clamps and
slide the boot off the shaft from the inboard side.
To install:
- If the outboard boot was removed, slide the boot
onto the shaft from the inboard side. Wrap tape on the splines before
installing to protect the boot.
- Install the inboard boot and remove the tape from
the shaft.
- Lubricate the inner race, bearing cage and ball bearings
with high temperature CV-joint grease.
-
Position the inner race in the bearing cage and align the matchmarks.
NOTE: Install the race with the chamfered splines
facing the large end of the cage.
- Install the ball bearings in the bearing cage. The
balls can be pressed into the cage windows with the heel of the hand.
- Install the inner race, cage and balls on the halfshaft
as an assembly. Make sure the chamfer on the bearing cage faces the snapring
and the paint marks made during removal line up. Install the inner race
snapring.
- Lubricate the outer race with high temperature CV-joint
grease. Install the outer race and add more grease to the outer race.
Install the wire ring bearing retainer.
- Position the CV-joint boot(s). Make sure the boot
is fully seated in the grooves in the shaft and outer race.
- Insert a small prybar with rounded edges between
the boot and the outer bearing race to allow trapped air to escape from
the boot. Install new boot clamps.
- Wrap the clamps around the boots in a clockwise direction,
pull tight with pliers and bend the locking tabs to secure in position.
- Work the CV-joint through its full range of travel
at various angles. The joint should flex, extend and compress smoothly.
- Install the halfshaft into the vehicle.
- Raise and safely support the vehicle.
- Remove the halfshaft assembly.
- Remove the boot bands. Slide the boot out of the
way and matchmark the outer ring and the shaft.
- Mark the shaft and tripot joint, then remove the
snapring. Drive the joint from the shaft.
- Installation is the reverse of removal. Once the
boot is installed, fill with the grease supplied with the boot kit.