Previous Next

Clutch Assembly

REMOVAL AND INSTALLATION

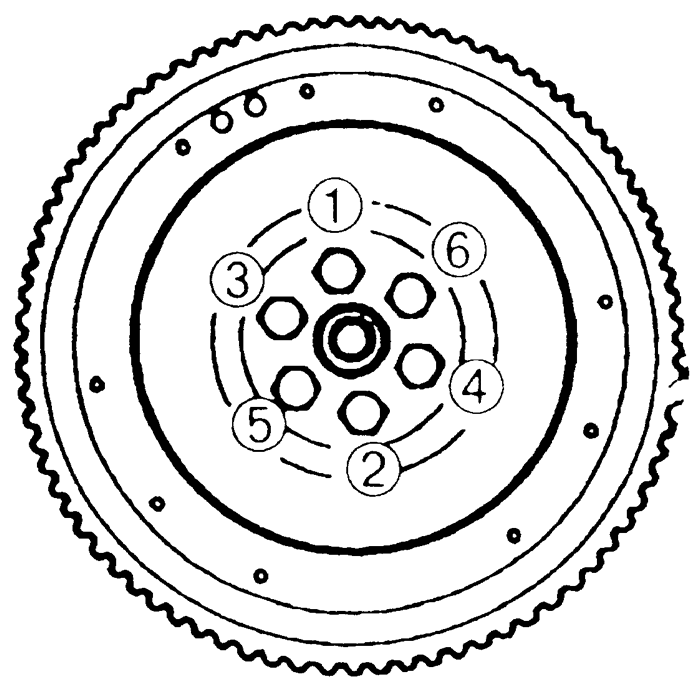
Fig. 1:Flywheel bolt removal and installation sequence — except RX7

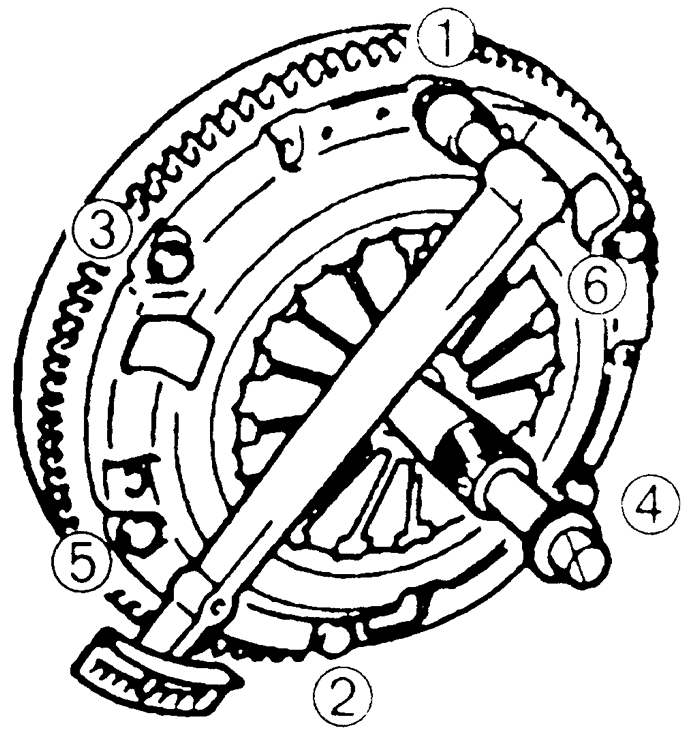
Fig. 2:Clutch cover bolt torque sequence — except RX7

Except RX7
  1. Disconnect the negative battery cable. Raise and safely support the vehicle.
  2. Remove the transaxle.
  3. Gradually loosen the clutch pressure plate bolts, in a crisscross pattern. Support the pressure plate and remove the bolts. Remove the pressure plate and clutch disc.
  4. Inspect the pilot bearing. If it is worn or damaged and does not turn easily by hand, remove it using a puller/slide hammer.
  5. Check the flywheel surface for scoring, cracks or burning and machine or replace, as necessary.
  6. Install holder tool 49 E011 1A0 or equivalent, to keep the flywheel from turning. Loosen the flywheel bolts evenly and gradually in a crisscross pattern. Remove the flywheel.
  7. Inspect the clutch release bearing for wear. Replace it if it sticks or does not turn easily.
  8. Inspect the release fork for wear or damage and replace as necessary.

    To install:

  9. Lubricate the release fork fingers and pivot with molybdenum grease and install in the release fork boot.
  10. Install the clutch release bearing on the release fork.
  11. If removed, install a new pilot bearing in the flywheel, using a suitable installation tool.
  12. Make sure the flywheel mounting surface and the crankshaft or eccentric shaft mounting surfaces are clean. Remove any old sealant from the flywheel bolt hole threads and the flywheel bolts.
  13. Apply sealant to the flywheel bolt threads and install them hand tight. Install the flywheel holding tool. Tighten the bolts, in a crisscross pattern, to 49 ft. lbs. (67 Nm) on the Miata 1.8L engine and 75 ft. lbs. (102 Nm) on all other models.
  14. Apply a small amount of molybdenum grease to the clutch disc splines and install the clutch disc on the flywheel, spring side toward the transmission or transaxle. Install a suitable alignment tool in the pilot bearing to position the clutch disc.
  15. Install the clutch pressure plate, aligning the dowel holes with the flywheel dowels. Install the pressure plate bolts and gradually tighten, in a crisscross pattern to 20 ft. lbs. (26 Nm). Remove the alignment tool.
  16. Install the transaxle and lower the vehicle.

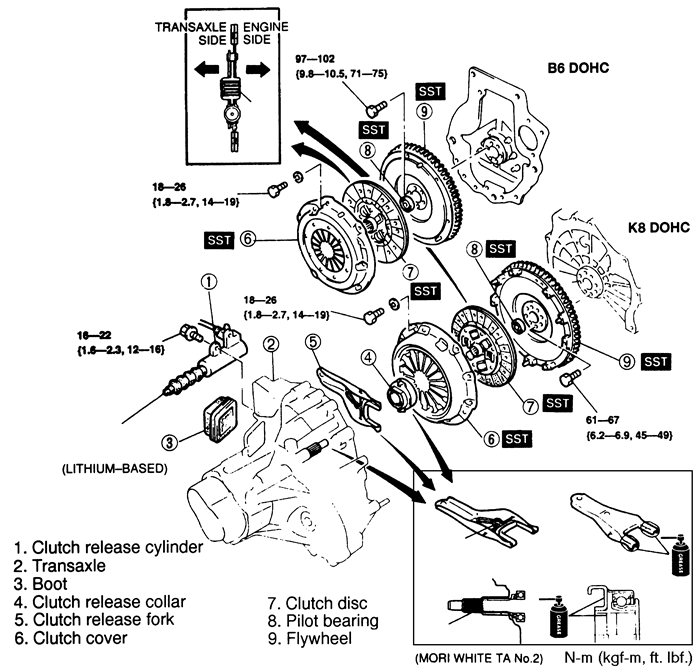
    Fig. 3:Clutch assembly (exploded view) — 1993–95 MX3 with F25M, F25MR, F2SM-R and G25MR transaxles

RX7
  1. Disconnect the negative battery cable. Raise and safely support the vehicle.
  2. Remove the transmission.
  3. Remove the clutch release fork assembly bolts and remove the release fork and bearing as an assembly. Inspect the release fork for wear or damage; make sure it swings freely without the return spring installed. Inspect the release bearing for wear, damage or sticking when it is turned. Replace parts as necessary.
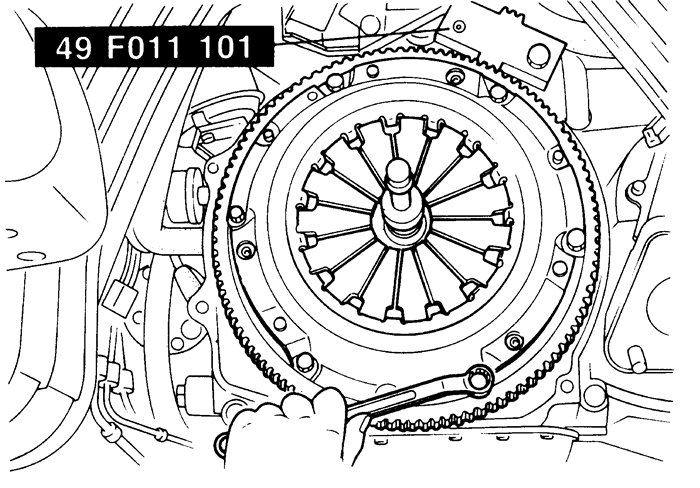
  4. Install flywheel holder tool 49 F011 101 or equivalent. Loosen the clutch pressure plate bolts gradually, in a crisscross pattern. Support the pressure plate, remove the bolts and remove the pressure plate and clutch disc.
  5. Remove the wire ring from the wedge collar and remove the wedge collar from the pressure plate.
  6. Inspect the pilot bearing for wear or damage, make sure it turns freely by hand. Remove the pilot bearing, with the oil seal, using a puller/slide hammer.
  7. Inspect the flywheel for scoring, cracks or burning. Machine or replace as necessary. To remove, install holder tool 49 F011 101 or equivalent and remove the locknut. Remove the key from the eccentric shaft.

    To install:

  8. Install the key in the eccentric shaft and install the flywheel. Apply thread locking compound to the locknut threads and sealant to the locknut contact surface. Install the locknut.
  9. Install the holder tool and tighten the locknut to 360 ft. lbs. (490 Nm).
  10. Install a new pilot bearing using a suitable installer. The bearing must be installed to a depth of 0.453–0.482 in. (11.5–12.3mm). Install a new oil seal.
  11. Apply a small amount of molybdenum grease to the clutch disc splines. Install the clutch disc on the flywheel, spring side toward the transmission. Install an alignment tool in the pilot bearing to position the clutch disc.
  12. Install a new wedge collar on the pressure plate. Apply a small amount of grease to a new wire ring and install.
  13. Align the pressure plate dowel holes with the flywheel dowels and install the flywheel. Install the pressure plate bolts and gradually tighten, in a crisscross pattern, to 19 ft. lbs. (26 Nm).
  14. Lubricate the release fork and install the release fork and release bearing assembly in the transmission. Tighten the bolts to 33 ft. lbs. (46 Nm).
  15. Install the transmission and lower the vehicle.

    Fig. 4:Ring gear brake tool (49 F011 101) — RX7

Previous Next