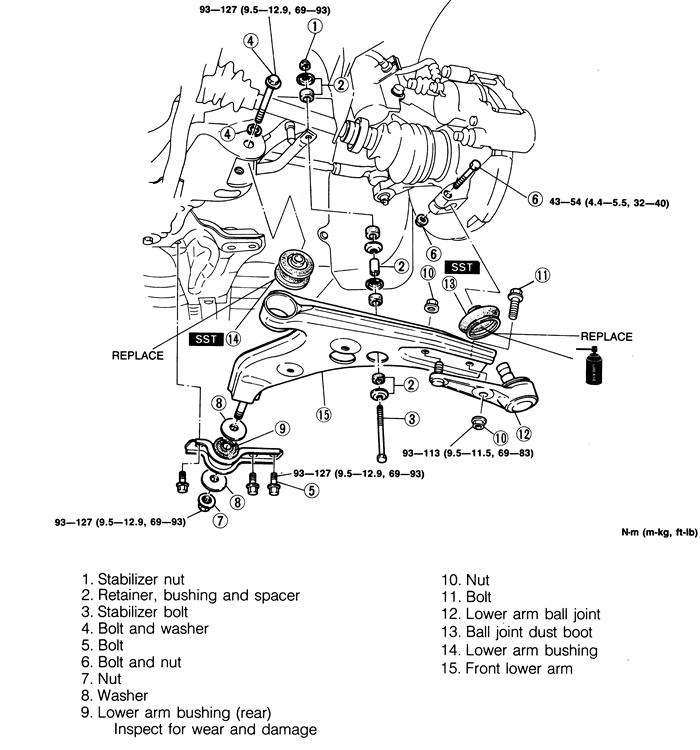
Fig. 1:Lower control arm, 4WD -- 1993-94 323, MX3
and Protege
Raise and safely support the vehicle. Remove the
wheel and tire assembly.
Remove the ball joint stud pinch bolt and nut from
the steering knuckle. Pry the lower control arm down from the knuckle,
and separate the ball joint from the knuckle.
Remove the bolt and nut and remove the ball joint
from the lower control arm.
Installation is the reverse of the removal procedure.
Tighten the ball joint-to-lower control arm bolt and nut to 86 ft. lbs.
(117 Nm). Tighten the ball joint pinch bolt and nut to 43 ft. lbs. (59
Nm). Check the front wheel alignment.
Raise and safely support the vehicle. Remove the
wheel and tire assembly.
Remove the cotter pin and loosen the nut on the lower
ball joint. With the nut protecting the ball joint stud, press the stud
from the knuckle using press tool 49 0727 575 or equivalent. Remove the
nut from the ball stud.
Remove the ball joint-to-lower control arm bolts
and nut and remove the lower ball joint.
Installation is the reverse of the removal procedure.
Tighten the ball joint-to-lower control arm bolts to 69 ft. lbs. (93 Nm).
Tighten the ball joint stud nut to 57 ft. lbs. (77 Nm) and install a new
cotter pin.