Previous Next

FRONT SUSPENSION

Strut

REMOVAL AND INSTALLATION

1993-94 323, MX3, Protege and 1993-97 626 and MX6
  1. Raise and safely support the vehicle. Remove the wheel and tire assembly.
  2. Support the lower control arm with a jack.
  3. Remove the bolt or clip attaching the brake hose and/or ABS sensor harness to the strut.
  4. If equipped with with automatic adjusting suspension, disconnect the electrical connector and remove the actuator from the top of the strut.
  5. Paint alignment marks on the strut mounting block and strut tower, so the strut can be reinstalled in the same position.
  6. Remove the upper strut mounting block nuts and the strut-to-knuckle bolts and remove the strut assembly.

    CAUTION
    Serious injury may result from careless action while removing the coil spring.

  7. Disassemble the strut to remove the coil spring as follows:
    1. Secure the mounting rubber in a vise.
    2. Remove the cap. Loosen the piston rod nut several turns, but do not remove it.
    3. Using a suitable coil spring compressor (Mazda special tools: 49 T034 001, 49 T034 002, 49 T034 003 and 49 T034 004 or equivalent) secure the strut assembly.
    4. Compress the coil spring and remove the nut.
    5. Remove the mounting rubber, thrust bearing, upper spring seat, upper rubber spring seat, dust cover, bound stopper and the coil spring.

      To install:

  8. If the coil spring was removed, assemble as follows:
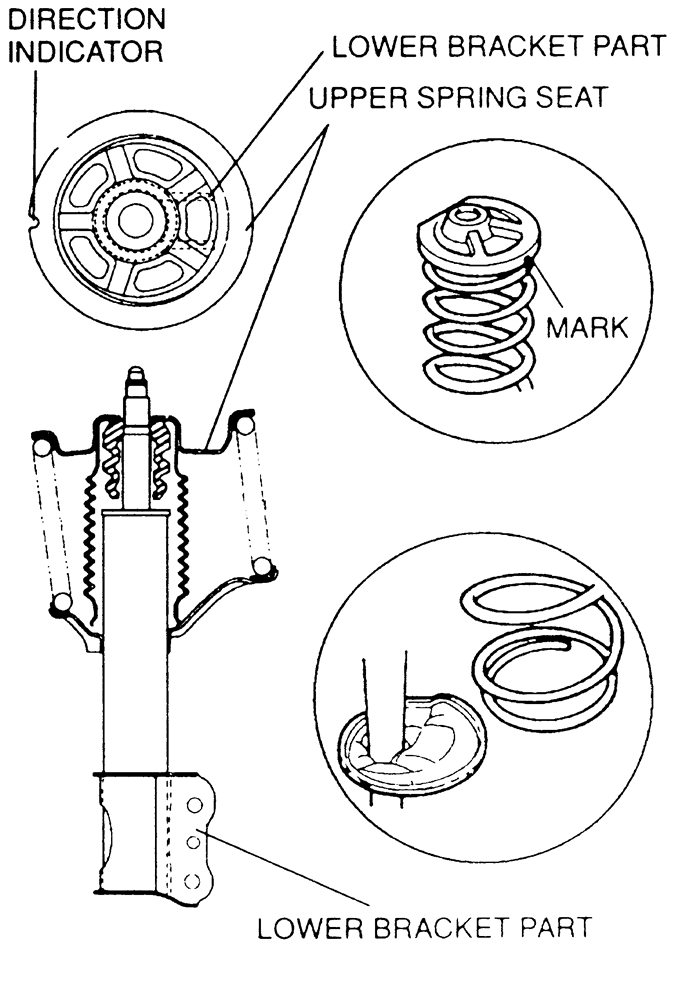
    1. Temporarily assemble the upper rubber spring seat, upper spring seat and coil spring to the strut. Mark their locations on the strut for proper reassembly.
    2. Align the marks of the upper spring seat and coil spring. Protect them with a shop rag, and remove them from the strut.
    3. Using the same coil spring compressor tool that disassembled the strut, compress the spring.
    4. Install the bound stopper and dust cover to the strut.
    5. Install the strut into the coil spring, fitting the end of the coil into the step of the lower seat.
    6. Install the thrust bearing and the mounting rubber. Tighten the piston rod nut several turns.
    7. Remove the compressor tool, and verify that the coil spring is seated on the step of the lower seat.
    8. Secure the mounting rubber in a vise, and tighten the nut to 66-86 ft. lbs. (90-116 Nm). Install the cap.
      Fig. 1:Seating the coil spring -- 1993-97 626 and MX6

  9. Install the strut into the strut tower, aligning the paint marks made during removal. Install the mounting nuts and tighten to 33-46 ft. lbs. (47-62 Nm).
  10. Install the strut-to-knuckle bolts and tighten to 69-86 ft. lbs. (94-117 Nm).
  11. If equipped with automatic adjusting suspension, install the actuator and connect the electrical connector.
  12. Install the clip or bolt attaching the brake hose and/or ABS sensor harness.
  13. Install the wheel and tire assembly and lower the vehicle. Check the front end alignment.
1993-95 929
  1. Raise and safely support the vehicle. Remove the wheel and tire assembly.
  2. Support the lower control arm with a jack.
  3. Remove the clip and disconnect the brake hose from the strut. Remove the bolt and disconnect the ABS sensor harness from the strut.
  4. Remove the cotter pin and loosen the nut from the upper lateral link at the spindle. Separate the upper lateral link ball joint from the spindle using tool 49 S231 575 or equivalent. Remove the nut.
  5. Paint an alignment mark on the cam plate and crossmember for assembly reference, then remove the nut and bolt and the upper lateral link.
  6. Remove the lower strut bolt from the lower control arm.
  7. Paint alignment marks on the strut mounting block and strut tower for assembly reference. Remove the nuts and remove the strut and coil assembly.
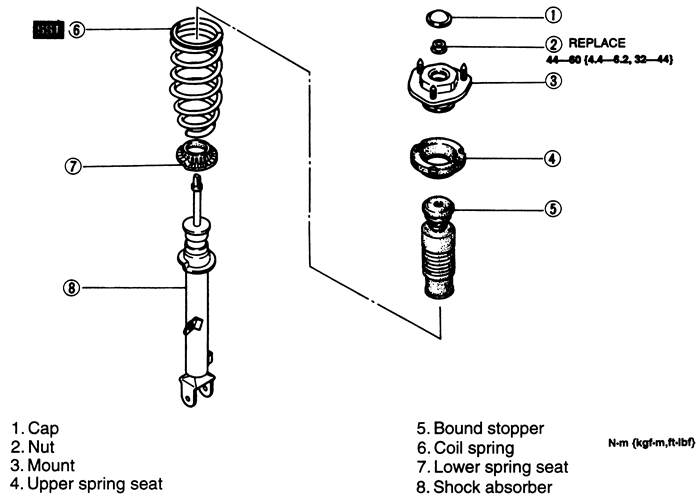
    Fig. 2:Strut (exploded view) -- 1993-95 929

  8. To remove the coil spring from the strut assembly:
    1. Safely secure the assembly in a vise. Loosen the piston rod upper nut several turns, but do not remove it.
    2. Assembly special tools 49 0223 640B and 49 G030 641. Compress the coil spring using the tools.
    3. Remove the upper nut, and remove the coil spring.

      To install:

  9. Install the coil spring on the strut assembly using the same special tools used to remove it. Tighten the upper nut in a vice with a final torque of 32-44 ft. lbs. (44-60 Nm).
  10. Install the strut, making sure the brake hose bracket faces forward.
  11. Install the strut into the tower, being sure to align the marks made during removal and loosely install the nuts.
  12. Loosely install the lower strut mounting bolt.
  13. Install the upper lateral link with the bolt and nut. Align the marks made during removal and tighten the nut to 86 ft. lbs. (117 Nm).
  14. Connect the ball joint to the spindle and tighten the nut to 80 ft. lbs. (108 Nm). Install a new cotter pin.
  15. Install the bolt and clip connecting the ABS harness and brake hose to the strut.
  16. Install the wheel and tire assembly and lower the vehicle.
  17. When the vehicle is on the ground, tighten the strut block-to-tower nuts to 46 ft. lbs. (63 Nm) and the lower strut bolt to 87 ft. lbs. (118 Nm).
  18. Check the front wheel alignment.
1995 MX3
  1. Raise and safely support the vehicle. Remove the wheel and tire assembly.
  2. Support the lower control arm with a jack.
  3. Remove the bolt or clip attaching the brake hose and/or ABS sensor harness to the strut.
  4. Paint alignment marks on the strut mounting block and strut tower, so the strut can be reinstalled in the same position.
  5. Remove the upper strut mounting blocknuts and the strut-to-knuckle bolts and remove the strut assembly.

    CAUTION
    Serious injury may result from careless action while removing the coil spring.

  6. Disassemble the strut to remove the coil spring as follows:
    1. Secure the mounting rubber in a vise.
    2. Loosen the piston rod nut several turns, but do not remove it.
    3. Using a suitable coil spring compressor (Mazda special tools: 49 T034 001, 49 T034 002, 49 T034 003 and 49 T034 004 or equivalent) secure the strut assembly.
    4. Compress the coil spring and remove the nut.
    5. Remove the mounting rubber, thrust bearing, upper spring seat, upper rubber spring seat, dust cover, bound stopper and the coil spring.

      To install:

  7. If the coil spring was removed, assemble as follows:
    1. Temporarily assemble the upper rubber spring seat, upper spring seat and coil spring to the strut. Mark their locations on the strut for proper reassembly.
    2. Align the marks of the upper spring seat and coil spring. Protect them with a shop rag, and remove them from the strut.
    3. Using the same coil spring compressor tool that disassembled the strut, compress the spring.
    4. Install the bound stopper and dust cover to the strut.
    5. Install the strut into the coil spring, fitting the end of the coil into the step of the lower seat.
    6. Install the thrust bearing and the mounting rubber. Tighten the piston rod nut several turns.
    7. Remove the compressor tool, and verify that the coil spring is seated on the step of the lower seat.
    8. Secure the mounting rubber in a vise, and tighten the nut to 58-81 ft. lbs. (79-109 Nm).
  8. Install the strut into the strut tower, aligning the paint marks made during removal. Install the mounting nuts and tighten to 33-46 ft. lbs. (47-62 Nm).
  9. Install the strut-to-knuckle bolts and tighten to 76-93 ft. lbs. (103-126 Nm).
  10. Install the clip or bolt attaching the brake hose and/or ABS sensor harness.
  11. Install the wheel and tire assembly and lower the vehicle. Check the front end alignment.
Millenia
  1. Raise and safely support the vehicle. Remove the wheel and tire assembly.
  2. Support the lower control arm with a jack.
  3. Remove the nut and disconnect the brake hose from the strut. Remove the nuts and disconnect the ABS sensor cable.
  4. Matchmark the strut mounts and remove the mounting nuts, then remove the strut assembly.
  5. Remove the cap and the damper fork.

    CAUTION
    Removing the piston rod nut is dangerous. The shock absorber and spring could fly off under tremendous pressure and cause serious injury or death. Secure the shock absorber in a compression tool before removing the piston rod nut.

  6. Install the assembly into a strut compression tool and remove the top mount nut and mount.
  7. Remove the upper spring seat, bound stopper, coil spring and lower spring seat.

    To install:

  8. Assemble the strut assembly and install the damper fork and cap to the strut.
  9. Install the strut, making sure the brake hose bracket faces forward.
  10. Install the strut in the strut tower, aligning the marks made during removal. Install the mounting nuts and torque to 34-46 ft. lbs. (47-62 Nm).
  11. Install the lower strut damper fork mounting bolt and tighten to 73-101 ft. lbs. (99-137 Nm).
  12. Connect the ABS sensor cable mount, tighten the nuts to 70-86 in. lbs. (7.9-9.8 Nm).
  13. Attach the brake line mount to the strut and install the mounting nut, torque to 14-18 ft. lbs. (19-25 Nm).
  14. Install the wheel and tire assembly and lower the vehicle. Check the front wheel alignment.
1993-97 Miata
  1. Raise and safely support the vehicle. Remove the wheel and tire assembly.
  2. Remove the engine undercover. Remove the band for the wheel speed sensor harness.
  3. Remove the bolt and disconnect the stabilizer bar from the link.
  4. Paint alignment marks on the upper strut mounting block and the strut tower, so the strut can be reinstalled in the same position.
  5. Remove the cotter pin and the mounting nut for the upper ball joint.
  6. Remove the nuts from the strut mounting block. Remove the lower strut mounting bolt and nut.
  7. Loosen the lower control arm bolts and pull down on the hub/knuckle assembly. Remove the strut up through the upper control arm.
  8. To remove the coil spring from the strut assembly:
    1. Safely secure the assembly in a vise. Loosen the piston rod upper nut several turns, but do not remove it.
    2. Assembly special tools 49 G034 101, 102 and 103. Compress the coil spring using the tools.
    3. Remove the upper nut, and remove the coil spring.

      To install:

  9. Install the coil spring on the strut assembly using the same special tools used to remove it. Tighten the upper nut in a vice with a final torque of 24-33 ft. lbs. (32-46 Nm).
  10. Position the strut and loosely install the lower bolt and nut.
  11. Install the strut in the strut tower, making sure the paint marks made during removal are aligned, and loosely install the upper mounting blocknuts.
  12. Install the upper ball joint to the knuckle. Use a new cotter pin and loosely install the nut.
  13. Connect the stabilizer bar to the link and loosely tighten the bolt.
  14. Tighten the lower control arm bolts and nuts to 83 ft. lbs. (113 Nm).
  15. Install the engine undercover and the band for the wheel speed sensor harness. Install the wheel and tire assembly and lower the vehicle.
  16. Tighten the lower strut bolt to 54-69 ft. lbs. (73-93 Nm). Tighten upper strut nuts to 22-27 ft. lbs. (30-36 Nm). Tighten the upper ball joint nut to 31-44 ft. lbs. (42-60 Nm). Tighten the stabilizer bolt to 27-40 ft. lbs. (37-54 Nm).
  17. Check the front wheel alignment.
1993-95 RX7
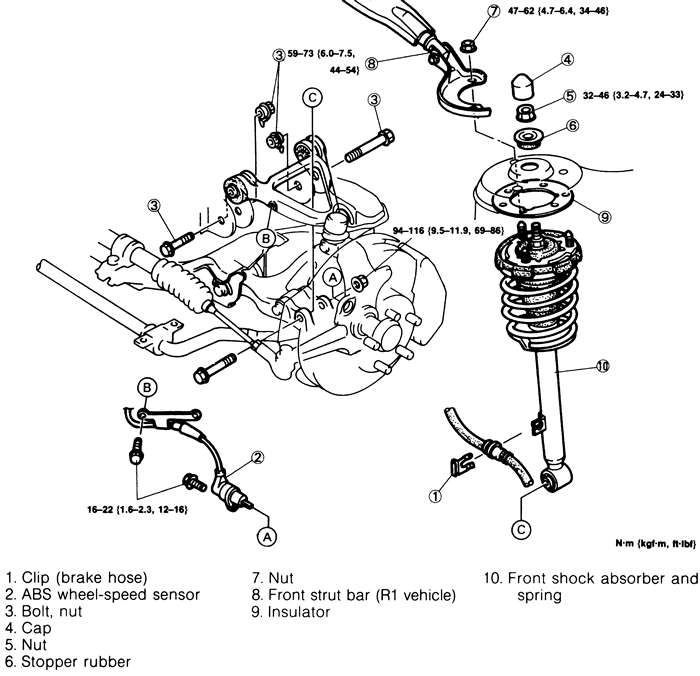
Fig. 3:Strut removal and installation -- 1993-95 RX7

  1. Raise and safely support the vehicle. Remove the wheel and tire assembly.
  2. Support the lower control arm with a jack.
  3. Remove the clip and disconnect the brake hose from the strut. Remove the bolts and disconnect the ABS sensor and harness.
  4. Remove the upper control arm bolts and nuts.
  5. Remove the cap, nut and stopper at the top center of the strut. Pain an alignment mark on the upper strut mounting block and strut tower for assembly reference. Remove the nuts.
  6. Remove the strut bar from between the strut towers.
  7. Remove the lower strut mounting bolt and remove the strut.

    To install:

  8. Install the strut, making sure the brake hose bracket faces forward.
  9. Install the strut in the strut tower, aligning the marks made during removal. If equipped, install the strut bar. Install the nuts and tighten to 34-46 ft. lbs. (47-62 Nm).
  10. Install the stopper rubber and nut at the top center of the strut and tighten to 24-33 ft. lbs. (32-46 Nm). Install the cap.
  11. Install the lower strut mounting bolt and tighten to 69-86 ft. lbs. (94-116 Nm).
  12. Install the upper control arm bolts and nuts and tighten to 44-54 ft. lbs. (59-73 Nm).
  13. Connect the ABS sensor and harness. Tighten the bolts to 12-16 ft. lbs. (16-22 Nm). Install the brake hose clip.
  14. Install the wheel and tire assembly and lower the vehicle. Check the front wheel alignment.
 
Previous Next