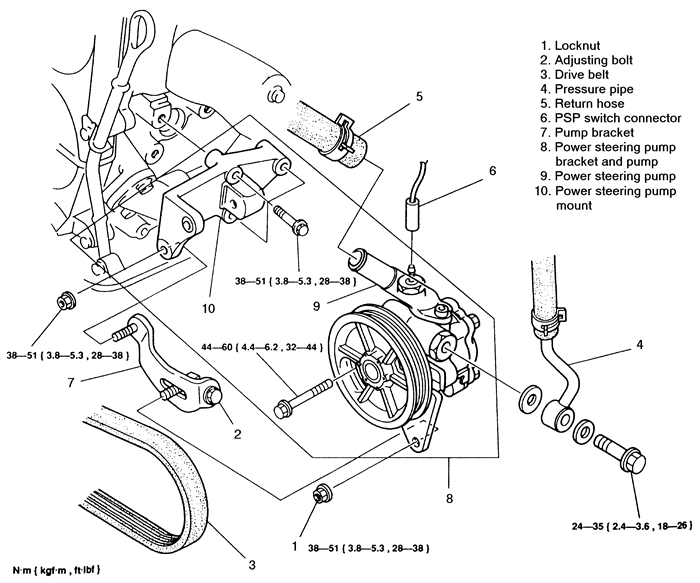
Fig. 1:Power steering pump removal and installation --
1995-97 Protege
Disconnect the negative battery cable.
Remove the bottom locknut from the pump bracket.
Loosen the adjusting nut and remove the drive belt.
Disconnect the pressure pipe and the return hose.
Plug the lines to prevent fluid spills.
Disconnect the pump switch connector.
Remove the pump bracket.
Remove the remaining pump mount bolts and remove the pump.
To install:
Replace the pump and install the mounting nuts and
bolts. Torque the bracket nuts and bolts to 28-38 ft. lbs. (38-51 Nm).
Torque the pump to bracket mount bolt to 32-44 ft. lbs. (44-60 Nm).
Connect the pump switch connector.
Connect the return hose and pressure pipe.
Replace the drive belt and properly adjust the tension
Install the bottom bracket locknut, torque to 28-38
ft. lbs. (38-51 Nm).
Disconnect and plug the hoses at the pump. Remove
the O-rings
It is necessary to remove the pump pulley before
removing the pump. Hold the pulley by inserting a small prybar through
one of the holes in the pulley to hold it. Remove the pulley nut and pulley.
Disconnect the power steering pressure switch connector.
Support the pump, remove the mounting bolts and lift out the pump.
To install:
Position the pump, and install the mounting bolts.
Tighten the bolts to 28-38 ft. lbs. (38-51 Nm).
Unplug and connect the return hose to the pump. Unplug
the pressure hose, and install the hose using a new O-rings. Tighten the
bolt to 12-17 ft. lbs. (16-23 Nm).
Connect the power steering pressure switch connector.
Install the pump bracket, and torque the mounting
bolts to 24-33 ft. lbs. (31-46 Nm).
Position the pulley on the pump shaft, and fasten
the washer and nut onto the end of the shaft. Hold the pulley by inserting
a small prybar through one of the holes in the pulley to hold it. Tighten
the pulley nut to 37-43 ft. lbs. (49-58 Nm).
Install the drive belt and the adjusting bolt.
Install the nuts onto the adjusting bracket, and
the bolt at the pulley.
Adjust the belt tension, and fill and bleed the system.
Check for leaks.
Disconnect the power steering pressure switch connector.
Disconnect and plug the hoses at the pump.
Remove the pump drive belt.
It is necessary to remove the pump pulley before
removing the pump. Hold the pulley by inserting a small prybar through
one of the holes in the pulley to hold it. Remove the pulley nut and pulley.
Support the pump, remove the mounting bolts and lift out the pump along
with the bracket as an assembly.
To install:
Position the pump, and install the mounting bolts.
Tighten the upper bolt to 14-18 ft. lbs. (19-25 Nm). Tighten the lower
mounting bolt to 24-33 ft. lbs. (32-46 Nm).
Position the pulley on the pump shaft, and fasten
the washer and nut onto the end of the shaft. Hold the pulley by inserting
a small prybar through one of the holes in the pulley to hold it. Tighten
the pulley nut to 37-43 ft. lbs. (49-58 Nm).
Install the drive belt.
Unplug and connect the return hose to the pump. Unplug
the pressure hose, and install the hose using a new washer. Tighten the
bolt to 18-26 ft. lbs. (24-35 Nm).
Connect the power steering pressure switch connector.
Adjust the belt tension, and fill and bleed the system.
Check for leaks.
Remove the locknut that secures the idler pulley,
and remove the idler pulley and bearing.
Remove the adjusting bolt from the pump bracket.
Disconnect and plug the hoses at the pump.
Remove the pump drive belt.
It is necessary to remove the pump pulley before
removing the pump. Hold the pulley by inserting a small prybar through
1 of the holes in the pulley to hold it. Remove the pulley nut and pulley.
Remove the hose and pump brackets. Disconnect the
power steering pressure switch connector.
Support the pump, remove the mounting bolts and lift out the pump.
To install:
Position the pump, and install the mounting bolts.
Tighten the bolts to 24-33 ft. lbs. (31-46 Nm).
Unplug and connect the return hose to the pump. Unplug
the pressure hose, and install the hose using a new washer. Tighten the
bolt to 22-32 ft. lbs. (30-44 Nm).
Connect the power steering pressure switch connector.
Install the pump bracket, and torque the mounting
bolts to 24-33 ft. lbs. (31-46 Nm).
Install the hose bracket onto the pump bracket and
tighten the pressure hose mounting bolt through the bracket at 61-87 inch
lbs. (7-10 Nm).
Position the pulley on the pump shaft, and fasten
the washer and nut onto the end of the shaft. Hold the pulley by inserting
a small prybar through 1 of the holes in the pulley to hold it. Tighten
the pulley nut to 37-43 ft. lbs. (49-58 Nm).
Install the drive belt and the adjusting bolt.
Install the idler pulley and bearing. Tighten the
locknut to 28-38 ft. lbs. (38-51 Nm).
Install the transverse member and tighten the mounting
bolts to 69-96 ft. lbs. (94-131 Nm).
Adjust the belt tension, and fill and bleed the system.
Check for leaks.
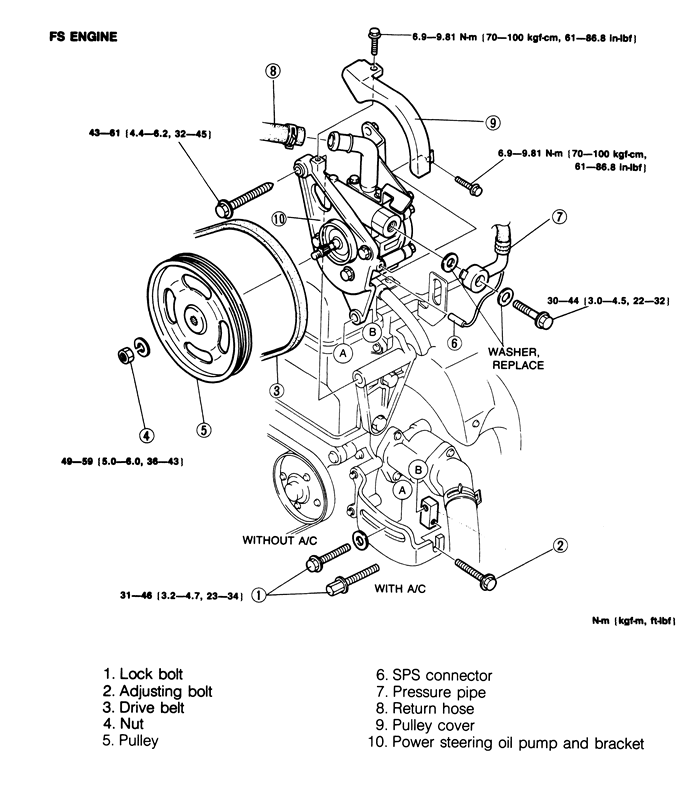
Fig. 2:Steering pump, with FS engine -- 1995-97 626
and MX6
Disconnect the negative battery cable.
Remove the transverse member.
Remove the lockbolts and the adjusting bolt from
the pump bracket.
Disconnect and plug the hoses at the pump.
Remove the pump drive belt.
It is necessary to remove the pump pulley before
removing the pump. Hold the pulley by inserting a small prybar through
1 of the holes in the pulley to hold it. Remove the pulley nut and pulley.
Disconnect the power steering pressure switch connector.
Remove the pulley cover.
Support the pump, remove the mounting bolts and lift out the pump along
with the bracket as an assembly.
To install:
Position the pump, and install the mounting bolts.
Tighten the upper bolt to 32-44 ft. lbs. (44-60 Nm).
Install the pulley cover to the bracket, and tighten
the bolts to 61-87 inch lbs. (7-10 Nm).
Unplug and connect the return hose to the pump. Unplug
the pressure hose, and install the hose using a new washer. Tighten the
bolt to 22-32 ft. lbs. (30-44 Nm).
Connect the power steering pressure switch connector.
Position the pulley on the pump shaft, and fasten
the washer and nut onto the end of the shaft. Hold the pulley by inserting
a small prybar through 1 of the holes in the pulley to hold it. Tighten
the pulley nut to 37-43 ft. lbs. (49-58 Nm).
Install the drive belt.
Install the adjusting bolt. Install the lockbolts
and tighten to 24-33 ft. lbs. (31-46 Nm).
Install the transverse member and tighten the mounting
bolts to 69-96 ft. lbs. (94-131 Nm).
Adjust the belt tension, and fill and bleed the system.
Check for leaks.
It is necessary to remove the pump pulley before
removing the pump. Hold the pulley with tool 49 W023 585A or equivalent,
or if possible, insert a small prybar through 1 of the holes in the pulley
to hold it. Remove the pulley nut and pulley.
Disconnect and plug the hoses at the pump. If equipped,
disconnect the pressure switch connector.
Support the pump, remove the mounting bolts and lift out the pump.
To install:
Position the power steering pump, and install the
mounting bolts. Tighten the bolts to 12-16 ft. lbs. (16-22 Nm).
Unplug and connect the hoses. If equipped, connect
the pressure switch connector.
Install the pulley. Tighten the pulley nut to 29-43
ft. lbs. (40-58 Nm).
Install the drive belt.
Install the adjusting bolt and locknut. Tighten the
locknut to 28-38 ft. lbs. (38-51 Nm).
Adjust the belt tension. Fill and bleed the system.
Disconnect the power steering pressure switch connector.
Remove the pressure hose bracket bolt. Disconnect
and plug the hoses at the pump. Remove the O-rings
Support the pump, remove the mounting bolts and lift out the pump.
To install:
Position the pump, and install the mounting bolts.
Tighten the bolts to 28-39 ft. lbs. (37-53 Nm).
Unplug and connect the return hose to the pump. Unplug
the pressure hose, and install the hose using NEW O-rings. Tighten the
fitting to 24-34 ft. lbs. (32-47 Nm). Tighten the bracket bolt to 14-18
ft. lbs. (19-25 Nm).
Connect the power steering pressure switch connector.
Install the drive belt, and the adjusting bolt.
Install the nuts onto the adjusting bracket, and
the bolt at the pulley.
Adjust the belt tension, and fill and bleed the system.
Check for leaks.