Previous Next

Sway Bar

REMOVAL AND INSTALLATION

1993-94 323, 1993-95 MX3 and 1993-97 Protege
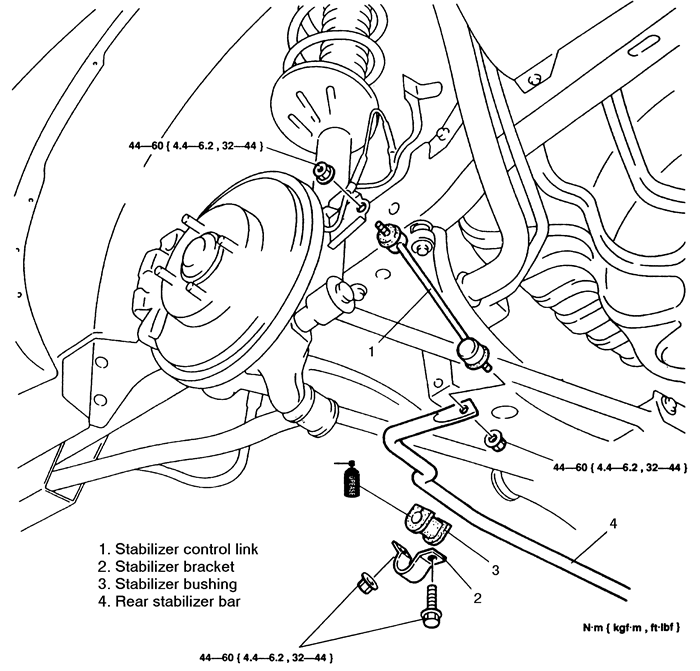
Fig. 1:Rear sway bar and related components, exploded view -- 1995-97 Protege

  1. Raise and safely support the rear of the vehicle.
  2. Remove the rear wheels from the vehicle.
  3. Remove the stabilizer bar to link mounting nut and protectors.
  4. Remove the stabilizer bracket, and remove the stabilizer bar. Remove the stabilizer bushings and inspect the bushing for deterioration or wear. Replace if necessary.

    To install:

  5. Apply rubber grease to the inside of the bushing.
  6. Position the stabilizer bar, and loosely tighten the mounting bolts.
  7. Install the rear wheels, and lower the vehicle.
  8. Tighten the stabilizer bar to link nuts and the bracket bolts to 32-44 ft. lbs. (44-60 Nm).
1993-97 626 and MX6
  1. Raise and safely support the rear of the vehicle.
  2. Remove the rear wheels from the vehicle.
  3. Remove the stabilizer bar to link mounting nut and protectors.
  4. Remove the stabilizer bracket, and remove the stabilizer bar. Remove the stabilizer bushings and inspect the bushing for deterioration or wear. Replace if necessary.

    To install:

  5. Position the stabilizer bar, and loosely tighten the mounting bolts.
  6. Install the rear wheels, and lower the vehicle.
  7. Tighten the stabilizer bar to link nuts and the bracket bolts to 27-39 ft. lbs. (37-53 Nm).
1993-95 929
  1. Raise and support the vehicle safely. Remove the front wheels.
  2. Remove the stabilizer control link.
  3. Remove the 2 stabilizer nuts, and remove the upper bushing and bracket from each side of the vehicle.
  4. Remove the stabilizer bar from the vehicle. Examine the insulators (bushings) carefully for any sign of wear and replace them if necessary.

    NOTE: Check the bushings inside the brackets for wear or deformation. A worn bushing can cause a distinct noise as the bar twists during cornering operation.

    To install:

  5. Install the stabilizer bar bushings in the correct position.
  6. Loosely install the stabilizer bar brackets.
  7. Position the stabilizer control link. Install the upper link nuts. Tighten the link nuts so that there is 0.71-0.87 inches (18.1-22.1mm) of thread exposed.
  8. Torque the stabilizer link bolt to 32-39 ft. lbs. (44-53 Nm).
  9. Install front wheels and lower the vehicle.
  10. Tighten the stabilizer bar bracket bolts to 24-33 ft. lbs. (32-46 Nm). Check front wheel alignment.
1995-97 Millenia
  1. Raise and safely support the vehicle.
  2. Disconnect the stabilizer control link.
  3. Remove the stabilizer brackets and bushings.
  4. Remove the rear stabilizer.
  5. Installation is the reverse of removal. Torque the stabilizer bracket mounting bolts and the control link mount nut to 32-44 ft. lbs. (44-60 Nm).
1993-97 Miata
  1. Raise and safely support the rear of the vehicle.
  2. Remove the rear wheels from the vehicle.
  3. Remove the stabilizer bracket and the stabilizer bushing, inspect the bushing for deterioration or wear and replace if necessary.
  4. Remove the stabilizer to control link bolt, and remove the stabilizer bar.

    To install:

  5. Position the stabilizer bar. Align the bushing on the stabilizer bar with the painted marking. Loosely install the mounting bolts.
  6. Install the rear wheels, and lower the vehicle.
  7. Tighten the control link to stabilizer bar bolts to 27-40 ft. lbs. (36-54 Nm), and the stabilizer bracket bolts to 14-21 ft. lbs. (20-28 Nm).
1993-95 RX7
  1. Raise and support the vehicle safely. Remove the rear wheels and the undercover.
  2. Remove the stabilizer control link nut and the stabilizer plate mount bolts. Remove the bushings.
  3. Remove the stabilizer bar. If necessary, remove the stabilizer control link.
  4. Installation is the reverse of removal. Torque the stabilizer plate mount bolts to 14-19 ft. lbs. (18-26 Nm). Torque the stabilizer bar to control link mount nut to 27-39 ft. lbs. (37-53 Nm). Check front wheel alignment.
 
Previous Next