NOTE: The evaporator housing can be removed by itself, without
removing the console, instrument panel or heater core. The heater core, though,
cannot be removed without removing the evaporator.
- If equipped with A/C, have the system properly discharged at a reputable
repair shop.
- Disconnect the negative battery cable.
- Drain the cooling system into a suitable container.
- If equipped with A/C, disconnect the refrigerant lines from the evaporator.
Cover the exposed ends of the lines to minimize contamination.
- Remove the instrument panel, as outlined in Section 10 of this manual.
- Remove the floor console by first removing the plugs, then the screws
retaining the side covers and the small cover piece in front of the shifter.
Remove the shifter knob, manual transmission, and the cup holder. Remove
both small pieces of upholstery to gain access to retainer screws. Disconnect
both electrical connectors from the front of the console. Remove the shoulder
harness guide plates and the console assembly.
- Remove both stamped steel reinforcement pieces.
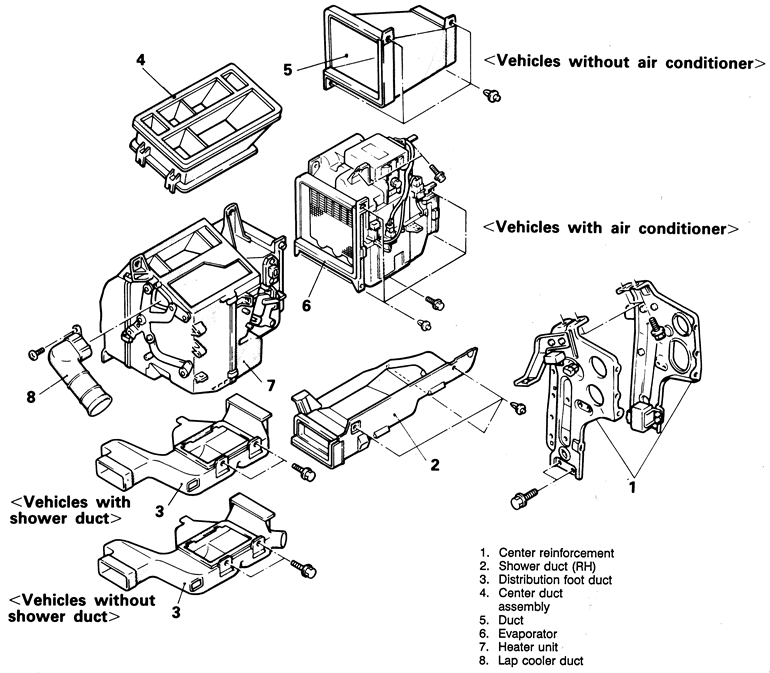
- Remove the lower ductwork from the heater box.
- Remove the upper center duct.
- Vehicles without air conditioning will have a square duct in place of
the evaporator. Remove this duct if present. If the vehicle is equipped
with air conditioning, remove the evaporator assembly:
- Remove the wiring harness connectors and the electronic control unit.
- Remove the drain hose and lift out the evaporator unit.
- If servicing the assembly, disassemble the housing and remove the
expansion valve and evaporator.
- With the evaporator removed, remove the heater unit. To prevent bolts
from falling inside the blower assembly, set the inside/outside air-selection
damper to the position that permits outside air introduction.
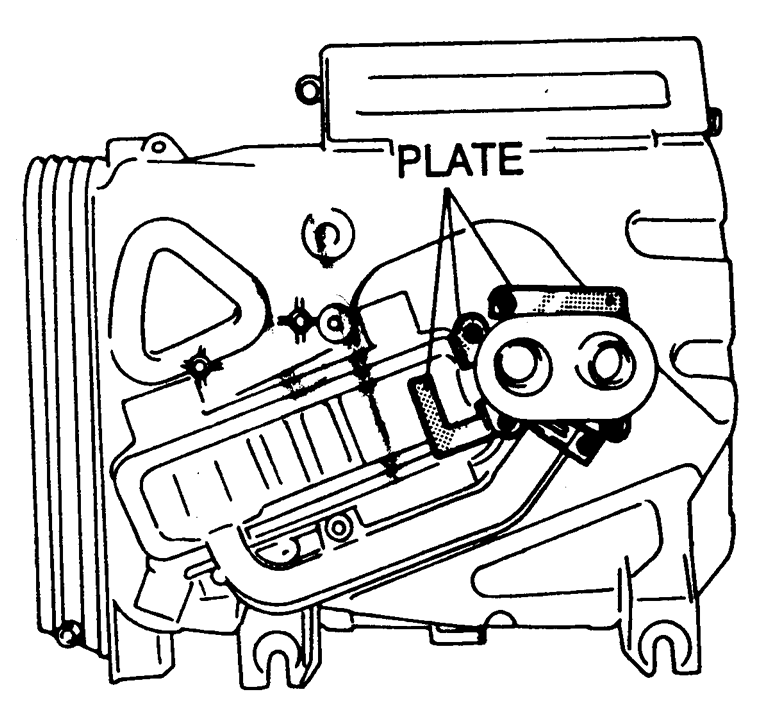
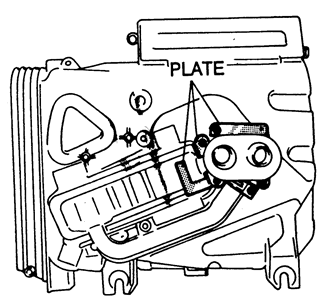
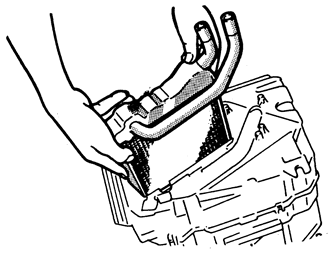
- Remove the cover plate around the heater tubes and remove the core fastener
clips. Pull the heater core from the heater box, being careful not to damage
the fins or tank ends.
| Fig. 1: To prevent bolts from falling inside the
blower, set the air selector damper to the position that allows
outside air into the vehicle

|
| Fig. 2: Remove the plate from the heater unit .
. .
|
| Fig. 3: . . . then pull heater core from heater
unit
|
| Fig. 4: Exploded view of the heater unit and related
components — 1990–94 vehicles

|
To install:
- Install the heater core to the heater box. Install the clips and cover.
- Install the heater box and connect the duct work.
- Assemble the housing, evaporator and expansion valve, making sure the
gaskets are in good condition. Install the evaporator housing.
- Using new lubricated O-rings, connect the refrigerant lines to the evaporator.
- Install the electronic transmission ELC box. Connect all wires and control
cables.
- Install the instrument panel assembly and the console by reversing their
removal procedures.
- Connect the negative battery cable and check the entire climate control
system for proper operation. Check the system for leaks.
- If equipped with A/C, take the vehicle to a reputable repair shop to have
the A/C system evacuated and recharged.
- Properly disarm the SRS system by disconnecting the negative battery cable
and waiting 60 seconds.
- Drain the engine coolant into a suitable container.
- Remove the instrument panel, as outlined in Section 10 of this manual.
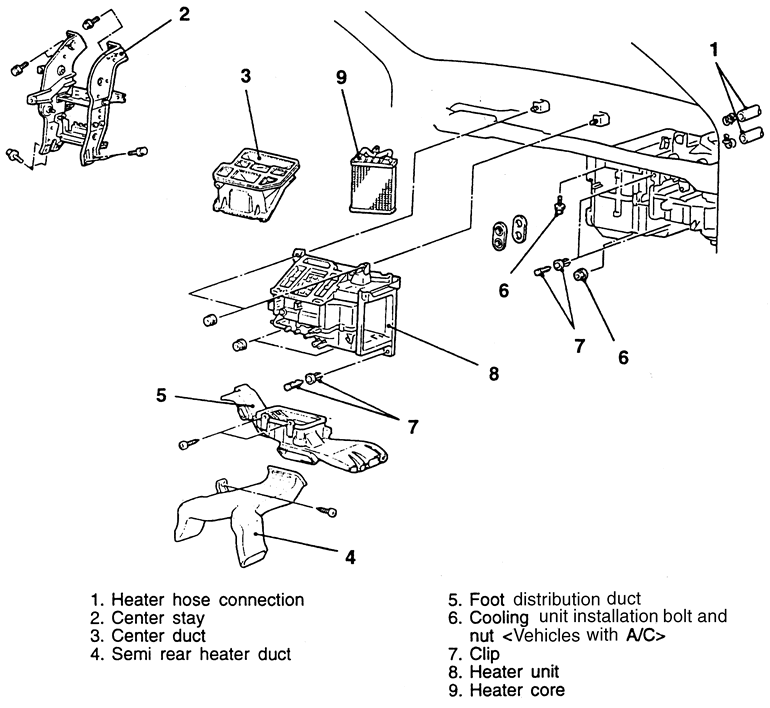
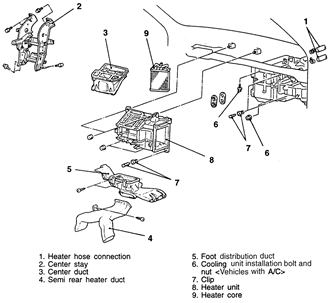
- Disconnect the heater hose connections.
- Remove the center stay and duct.
- Remove the semi rear heater duct.
- Remove the foot distribution duct.
- If equipped with A/C, remove the cooling unit bolt and nut.
- Remove the retaining clip by using a Philips-head screwdriver to push
the pin (in the center of the clip) in about 0.08 in. (2mm), then pull the
clip out to remove it.
WARNING
Do not push the pin in more than necessary because the grommet may be
damaged or the pin may fall in.
- Remove the heater unit after sliding the cooling unit toward you slightly.
- Remove the heater core from the vehicle.
| Fig. 5: Heater core and related components — 1995–98
vehicles
|
To install:
- Position the heater core in the vehicle.
- Install the heater unit.
- Install the retaining clip by inserting with the pin pulled out, then
pushing the pin inward until the head is flush with the grommet.
- If equipped with A/C, install the cooling unit bolt and nut.
- Connect the foot distribution duct.
- Install the semi rear heater duct.
- Install the center duct and stay.
- Attach the heater hose connection(s).
- Install the instrument panel, as outlined in Section 10 of this manual.