Previous Next

REMOVAL & INSTALLATION

1991–94 Vehicles
  1. Disconnect the negative battery cable. Use a syringe or similar device to remove as much fluid as possible from the reservoir. Some fluid will be spilled from lines during removal of the hydraulic unit so make sure to protect adjacent painted surfaces.
  2. On turbocharged engine, remove the center intercooler duct. Loosen the clamps and remove the bolts holding the duct to the air cleaner.
  3. Disconnect the brake lines from the hydraulic unit. Correct reassembly is critical. Label or identify the lines before removal. Plug each line immediately after removal.
  4. Remove the cover from the relay box. Disconnect the electrical harness to the hydraulic unit.
  5. Disconnect the hydraulic unit ground strap from the chassis.
  6. Remove the 3 nuts holding the hydraulic unit. Remove the unit upwards.

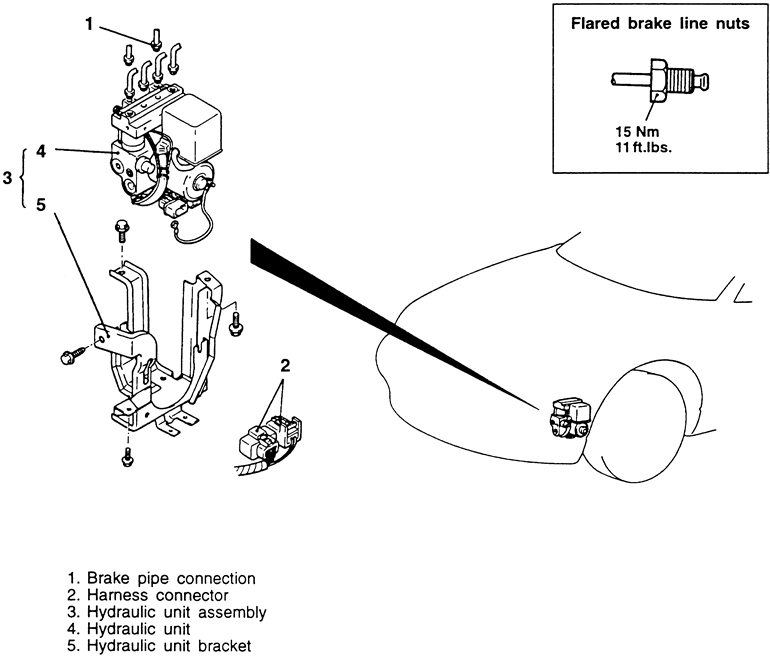
    NOTE: The hydraulic unit is heavy; use care when removing it. The unit must remain in the upright position at all times and be protected from impact and shock.

  7. Set the unit upright supported by blocks on the workbench. The hydraulic unit must not be tilted or turned upside down. No component of the hydraulic unit should be loosened or disassembled.
  8. The bracket assemblies and relays may be removed if desired.

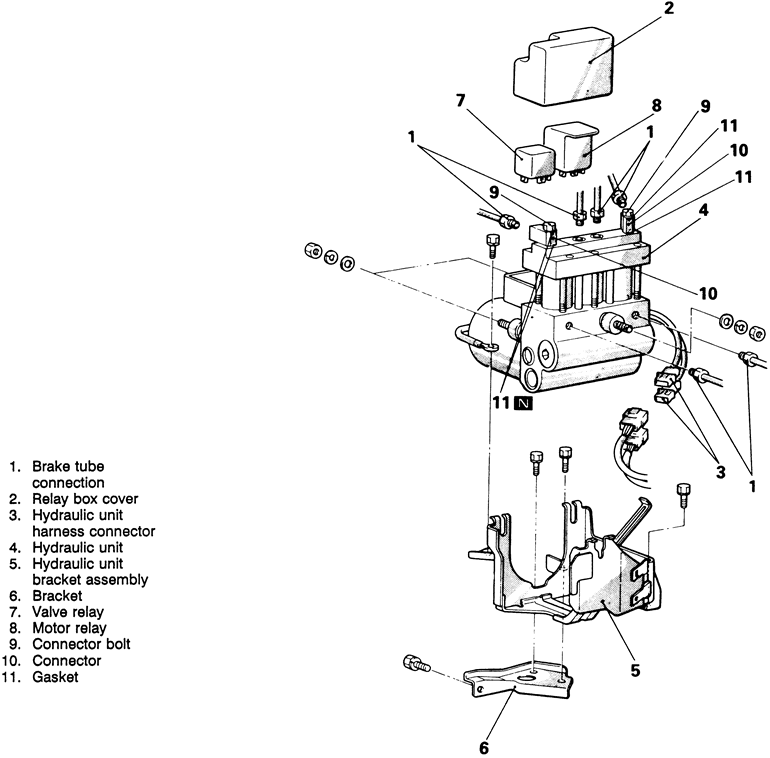
    Fig. 1: Exploded view of the ABS hydraulic unit

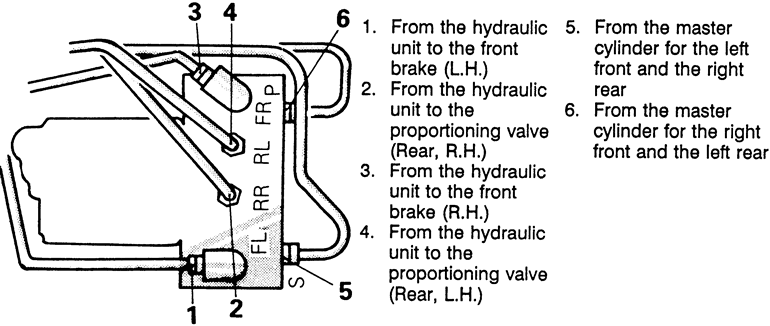
    Fig. 2: Connection of brake tubes to ABS hydraulic unit

    To install:

  9. Install the relays and brackets if removed.
  10. Install the hydraulic unit into the vehicle, keeping it upright at all times.
  11. Install the retaining nuts and tighten.
  12. Connect the ground strap to the chassis bracket. Connect the hydraulic unit wiring harness.
  13. Install the cover on the relay box.
  14. Connect each brake line loosely to the correct port and double check the placement. Tighten each line to 10 ft. lbs. (13.5 Nm).
  15. Fill the reservoir to the MAX line with brake fluid.
  16. Bleed the master cylinder, then bleed the brake lines.
  17. If equipped, install the intercooler air duct.
1995–98 Vehicles
  1. Disconnect the negative battery cable. Use a syringe or similar device to remove as much fluid as possible from the reservoir. Some fluid will be spilled from lines during removal of the hydraulic unit so make sure to protect adjacent painted surfaces.
  2. Remove the left side splash shield.
  3. Remove the left side headlight assembly.
  4. For the 2.0L non-turbo engine, remove the following components:
    1. Air cleaner assembly
    2. Engine Control Module (ECM)
    3. Relay box bracket
  5. For 2.0L turbo and 2.4L engines, unfasten the power steering fluid reservoir mounting bolts. Remove the power steering pressure pipe and return pipe clamp mounting bolts.

    Fig. 3: ABS hydraulic unit mounting — 1995–98 vehicles

  6. Disconnect the brake lines from the hydraulic unit.
  7. Detach the electrical harness connector.
  8. Unfasten the bolts, then remove the hydraulic unit assembly.

    WARNING
    Be careful when removing the hydraulic unit, as it is heavier than is looks. Do not disassemble, drop or turn the unit upside down.

  9. If necessary, you can remove the retainers then separate the hydraulic unit from the bracket.
  10. Installation is the reverse of the removal, but make sure to connect the brake lines to the unit as shown in the accompanying figure.

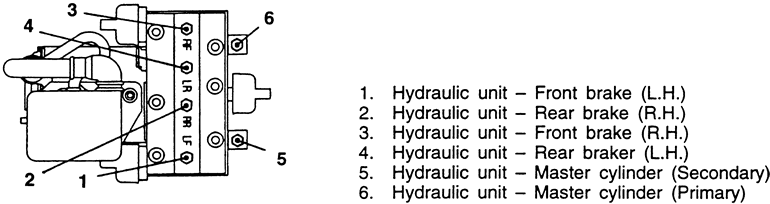
    Fig. 4: Hydraulic unit brake line connection identification

  11. Properly bleed the brake system, as outlined in this section.

Previous Next