In the process of removing the engine, you will come across a number of steps
which call for the removal of a separate component or system, such as "disconnect
the exhaust system" or "remove the radiator." In most instances, a detailed
removal procedure can be found elsewhere in this manual.
It is virtually impossible to list each individual wire and hose which must
be disconnected, simply because so many different model and engine combinations
have been manufactured. Careful observation and common sense are the best possible
approaches to any repair procedure.
Removal and installation of the engine can be made easier if you follow these
basic points:
- If you have to drain any of the fluids, use a suitable container.
- Always tag any wires or hoses and, if possible, the components they came
from before disconnecting them.
- Because there are so many bolts and fasteners involved, store and label
the retainers from components separately in muffin pans, jars or coffee cans.
This will prevent confusion during installation.
- After unbolting the transmission or transaxle, always make sure it is properly
supported.
- If it is necessary to disconnect the air conditioning system, have this
service performed by a qualified technician using a recovery/recycling station.
If the system does not have to be disconnected, unbolt the compressor and
set it aside.
- When unbolting the engine mounts, always make sure the engine is properly
supported. When removing the engine, make sure that any lifting devices are
properly attached to the engine. It is recommended that if your engine is
supplied with lifting hooks, your lifting apparatus be attached to them.
- Lift the engine from its compartment slowly, checking that no hoses, wires
or other components are still connected.
- After the engine is clear of the compartment, place it on an engine stand
or workbench.
- After the engine has been removed, you can perform a partial or full teardown
of the engine using the procedures outlined in this manual.
- Relieve fuel system pressure.
CAUTION
Observe all applicable safety precautions when working around fuel. Whenever
servicing the fuel system, always work in a well ventilated area. Do not
allow fuel spray or vapors to come in contact with a spark or open flame.
Keep a dry chemical fire extinguisher near the work area. Always keep fuel
in a container specifically designed for fuel storage; also, always properly
seal fuel containers to avoid the possibility of fire or explosion.
- Disconnect the negative battery cable.
- Remove the engine undercover if equipped.
- Matchmark the hood and hinges and remove the hood assembly.
- Remove the air cleaner assembly and all adjoining air intake duct work.
- Drain the engine coolant, remove the radiator hoses, and remove the radiator
assembly, coolant reservoir, and intercooler, as equipped.
CAUTION
Never open, service or drain the radiator or cooling system when hot; serious
burns can occur from the steam and hot coolant. Also, when draining engine
coolant, keep in mind that cats and dogs are attracted to ethylene glycol
antifreeze and could drink any that is left in an uncovered container or
in puddles on the ground. This will prove fatal in sufficient quantities.
Always drain coolant into a sealable container. Coolant should be reused
unless it is contaminated or is several years old.
- Remove the transaxle and transfer case as equipped.
- Tag and detach the following electrical connections:
- Accelerator cable
- Heater hoses
- Brake booster vacuum hose
- Vacuum hoses
- Fuel lines
- Engine ground cables
- Any applicable sensors
- Coolant temperature and oil pressure sending units
- Exhaust Gas Recirculation (EGR) temperature sensor
- Connection for the idle speed control motor
- Fuel injectors
- Power transistor
- Ignition coil and any applicable distributor connections
- The connections for the alternator
- Power steering pressure switch
- A/C compressor
- Refrigerant temperature switch
- Condenser
- Remove the air conditioner drive belt and the air conditioning compressor.
Leave the hoses attached. Do not discharge the system. Place the compressor
aside and secure it using a suitable device.
- Remove the power steering pump and place the pump aside and secure it using
a suitable device.
- Remove the exhaust manifold-to-exhaust pipe nuts. Discard the gasket.
- Install the engine hoist equipment and make certain the attaching points
on the engine are secure.
- Raise the hoist enough to support the engine.
- Remove the front and rear engine roll stoppers.
- Remove the left engine mount and support bracket.
WARNING
Double check that all cables, hoses, harness connectors, etc., are disconnected
from the engine.
- Slowly lift the engine and remove it from the vehicle.
To install:
- Install the engine and secure all control brackets and mounts.
- Install the transaxle, and transfer case if equipped.
- The balance of the installation is the reverse of removal with the addition
of the following notes:
- Use new clamps or O-rings to connect the high pressure fuel line and
the fuel return line.
- Use new gaskets to connect the exhaust system to the engine.
- Fill the engine with the proper amount of engine oil and coolant.
- Start the engine, allow it to reach normal operating temperature.
- Check for leaks.
- Check the ignition timing and adjust if necessary.
- Road test the vehicle and check all fluid levels and functions for proper
operation.
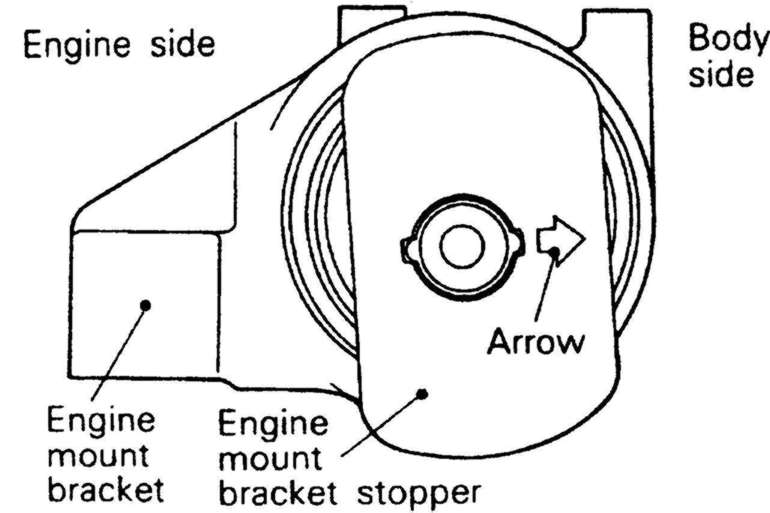
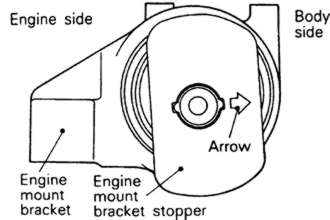
| Fig. 1: Alignment of the engine mount stopper
bracket — Diamante shown
|