NOTE: Refer to Section 1 for the proper timing belt service interval.
NOTE: If coolant or engine oil comes in contact with the timing belt, they will drastically shorten its life. Also, do not allow engine oil or coolant to contact the timing belt sprockets or tensioner assembly.
To install:
| Fig. 1: Exploded view of the timing belt covers,
timing belt and related parts — 1990–94 1.5L
engine
|
| Fig. 2: Camshaft and crankshaft sprocket mark alignment
for proper timing belt installation — 1990–94
1.5L engine
|
WARNING
Coolant and engine oil will damage the rubber in the timing belt, drastically
reducing its life. Do not allow engine oil or coolant to contact the timing
belt, the sprockets or tensioner assembly.
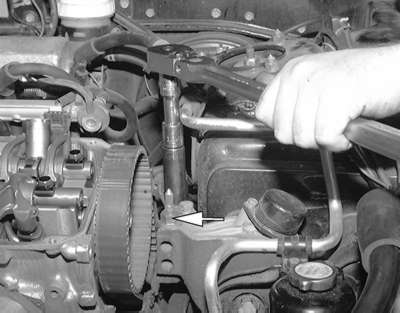
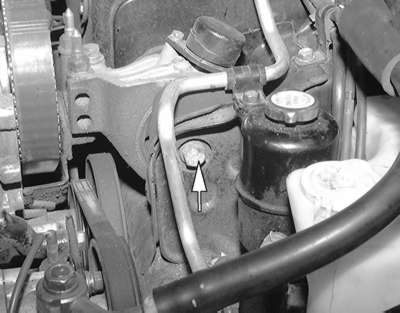
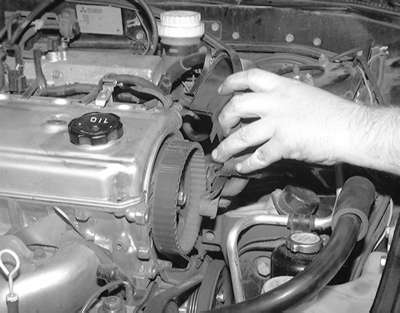
| Fig. 3: Align the timing belt sprockets as indicated
before removing the timing belt — 1995–00 1.5L
engine
|
To install:
NOTE: The 1.6L engine is not equipped with silent shafts. Disregard all instructions pertaining to silent shafts if working on that engine.
NOTE: Always rotate the crankshaft in a clockwise direction. Make a mark on the back of the timing belt indicating the direction of rotation so it may be reassembled in the same direction if it is to be reused.
To install:
| Fig. 4: Camshaft and crankshaft timing belt sprocket
alignment marks — 1990–94 Mitsubishi 1.6L and
2.0L DOHC engines
|
NOTE: When tightening the bolt of the tensioner, ensure that the tensioner pulley shaft does not rotate with the bolt. Allowing it to rotate with the bolt can cause excessive tension on the belt.
NOTE: Both camshaft sprockets are used for the intake and exhaust camshafts and are provided with 2 timing marks. When the sprocket is mounted on the exhaust camshaft, use the timing mark on the right with the dowel pin hole on top. For the intake camshaft sprocket, use the 1 on the left with the dowel pin hole on top.
NOTE: The above step assures that the oil pump socket is in correct orientation to the silent shafts. This step must not be skipped or a vibration may develop during engine operation.
To install:
| Fig. 5: Camshaft and crankshaft sprocket alignment
for proper timing belt replacement — 1.8L and 2.0L
SOHC engines
|
| Fig. 6: Silent shaft sprocket alignment marks for
belt replacement — 1.8L and 2.0L SOHC engines
|
| Fig. 7: Checking the rear silent shaft for proper
positioning — 1.8L and 2.0L SOHC engines
|
NOTE: There is a possibility to align all timing marks and have the oil pump sprocket and silent shaft out of time, causing an engine vibration during operation. If the following step is not followed exactly, there is a 50 percent chance that the silent shaft alignment will be 180 degrees off.
NOTE: If the timing belt is to be reused, mark the direction of rotation on the flat side of the belt with an arrow.
WARNING
Do not rotate the camshafts or the crankshaft while the timing belt is removed.
| Fig. 8: Camshaft and crankshaft timing belt sprocket
TDC alignment mark positioning for timing belt removal and installation — 2.0L
turbo engine
|
To install:
WARNING
Do not compress the pushrod too quickly, damage to the pushrod can occur.
| Fig. 9: Timing belt B installation mark alignment — 2.0L
turbo
|
| Fig. 10: Remove the upper engine mount-to-mount bracket
nuts
|
| Fig. 11: Remove the upper engine mount through-bolt .
. .
|
| Fig. 12: . . . then remove the engine mount from the
vehicle
|
| Fig. 13: Remove the three upper timing cover retaining
bolts . . .
|
| Fig. 14: . . . then remove the upper timing cover
|
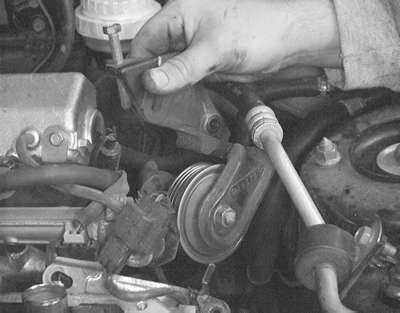
| Fig. 15: Remove the A/C belt tensioner pulley and bracket
assembly
|
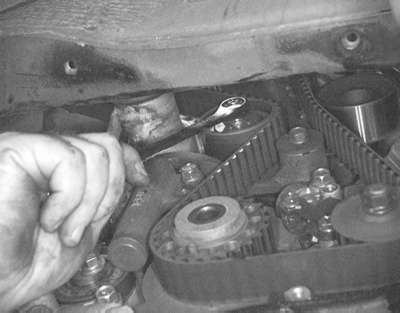
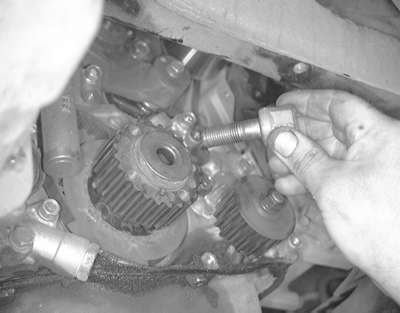
| Fig. 16: Loosen the bolt on the tensioner pulley and
slide the pulley to the left to relieve the tension on the timing belt
|
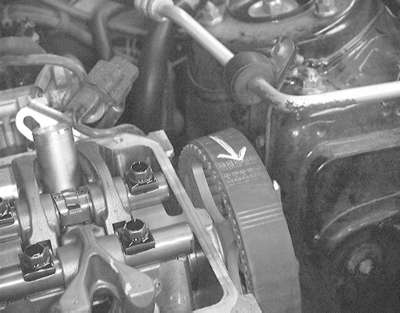
| Fig. 17: Make sure you mark the rotation of the timing
belt if you plan on reusing the belt
|
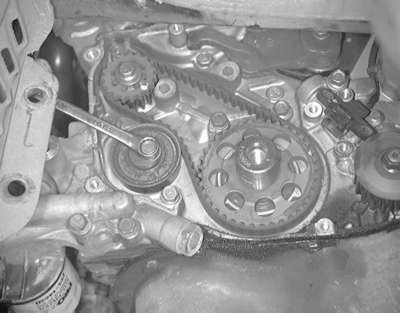
| Fig. 18: Remove the timing belt from the engine by lifting
it out the top
|
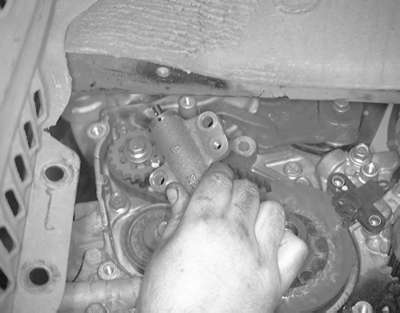
| Fig. 19: Unfasten the two timing belt tensioner retaining
bolts . . .
|
| Fig. 20: . . . then remove the tensioner from the engine
block
|
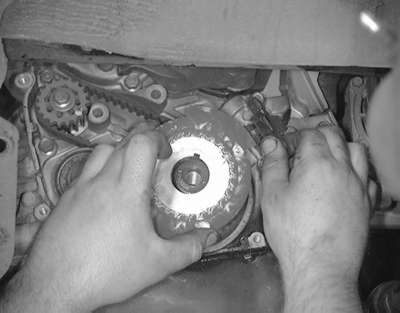
| Fig. 21: Remove the bolt and remove the crankshaft timing
belt pulley
|
| Fig. 22: After unfastening the retainer, remove the CKP
trigger wheel from the crankshaft
|
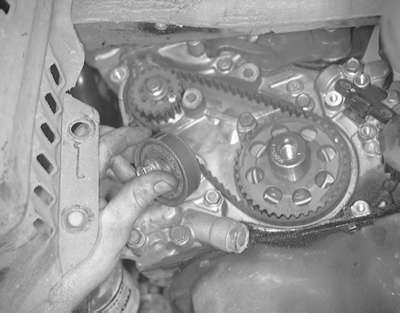
| Fig. 23: Remove the silent shaft tensioner retaining
bolt . . .
|
| Fig. 24: . . . then remove the tensioner from the engine
block
|
| Fig. 25: Remove the silent shaft belt from the engine
|
CAUTION
Wait at least 90 seconds after the negative battery cable is disconnected
to prevent possible deployment of the air bag.
CAUTION
Never open, service or drain the radiator or cooling system when hot; serious
burns can occur from the steam and hot coolant. Also, when draining engine
coolant, keep in mind that cats and dogs are attracted to ethylene glycol
antifreeze and could drink any that is left in an uncovered container or
in puddles on the ground. This will prove fatal in sufficient quantities.
Always drain coolant into a sealable container. Coolant should be reused
unless it is contaminated or is several years old.
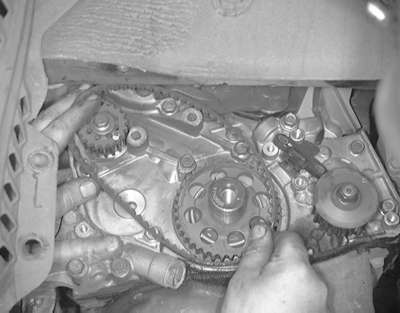
| Fig. 26: Silent shaft alignment marks. Notice the
tension side of the inner (silent shaft) belt — 2.4L
engine
|
| Fig. 27: Timing belt pulley alignment marks — 2.4L
engine
|
To install:
NOTE: If the following steps are not followed exactly, there is a chance that the silent shaft alignment will be 180 degrees off. This will cause a noticeable vibration in the engine and the entire procedure will have to be repeated.
NOTE: It is possible to align the timing marks on the camshaft sprocket, crankshaft sprocket and the oil pump sprocket with the left balance shaft out of alignment.
WARNING
Do not manually apply pressure to the tensioner. This will overtighten the
belt and will cause a howling noise.
WARNING
If any binding is felt when adjusting the timing belt tension by turning
the crankshaft,
STOP turning the engine, because the pistons may be hitting the valves.
| Fig. 28: Exploded view of the timing belt covers,
timing belt and related parts — 1992–94 Mitsubishi
3.0L SOHC engine
|
| Fig. 29: Crankshaft and camshaft sprocket alignment
for proper timing belt replacement — 1992–94
Mitsubishi 3.0L SOHC engine
|
To install:
CAUTION
Wait at least 90 seconds after the negative battery cable is disconnected
to prevent possible deployment of the air bag.
| Fig. 30: Align the sprockets properly before removing
or installing the timing belt — 1995–96 Diamante
with the 3.0L (6G72) SOHC engine
|
To install:
| Fig. 31: Crankshaft and camshaft sprocket alignment
for proper timing belt replacement — 1992–94
Mitsubishi 3.0L DOHC engine
|
To install:
NOTE: Keep fingers out from between the camshaft sprockets. The sprockets may move unexpectedly because of valve spring pressure and could pinch fingers.
CAUTION
Be sure to disconnect the negative battery cable. Wait at least 90 seconds
after the negative battery cable is disconnected to prevent possible deployment
of the air bag.
WARNING
Turning the camshaft sprocket when the timing belt is removed could cause
the valves to contact with the pistons, resulting in severe engine damage.
| Fig. 32: Sprocket alignment for timing belt installation — 1995–96
Diamante with the 3.0L (6G72) DOHC engine
|
To install:
NOTE: The auto-tensioner assembly must be reset to correctly adjust belt tension.
WARNING
DO NOT rotate or turn the camshafts when removing the sprockets or severe
engine damage will result from internal component interference.
NOTE: Since the camshaft sprockets turn easily, secure them with box wrenches when installing the timing belt.
CAUTION
Never open, service or drain the radiator or cooling system when hot; serious
burns can occur from the steam and hot coolant. Also, when draining engine
coolant, keep in mind that cats and dogs are attracted to ethylene glycol
antifreeze and could drink any that is left in an uncovered container or
in puddles on the ground. This will prove fatal in sufficient quantities.
Always drain coolant into a sealable container. Coolant should be reused
unless it is contaminated or is several years old.
NOTE: If the same timing belt will be reused, mark the direction of timing belt's rotation, for installation in the same direction. Be sure engine is positioned so No. 1 cylinder is at the TDC of it's compression stroke and the sprockets timing marks are aligned with the engine's timing mark indicators.
| Fig. 33: Clean the timing marks to verify their position
when aligning — 3.5L engine
|
To install:
WARNING
If any binding is felt when adjusting the timing belt tension by turning
the crankshaft, STOP turning the engine, because the pistons may be hitting
the valves.