Previous Next

MacPherson Strut and Coil Spring

REMOVAL & INSTALLATION

Diamante, 1990–93 Galant, and 1999–00 Galant
  1. Disconnect the negative battery cable.
  2. Raise and safely support the vehicle.
  3. Remove the brake hose and the tube bracket.

    NOTE: Do not pry the brake hose and tube clamp away when removing it.

  4. If equipped with ABS, disconnect the front speed sensor mounting clamp from the strut.
  5. Support the lower arm and remove the strut to knuckle bolts. Use a piece of wire to suspend the knuckle to keep the weight off the brake hose.
  6. If equipped with Active Electronic Control Suspension (Active-ECS) perform the following:
    1. Loosen the nut that secures the air line to the to the top of the strut and discard the O-ring.
    2. Remove the bolts that secure the actuator to the top of the strut and remove the component. Disconnect the wiring harness.

      NOTE: Before removing the top bolts, make matchmarks on the body and the strut insulator for proper reassembly.

  7. Remove the strut upper nuts and remove the strut assembly from the vehicle.

    To install:

  8. Install the strut to the vehicle and tighten the upper mounting nuts to 33 ft. lbs. (45 Nm).
  9. Align the strut to the knuckle and connect with the mounting bolts. Tighten the mounting bolts to 70–76 ft. lbs. (90–105 Nm).
  10. If equipped with Active-ECS, perform the following:
    1. Install the air line with a new O-ring.
    2. Install the actuator to the top of the strut. Connect the wiring harness.
  11. Install the brake hose bracket and the ABS clamp, if equipped.
  12. Install the wheel and tire assembly.
  13. Have a front end alignment performed.
Mirage

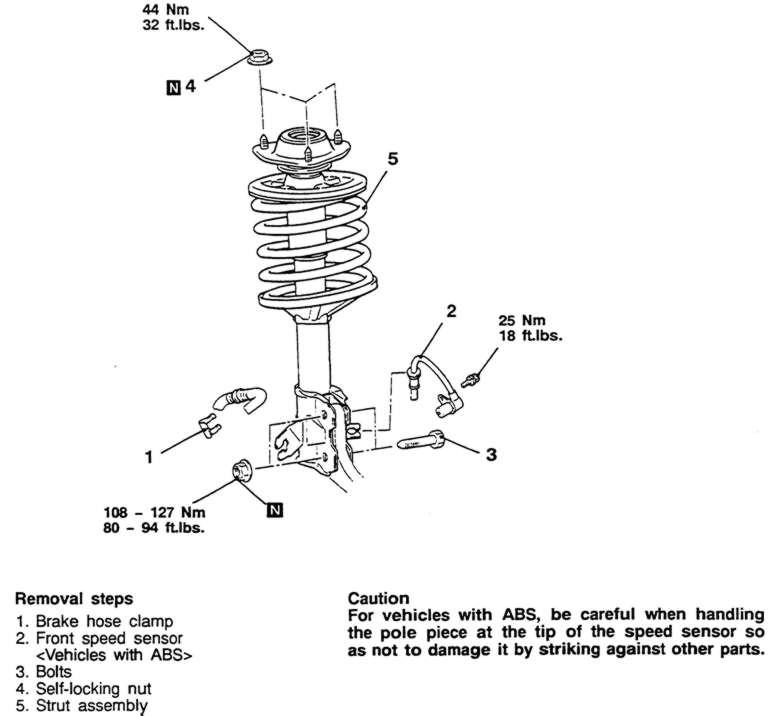
Fig. 1: Front strut assembly and related parts — Mirage

  1. Disconnect the negative battery cable.
  2. Raise and safely support vehicle.
  3. Remove the brake hose and tube bracket retainer bolt and bracket from the front strut. Do not pry the brake hose and tube clamp away when removing.
  4. If equipped with ABS, disconnect the front speed sensor mounting clamp from the strut.
  5. Support the lower arm using floor jack or equivalent. Remove the lower strut to knuckle bolts.

    NOTE: Before removing the top bolts, make matchmarks on the body and the strut insulator for proper reassembly.

  6. Remove the strut upper mounting bolts.
  7. Remove the strut assembly from the vehicle.

    To install:

  8. Install the strut to the vehicle and install the top mounting bolts. Tighten the mounting bolts to 29 ft. lbs. (40 Nm).
  9. Position the strut on the knuckle and install the mounting bolts. While holding the head of the lower mounting bolt, tighten the nuts to 80–94 ft. lbs. (110–130 Nm).
  10. Install the brake hose bracket and the ABS clamp, if equipped.
  11. Install the wheel and tire assembly.
  12. Have a front end alignment performed.

Previous Next