NOTE: Prior to removal of the steering rack, center the front
wheels and remove the ignition key. Failure to do so may damage the SRS clockspring
and render SRS system inoperative. Be sure to properly disarm the air bag
system.
- Disconnect the battery negative cable.
- Raise the vehicle and support safely and remove the wheels.
- Disconnect the Heated Oxygen (HO2S) sensor and remove the front exhaust
pipe.
- Properly support the engine. Remove both roll stopper mounting bolts and
the four center member installation bolts.
- Remove the center member.
NOTE: Matchmark the pinion input shaft of the rack to
the lower steering column joint for installation purposes.
- Remove the pinch bolt holding the lower steering column joint to the rack
and pinion input shaft.
- Remove the cotter pins and disconnect the tie rod ends from the steering
knuckle.
- Remove the rack and pinion steering assembly and its rubber mounts from
the right side of the vehicle.
To install:
- Align the matchmarks of the input shaft and install the rack to the vehicle.
- Secure the rack using the retainer clamps and bolts. Tighten the bolts
to 51 ft. lbs. (70 Nm).
- Tighten the steering column pinch bolt to 13 ft. lbs. (18 Nm).
- Install the center member.
- Install the front exhaust pipe.
- Connect the HO2S sensor.
- Connect the tie rod ends to the steering knuckles and tighten the castle
nuts to 25 ft. lbs. (34 Nm). Install new cotter pins.
- Install the wheels and connect the negative battery cable.
- Have a front end alignment performed.
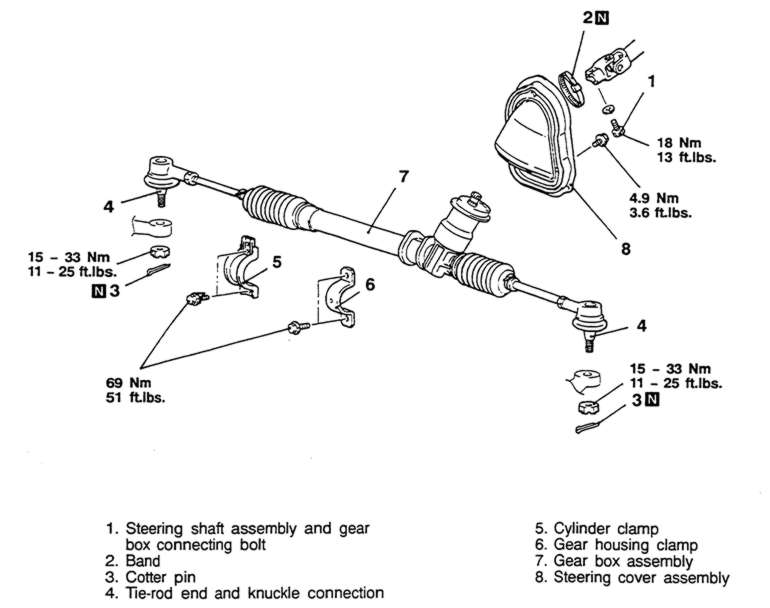
| Fig. 1: Exploded view of the manual steering gear
mounting — Mirage

|