Before servicing the vehicle, refer to the precautions in the beginning
of this section.
Disconnect the negative battery cable.
Raise and safely support the vehicle.
Remove or disconnect the following:
Transaxle assembly from the vehicle
Pressure plate attaching bolts. If the pressure plate is to be reused,
loosen the bolts in succession, 1 or 2 turns at a time to prevent warping
the cover flange.
Pressure plate release bearing assembly and the clutch disc. Do not
use solvent to clean the bearing.
Inspect the condition of the clutch components and replace any worn parts.
To install:
Inspect the flywheel for heat damage or cracks. Resurface or replace the
flywheel as required.
Using the proper alignment tool, install the clutch disc to the flywheel.
Install the pressure plate assembly and tighten the pressure plate bolts evenly
to 11–15 ft. lbs. (15–21 Nm). Remove the alignment tool.
Apply a light coat of high temperature grease to the clutch fork at the
ball pivot and where the fork contacts the bearing. Also a little bit of grease
can be applied to end of the release cylinder pushrod and to the pushrod hole
on the fork. Apply a light coat of grease on the transaxle input shaft splines.
Install or connect the following:
New clutch release bearing. Pack its inner surface with high temperature
grease
Transaxle assembly
Lower the vehicle and connect the negative battery cable.
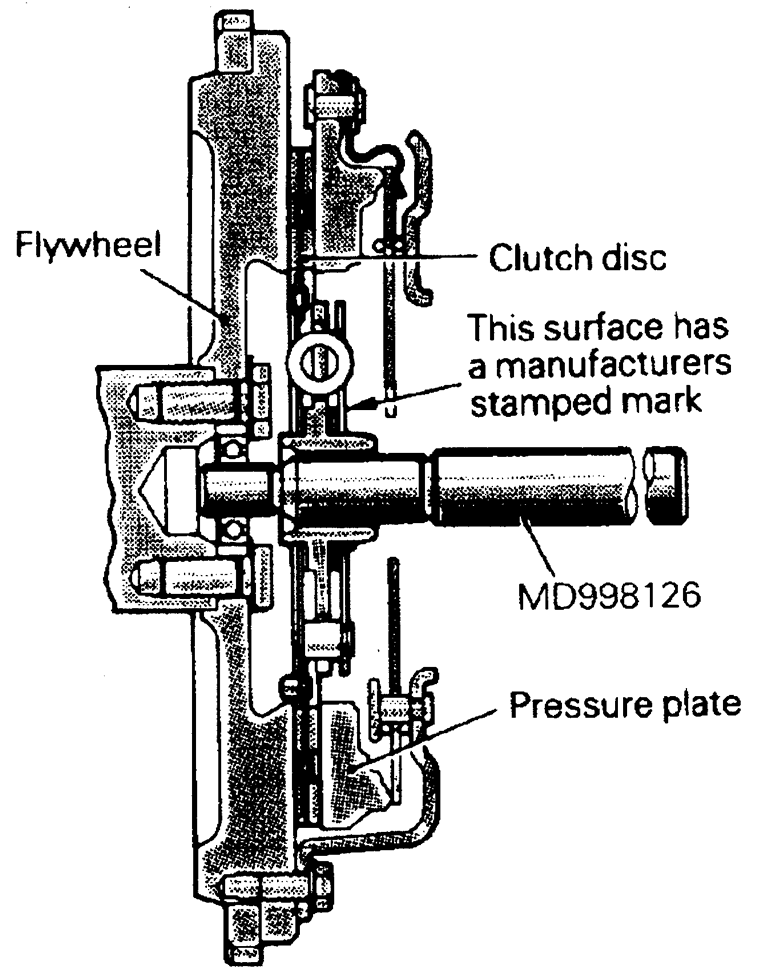
Fig. 1: Use the alignment dowel to center the disc on
the flywheel — Mirage
Before servicing the vehicle, refer to the precautions in the beginning
of this section.
Remove or disconnect the following:
Negative battery cable
Transaxle assembly from the vehicle
Pressure plate attaching bolts, pressure plate and clutch disc. If the
pressure plate is to be reused, loosen the bolts in a diagonal pattern,
1 or 2 turns at a time. This will prevent warping the clutch cover assembly.
Return clip and the pressure plate release bearing. Do not use solvent
to clean the bearing.
Inspect the clutch release fork and fulcrum for damage or wear. If necessary,
remove the release fork and unthread the fulcrum from the transaxle.
Carefully inspect the condition of the clutch components and replace any
worn or damaged parts.
To install:
Inspect the flywheel for heat damage or cracks. Resurface or replace the
flywheel as required.
Install the fulcrum and tighten to 25 ft. lbs. (35 Nm). Install the release
fork. Apply a coating of multi-purpose grease to the point of contact with
the fulcrum and the point of contact with the release bearing. Apply a coating
of multi-purpose grease to the end of the release cylinder pushrod and the
pushrod hole in the release fork.
Apply multi-purpose grease to the clutch release bearing. Pack the bearing
inner surface and the groove with grease. Do not apply grease to the resin
portion of the bearing. Place the bearing in position and install the return
clip.
Using the proper alignment tool, install the clutch disc to the flywheel.
Install the pressure plate assembly. Install the retainer bolts and tighten
a little at a time, in a diagonal sequence. Tighten them to a final torque
of 14 ft. lbs. (19 Nm) on 1997 Galant models and 16 ft. lbs. (22 Nm) on all
other models. Remove the aligning tool.
Install the transaxle assembly.
Check for proper clutch operation.
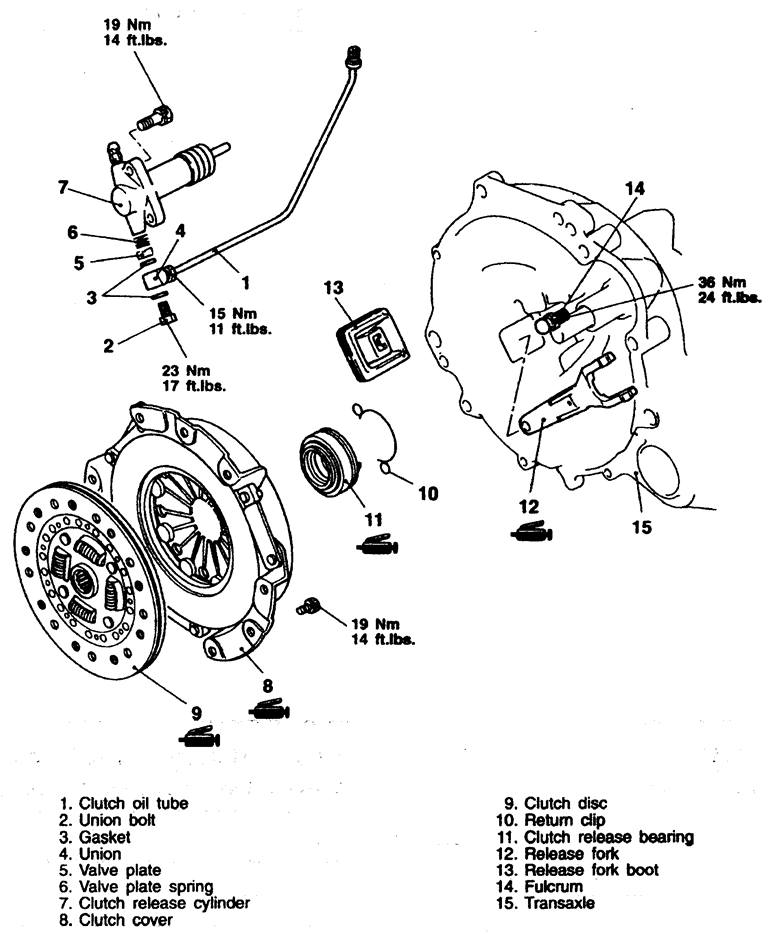
Fig. 2: Exploded view of non-turbo clutch assembly — Eclipse
with F5M31, F5M33, F5MC1 and W5M33 manual transaxles