Previous Next

Intake Manifold

REMOVAL & INSTALLATION

2.4L Engine
  1. Before servicing the vehicle, refer to the precautions in the beginning of this section.
  2. Drain the engine coolant.
  3. Relieve the fuel pressure.
  4. Remove or disconnect the following:

    CAUTION
    Wait at least 90 seconds after the negative battery cable is disconnected to prevent possible deployment of the air bag.

  5. Upper radiator hose from the thermostat housing
  6. Air intake hoses, breather hose and the air intake pipe
  7. Wires, hoses and linkages from the throttle body
  8. Ignition coil
  9. Brake booster hose and vacuum hose cluster from the air intake plenum
  10. Air intake plenum from the intake manifold
  11. Fuel lines, keep the line covered or plugged
  12. Fuel rail assembly with injectors intact
  13. Heater hose from the manifold
  14. Engine Coolant Temperature (ECT) sensor
  15. Water outlet fitting
  16. Distributor, matchmark for reassembly
  17. Intake manifold from the cylinder head and engine
  18. Manifold Differential Pressure (MDP) sensor, if equipped
  19. Clean and dry the mating surfaces of the manifold and cylinder head.

    To install:

  20. Install or connect the following:
  21. Refill the radiator with coolant.
  22. Check the system for leaks.

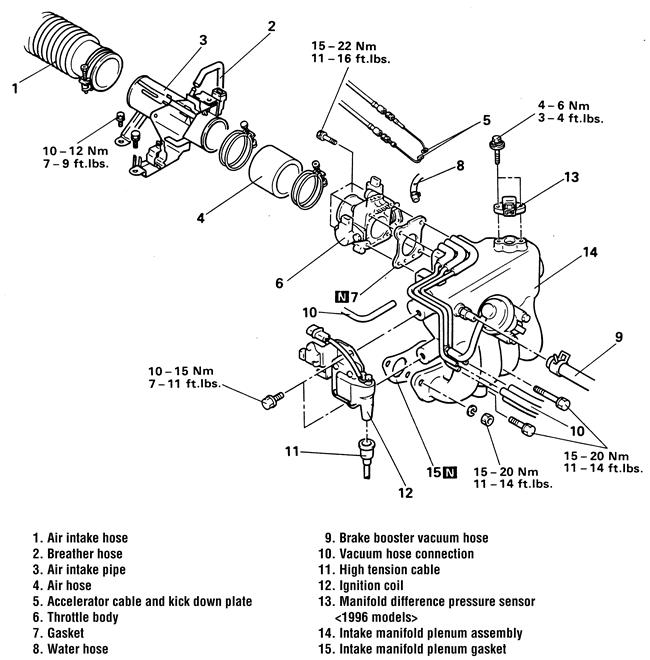
    Fig. 1: Exploded view of the intake plenum chamber and related components — 2.4L engine shown

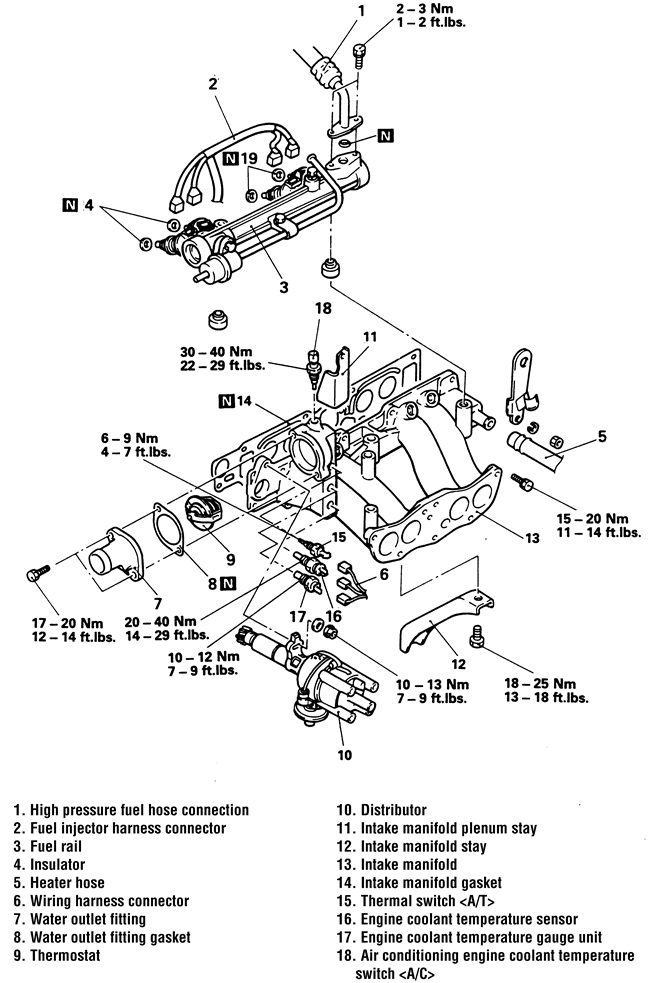
    Fig. 2: Exploded view of the intake manifold and related components — 2.4L engine shown

3.0L Engine
  1. Before servicing the vehicle, refer to the precautions in the beginning of this section.
  2. Relieve the fuel pressure.

    CAUTION
    The fuel injection system remains under pressure after the engine has been

    OFF. Properly relieve fuel pressure before disconnecting any fuel lines. Failure to do so may result in fire or personal injury.

  3. Drain the engine coolant.
  4. Remove or disconnect the following:

    CAUTION
    Work must be started after 90 seconds from the time the ignition switch is turned to the

    LOCK position and the negative battery cable is disconnected.

  5. Air intake hose from the throttle body
  6. Positive Crankcase Ventilation (PCV) hose
  7. Exhaust Gas Recirculation (EGR) valve
  8. Manifold Differential Pressure (MDP) sensor
  9. Vacuum hoses from the throttle body and air intake plenum
  10. Accelerator cable and the throttle control cable
  11. Coolant hoses
  12. Engine oil filler neck bracket from the air intake plenum
  13. EGR tube from the air intake plenum
  14. Plenum brackets
  15. Air intake plenum assembly from the intake manifold and remove. Note the position of the mounting bolts as they are removed.
  16. Fuel hose from the fuel rail
  17. Fuel return line and vacuum hose from the fuel pressure regulator
  18. Electrical connectors from the injectors
  19. Fuel rail and injectors
  20. Intake manifold
  21. Remove the gaskets and thoroughly clean and dry the mating surfaces of the manifold and heads.

    To install:

  22. Install or connect the following:
  23. Connect the hoses and connect the wires to the coolant switches.
  24. Fuel rail assembly and connect the fuel hoses
  25. New gasket and the air intake plenum to the intake manifold. Torque the nuts/bolts to 13 ft. lbs. (17 Nm).
  26. Plenum brackets
  27. PCV hose and vacuum hose cluster to the plenum
  28. EGR tube
  29. EGR temperature sensor wire
  30. Wires, hoses and linkages to the throttle body
  31. Air intake hose to the throttle body
  32. Upper radiator hose to the thermostat housing
  33. Negative battery cable
  34. Refill the radiator with coolant.
  35. Check fuel system for leaks.

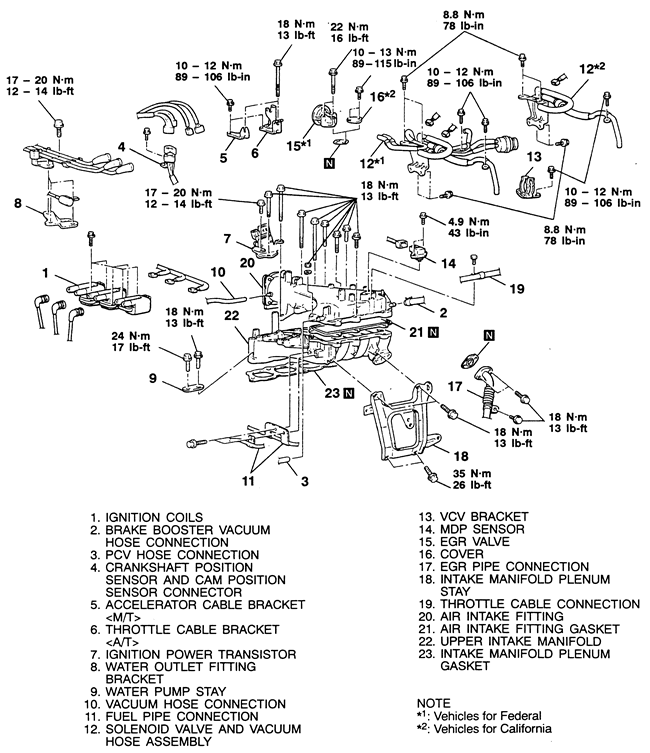
    Fig. 3: Exploded view of the upper intake manifold and related components — 3.0L 24-valve engine shown

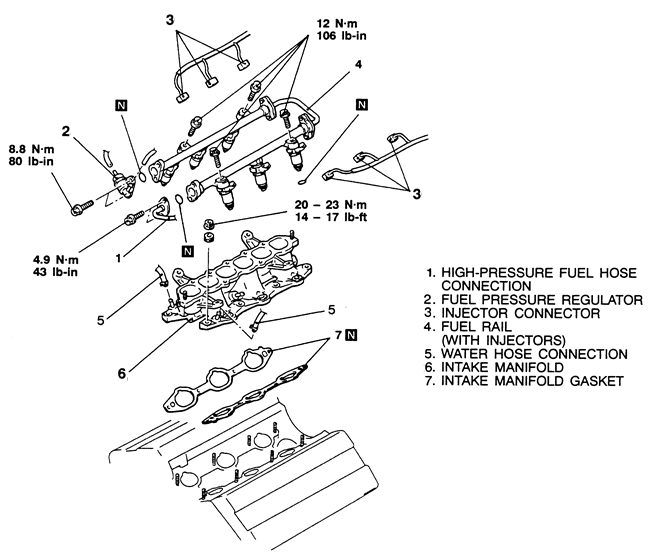
    Fig. 4: Exploded view of the lower intake manifold and related components — 3.0L 24-valve engine shown

3.5L Engines
  1. Before servicing the vehicle, refer to the precautions in the beginning of this section.

    CAUTION
    The fuel injection system remains under pressure after the engine has been

    OFF. Properly relieve fuel pressure before disconnecting any fuel lines. Failure to do so may result in fire or personal injury.

  2. Relieve the fuel pressure.
  3. Partially drain the cooling system.
  4. Remove or disconnect the following:

    CAUTION
    Wait at least 90 seconds after the negative battery cable is disconnected to prevent possible deployment of the air bag.

  5. Air intake hose from the throttle body
  6. Electrical connectors and vacuum hoses from the throttle body and air intake plenum
  7. Accelerator cable and the throttle control cable
  8. Coolant hoses
  9. Positive Crankcase Ventilation (PCV) hose
  10. Exhaust Gas Recirculation (EGR) temperature sensor connector
  11. EGR tube from the air intake plenum
  12. Intake manifold plenum cover
  13. Intake manifold plenum stay brackets
  14. Air intake plenum assembly from the intake manifold and remove. Note the position of the mounting bolts as they are removed
  15. Induction control valve assembly
  16. Fuel hose from the fuel rail
  17. Fuel return line and vacuum hose from the fuel pressure regulator
  18. Electrical connectors from the injectors
  19. Fuel rail and injectors
  20. Intake manifold
  21. Remove the gaskets and thoroughly clean and dry the mating surfaces of the manifold and heads.

    To install:

  22. Install or connect the following:
  23. Refill the radiator with coolant.
  24. Check the system for fuel leaks.
  25. Set all adjustments to specifications.

Previous Next