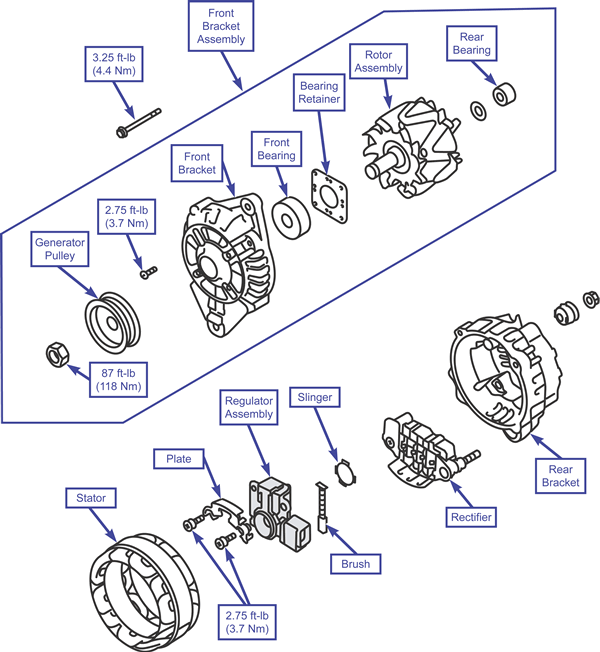
To Remove:
| Regulator assembly (2.4L)
|
CAUTION
When inserting a screwdriver into the front bracket assembly, be careful not to insert it too deeply because that will damage the stator coil.
- To remove the front bracket assembly, insert a flat-tipped screwdriver between the front bracket assembly and the stator core, and pry it down to separate the stator from the front bracket assembly.
CAUTION
When removing the generator pulley, be careful not to damage the rotor.
- When removing the generator pulley, set the pulley in an upward direction, clamp the rotor in a vise, and remove the pulley.
- Remove the rotor assembly.
- Remove the rear bearing.
- Remove the bearing retainer.
- Remove the front bearing and the front bracket.
CAUTION
Check that the heat from the soldering iron is not transmitted to the diode for a long time. Be careful that no unnecessary force is put upon the leads of diodes.
- When removing the stator, do the following:
- Step 1: Using a soldering iron (180W 250 W), unsolder the stator. This must be done in 4 seconds or less to keep heat from transferring to the diode.
- Step 2: When you remove the rectifier from the regulator assembly, unsolder the points soldered onto the rectifier.
- Remove the plate.
- Remove the regulator assembly.
- Remove the brush, the slinger, the rectifier, and the rear bracket.
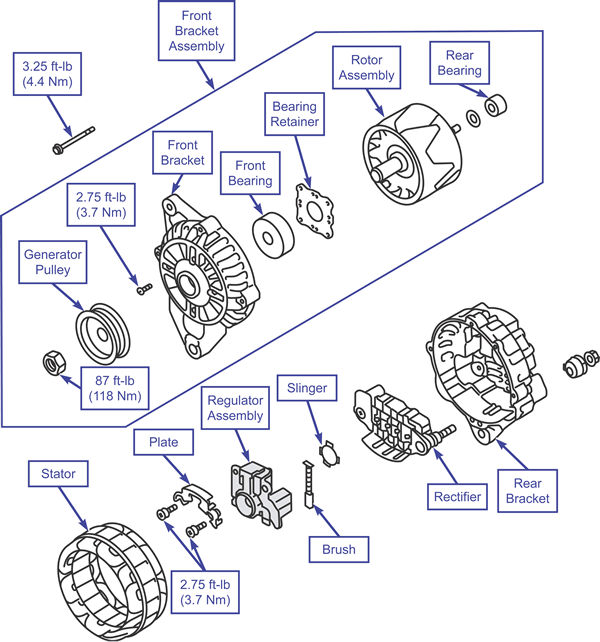
To Install:
| Regulator assembly (2.4L)
|
- Install the rear bracket, the rectifier, the slinger, and the brush.
NOTE: When you insert a wire for the regulator assembly procedure, the brush will then be secured in place making installation of the rotor easier.
- Install the regulator assembly, then insert a wire through the hole in the rear bracket while you press down on the brush, and secure the brush.
- Install the plate, the stator, the front bracket, and the front bearing.
- Install the bearing retainer and the rear bearing.
- Install the rotor assembly, then remove the wire used to secure the brush in place.
- Install the generator pulley.
- Install the front bracket assembly.
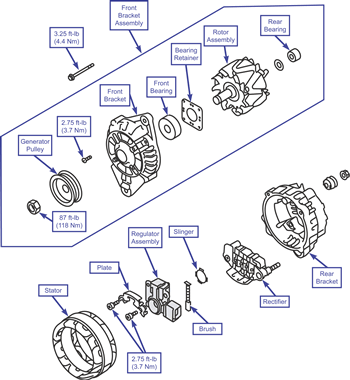
To Remove:
| Regulator assembly (3.0L)
|
CAUTION
When inserting a screwdriver into the front bracket assembly, be careful not to insert it too deeply because that will damage the stator coil.
- To remove the front bracket assembly, insert a flat-tipped screwdriver between the front bracket assembly and the stator core, and pry it down to separate the stator from the front bracket assembly.
CAUTION
When removing the generator pulley, be careful not to damage the rotor.
- When removing the generator pulley, set the pulley in an upward direction, clamp the rotor in a vise, and remove the pulley.
- Remove the rotor assembly.
- Remove the rear bearing.
- Remove the bearing retainer.
- Remove the front bearing and the front bracket.
CAUTION
Check that the heat from the soldering iron is not transmitted to the diode for a long time. Be careful that no unnecessary force is put upon the leads of diodes.
- When removing the stator, do the following:
- Step 1: Using a soldering iron (180W 250 W), unsolder the stator. This must be done in 4 seconds or less to keep heat from transferring to the diode.
- Step 2: When you remove the rectifier from the regulator assembly, unsolder the points soldered onto the rectifier.
- Remove the plate.
- Remove the regulator assembly.
- Remove the brush, the slinger, the rectifier, and the rear bracket.
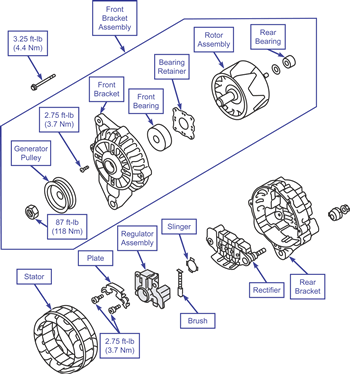
To Install:
| Regulator assembly (3.0L)
|
- Install the rear bracket, the rectifier, the slinger, and the brush.
NOTE: When you insert a wire for the regulator assembly procedure, the brush will then be secured in place making installation of the rotor easier.
- Install the regulator assembly, then insert a wire through the hole in the rear bracket while you press down on the brush, and secure the brush.
- Install the plate, the stator, the front bracket, and the front bearing.
- Install the bearing retainer and the rear bearing.
- Install the rotor assembly, then remove the wire used to secure the brush in place.
- Install the generator pulley.
- Install the front bracket assembly.